Installation and Upgrades
Installation Instructions: The Quickstart Guide
The FileCatalyst HotFolder QuickStart Guide is available on the main FileCatalyst website for download (or here if you are viewing this user guide after installing the software). The Quick Start Guide provides overview instructions on how to quickly install the HotFolder application, and runs through the First Run Wizard to set up a first task.
For command-line (headless) installs on Linux, please see the Install on Headless Linux section of this document, and the Install as a Service section.
Backup Procedure
Backup configuration files.The files to be backed-up will be found in the installation directory of the HotFolder. The default install folders are:
- Windows: "C:\Program Files\FileCatalyst HotFolder"
- Linux / AIX / Solaris: "/opt/utechsoft/hotfolder"
- Mac OSX:
- Upgrade from v3.2 or older: Backups of the configuration files are kept in your user home. During an upgrade of the server, we recommend a simple rename of the application folder to "FileCatalystHotFolderOld". This will keep all configuration files intact until we know the upgrade has been successfully installed.
- Upgrade from v3.3 onwards: Configuration files are stored in different places if you are running
the HotFolder as a service or if you are running it standalone.
- Standalone:
"/Users/<username>/Library/Application Support/FileCatalyst/HotFolder/"
- Service:
"/Library/Application Support/FileCatalyst/HotFolder/"
- Standalone:
Before upgrade, make a copy of the following files into a "backup" folder.
- fchf.conf
- bandwidth.xml
- hotfolders.xml
- sites.xml
- schedule.xml
On linux, you will also need to back up the following file if you are running the HotFolder as a service.
- service_wrapper/fc_env
Software upgrades
Upgrading FileCatalyst HotFolder requires a sequence of steps be taken based on the installation platform. Some steps are optional (to safeguard configuration data in case of a rollback), but should be followed to ensure the smoothest upgrade experience.
Windows
- Stop FileCatalyst HotFolder.
If you are running FileCatalyst HotFolder stand-alone (from "Start" menu), please select the "Exit FileCatalyst HotFolder" option in the file menu.
If you are running the HotFolder as a service, please open up the Windows Services and stop the process from running (default service name is "FileCatalyst HotFolder"). - Backup the configuration files, see the Backup Section
- Run the installer (install_fc_hotfolder.exe).
- Restart the FileCatalyst HotFolder application or service.
Linux/Unix
- Stop the FileCatalyst HotFolder.
If you are running the FileCatalyst HotFolder stand-alone (ie: running fc_hotfolder.sh or fc_hotfolder_console.sh script), you need to shut FileCatalyst HotFolder down before executing an upgrade. The following commands can be done to shut the service down and verify that processes are not running.- Execute the command "fc_hotfolder_shutdown.sh".
- Verify the service is down by running the command:
ps -ef | egrep -i "filecatalyst"
- Linux:
service fchotfolder stop - Solaris:
svcadm -v disable fchotfolder
- If you have installed the service you must run the service_wrapper/uninstall.sh script to ensure that the application is completely uninstalled.
- Backup the configuration files, see the Backup Section
- Unpack the software.
gunzip ./fc_hotfolder.tar.gz

tar -xvf ./fc_hotfolder.tar - Copy back fchf.conf settings overwritten by tar bundle
cp <BACKUP_FOLDER>/fchf.conf /opt/utechsoft/hotfolder/fchf.conf .Other files ("bandwidth.xml" and "sites.xml etc...") should not be overwritten by tar bundle.
- If you are running as a service you must rerun the service_wrapper/install.sh script to reinstall the service.
- Restart the FileCatalyst HotFolder application (either as a service or standalone).
MacOSX
- Stop the FileCatalyst HotFolder. If you are running FileCatalyst HotFolder stand-alone (on launch panel), please select the "Exit FileCatalyst HotFolder" option in the file menu.
- Backup the configuration files, see the Backup Section
- Run the installation Run the installer package file. The software should locate old configuration files and place them where needed.
- Restart the FileCatalyst HotFolder application either as a service or standalone. For information to how to install as a service, see the Mac service section.
Install FileCatalyst HotFolder on Headless Linux (command line only, no GUI)
- You must download FileCatalyst HotFolder v2.8.0 or higher version installed. v2.7.7 and less does not
support HotFolder remote administration
- Ungzip/untar the bundle into /opt/utechsoft/hotfolder
- Run the following command at the command prompt:
./jre/bin/java -jar FileCatalystHotFolder.jar -setadmin
- That will enable remote administration, set username/password for the remote admin.
- Edit fchf.conf file and enter in your HotFolder license key:
FC.hotfolder.config.client.connect.key=clientname12345abcdefg12345
- Install the HotFolder as a service onto the system
see SERVICE_WRAPPER_README for details included in the download tar bundle. When performing these steps be sure to read all the way to the bottom of the Wrapper Readme. There are added steps for certain OS's.
- Start HotFolder as a service (see the Wrapper Readme for instructions)
- Ensure that port 12505 is enabled in the firewall (used to communicate to the HF service)
- On a different system, where XWindows or Graphics are available download and install FileCatlayst
HotFolder Remote Administration, connect to the IP address of the headless system running the HotFolder
service.
Silent install on Windows
- To generate the settings file,run the installer from the command with the SAVEINF flag and the
destination file for the settings.
install_fc_hotfolder.exe /SAVEINF="C:\path\to\settings\settings.inf"
- Copy the installer and the generated file to the machine where you would like to perform the silent install.
- Run the installer from the command line with LOADIINF flag and the full path of the settings file.
install_fc_hotfolder.exe /VERYSILENT /LOADINF="C:\path\to\settings\settings.inf"
This feature is described in more detail here: FileCatalyst HotFolder: Silent Install Quickstart Guide.
Uninstalling FileCatalyst HotFolder
Windows
- If you are running FileCatalyst HotFolder stand-alone, from 'Start' menu select the 'Exit FileCatalyst HotFolder' option in the file menu
- If you are running HotFolder as a service, click on 'Start', search for services.msc, and then run that application
- Find the HotFolder service and stop it
- Open ‘Control Panel’, navigate to ‘Programs and Features’ and locate FileCatalyst HotFolder.
- Click ‘uninstall’ and click the 'yes' option when prompted
Silent uninstall on Windows
- Open a command prompt and navigate to the install directory of the product you wish to uninstall.
- Run the uninstaller from the command line with the VERYSILENT flag.
unins000.exe /VERYSILENT
- Note that if you have installed multiple versions in this directory, the number at the end of the exe may have been incremented
MacOSX
- Quit the application and stop the FileCatalyst service by using 'System Preferences' located under the Apple menu. Locate FileCatalyst HotFolder and stop the service.
- To uninstall the service, open ‘System Preferences’, find the FileCatalyst HotFolder service module, right-click on it and click 'remove from pane'
- From the ‘Finder’ window, click on ‘Applications’, find FileCatalystHotfolder.app, right-click on it and delete it
- From the ‘Finder’ window, click on ‘Applications’, find FileCatalystHotfolderAdmin.app, right-click on it and delete it
- Use ‘Finder’ to access the Library folder, open ‘Application Support’ and delete the FileCatalyst folder (path e.g. '/Library/Application Support/FileCatalyst' or '/Users/<username>/Library/Application Support/FileCatalyst')
Linux
Note: You may need admin access to perform some of these commands
- If you are running the FileCatalyst HotFolder stand-alone, you need to shut FileCatalyst HotFolder
down
- Open a new Terminal window
- Navigate to the folder where your HotFolder is installed (e.g. /opt/utechsoft/hotfolder/)
- Execute the command './fc_hotfolder_shutdown.sh'
- Verify the service is down by running the command ps -ef | egrep -i "filecatalyst"
- If you are running the FileCatalyst HotFolder as a service stop the service by using the appropriate
command for your version of linux in the terminal window (Ubuntu e.g. "service fchotfolder stop)
- Remove the service by navigating to service_wrapper folder located within the server folder (e.g. /opt/utechsoft/hotfolder/service_wrapper)
- Run ./uninstall.sh
- You can now remove the folder structure by using rm -rf <path to the server directory> (e.g. rm -rf /opt/utechsoft/hotfolder)
Changing the Configuration Directory
On Windows and Linux, the default directory for storing configuration is the install directory itself. However, the configuration directory can be changed, with all current configurations migrated to this new location.
Changing the Directory
- Create a file called "configLocation.properties" in the install directory.
- Define a new configuration root inside the "configLocation.properties"
as a key=value pair,
where the key is "config.location" and the value should be the new
desired config location.
Examples:-
config.location=C:/foo/bar/
-
config.location=${USERHOME}/AppData/Local/FileCatalyst/HotFolder/ -
config.location=${DESKTOP}/HotFolderConfigs/
-
- Start or restart the HotFolder
- Upon start or restart the HotFolder, your configurations will be copied over to the location defined in the configLocation.properties
Considerations
- User defined locations outside of the install directory take precedence over this feature. For example, if the logs location is defined as "E:/HotFolderLogs/" and "config.location=C:/foo/bar/", the log location will continue to be "E:/HotFolderLogs/"
- User defined locations inside of the install directory will still be respected relative to the newly defined config location. Ie. if the logs location is defined as "C:\Program Files\FileCatalyst HotFolder\newLogsFolder" and "config.location=C:/foo/bar/", the new logs location will be "C:/foo/bar/newLogsFolder"
- The shortcuts ${USERHOME} and ${DESKTOP} will be rejected if you are running as administrator or root or if running as a service. This will terminate the application.
- Defining a config location that is write-protected will be rejected. This will terminate the application
- Adding the "configLocation.properties" file to the install directory without a valid config location defined within will be rejected. This will terminate the application.
- If the application is terminated due to this feature, a file called "migrationError.log" will created in the location defined in the "configLocation.properties", or to the install directory should that fail.
- This feature currently does not support UNC paths.
Creating and Managing Sites
Overview
The HotFolder application can be configured to connect to any number of user accounts on any number of FileCatalyst Servers. Each such connection—even if only one FileCatalyst Server location is used—is considered a site. In other words, a “site” is defined by both its location (IP or domain) and the user account. Each server also provides a Connect link which provides access to the Quick Connect functionality.
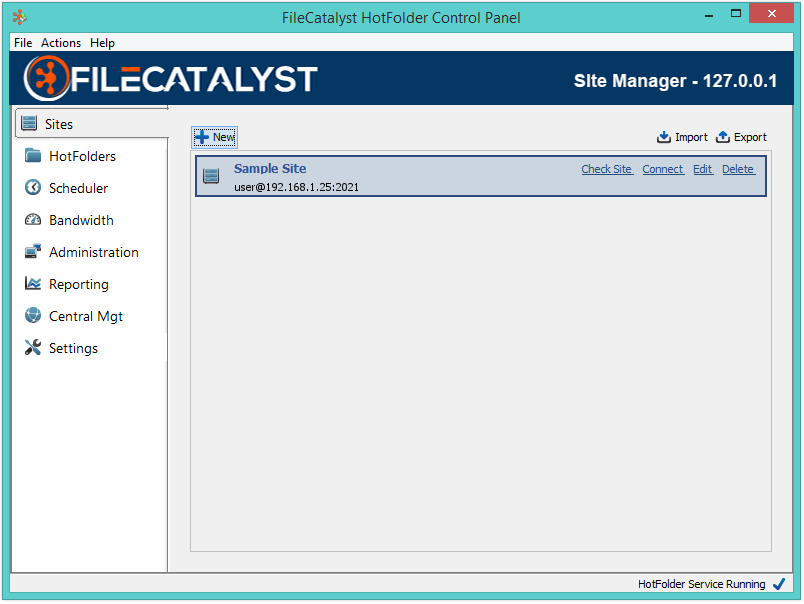
Creating a New Site
Select “Sites” from the left menu, then click “New”. This launches a wizard that takes you through the steps to create a new Site.
Managing Existing Sites
To change, update, or delete existing sites, browse to the Sites menu and click on a site to select it. Then right click and select an option, or click the “Delete” or “Edit” text inside the panel. “Edit” will open up the Site configuration where you can change location and other advanced settings.
Import/Export Sites
To import or export your Sites to an XML file, navigate to the Sites panel and click the “Import” or “Export” button as appropriate. Then select or enter a valid filename.
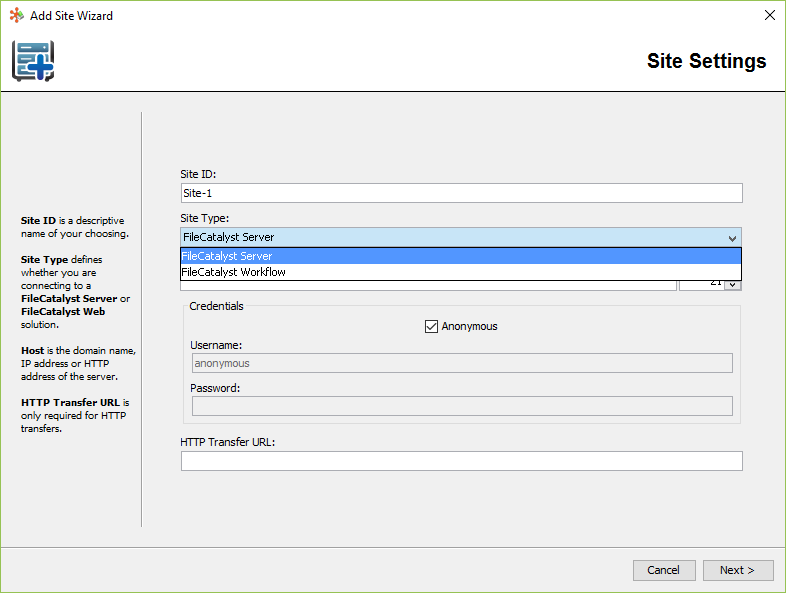
Site Settings
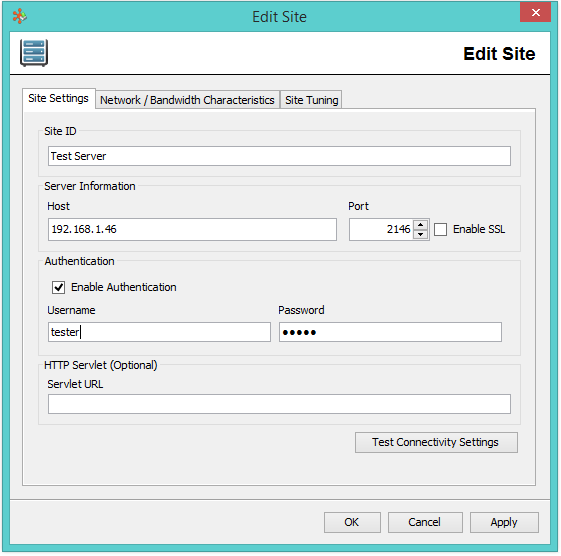
Site ID
Enter text to create a unique identifier. Choose something recognizable such as “New York Post-Processing”
Host
The location of the FileCatalyst Server (or FTP server) which HotFolder will connect to. Specify the the hostname or IP address (IPv4) of the server.
Port
The listener port of the remote FileCatalyst Server.
Enable SSL
Enable this option to allow HotFolder to establish an SSL-secured command channel (note: SSL must also be enabled on the server side). This overrides the default setting of using a cleartext channel for commands.
Enable Authentication
By default, HotFolder will use the “anonymous” account. To use an account provided by the administrator, you must select the Enable Authentication checkbox and fill out the username and password fields.
Servlet URL
An HTTP Servlet allows the FileCatalyst HotFolder to connect using an HTTP-based connection when UDP or FTP are not available. This functionality is an add-on feature licensed on the FileCatalyst Server. HTTP-based transfers cannot be accelerated with the FileCatalyst protocol, but two key benefits remain:
- Virtually guaranteed connectivity between endpoints: users do not need to configure their environment in order to transfer files.
- The reliability, security, and file transfer management capabilities of FileCatalyst technology are intact.
The value placed here should take the following format:
http://serverIPorHostname:12480/servlet/ftpservlet
NOTE: The HotFolder will be making a connection to an FTP Servlet and the FTP Servlet will make a standard FTP connection to the server. As a result you will have differences in reported bandwidth between the HotFolder and the Server as there is a degree of separation between the two and they are indeed transferring at different rates. This also means that while data flowing to the FTP Servlet may indeed respect bandwidth restrictions, the FTP Servlet has no such built in throttling.
Network/Bandwidth Characteristics

Note: Tab "Network / Bandwidth Characteristics" is available by enabling "Advanced View" on the HotFolder.
Bandwidth Characteristics
Upstream
The maximum possible upload speed between client and server. You may also change your maximum speed in the Bandwidth Scheduler; HotFolder will use the lesser of the two values.
Downstream
The maximum possible download speed between client and server. As with Upstream, Bandwidth Scheduler may also be used to set speeds; HotFolder will use the lesser of the two values.
Detect Bandwidth Characteristics
This utility attempts to measure the maximum possible upstream and downstream between client and server. The test may take several minutes and should be performed on a clean network to ensure accuracy.
Network Characteristics
Path MTU
The largest packet that may be transmitted without being fragmented into smaller packets. For example, if a network has an MTU of 1500 (typical for most networks) and the application transmits a packet of 3000 bytes, the packet would be broken into two smaller packets of 1500 bytes, transmitted, and recombined at the destination.
During an internet transmission, a packet may traverse several individual computer networks, all of which may have different MTU values. The Path MTU is the lowest MTU value on all networks between source and destination.
Average RTT
The average round trip time of a packet. RTT indicates the time required for a packet to be sent and acknowledgement to be received. In environments with high RTT, FileCatalyst will greatly outperform FTP.
Average Packet Loss
The number of packets that are lost in the network due to hardware/routing issues, oversized packets, or network congestion. Packet loss affects transfer speed; it is recommended that with higher packet loss, you set a lower packet size in the “Site Tuning” tab.
Detect Network Characteristics
This auto-detection utility will automatically determine the Path MTU, and run a test to obtain values for Average RTT and Packet Loss optimal for your connection. These values can then be used to optimize your unit and block size, as well as number of transmit threads being opened at any one time.
Site Tuning
Note: Tab "Site Tuning" is available by enabling "Advanced View" on the HotFolder.
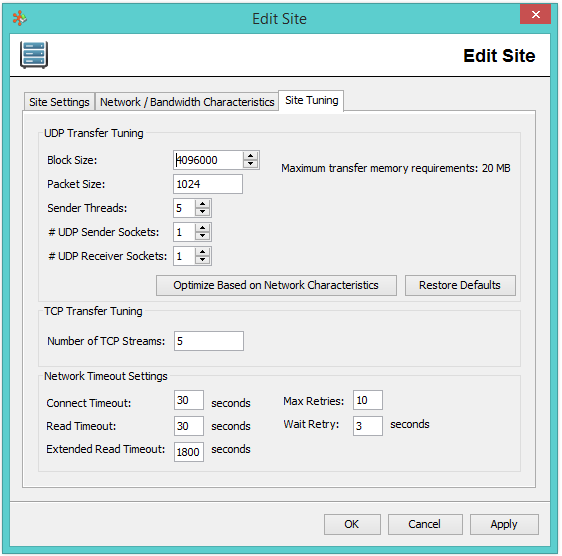
UDP Transfer Tuning
Block Size
Determines how much data will be sent by each individual transmitter thread to the receiver before waiting for acknowledgment. For example, if the block size is 10MB (10240000 bytes), then 10MB of data will be sent before proceeding to the next 10MB of data. The transmitter thread must receive an acknowledgment that a block is received before proceeding to the next block. The larger the block size, the better the throughput (due to fewer acknowledgments). Since block size works best when it is divisible by unit size, we will adjust this value to a value divisible by unit size, close the user defined value
Packet Size
The maximum UDP packet size which client applications will send to the server. This should be less than the MTU of your network (usually 1500).
Number of Sender Threads
To improve performance, FileCatalyst clients can begin sending new blocks of data before the previous block has been acknowledged. Sender Threads defines how many blocks can be started before waiting for all previous blocks to be acknowledged. This improves performance as it removes downtime during the acknowledgment phase. Memory consumption on the server and the client increases as this value is set higher. The exact amount of memory used is the product of the number of threads and the block size. Since overlap can be quite small (sometimes less than 500ms) the memory usage may appear to spike and drop immediately following acknowledgment.
Number of UDP Sender Sockets
If the bandwidth is above 500 Mbps and the supporting disk IO can support these speeds, it is recommended that client application specify UDP sender streams to be 2 or greater. This allows more data to be pushed out of the system, and provides higher maximum speeds.
Number of UDP Receiver Sockets
If the bandwidth is above 4 Gbps and the supporting disk IO can support these speeds, it is recommended that client application specify UDP receiver streams to be 2 or greater. This allows more data to be pulled from the system, and provides higher maximum speeds.
Optimize Based on Network Characteristics
This optimization tool takes the values entered or auto detected and calculates the optimal settings for your connection.
Note: Optimization is based on definitions in both the "Network / Bandwidth Characteristics" tab and the bandwidth scheduler. Before automatically optimizing, your connection speed should be properly configured in both.
TCP Transfer Tuning
Number of TCP Streams
In TCP mode, FileCatalyst can open one or more concurrent connections. This can resolve issues where TCP is hindered by high RTT. If the actual throughput of standard FTP is about 1/2 of available bandwidth, setting this value to 2 could optimize the connection. If standard FTP is only achieving 1/10th of actual available bandwidth, then setting this value to 10 could optimize the connection. Adding concurrent streams increases CPU consumption.
Network Timeout Settings
Connect Timeout
The length of time that HotFolder will persist in connecting to a Site. The default is 30 seconds; however, with extremely high RTT or packet loss this may need to be increased.
Read Timeout
The length of time that HotFolder will persist in reading a response from a Site after a command has been executed. The default is 30 seconds; however, with extremely high RTT or packet loss this may need to be increased. The timeout value applies only to commands that are expected to reply quickly.
Extended Read Timeout
The length of time HotFolder will persist in reading a response from a FileCatalyst Server after a command that is expected to reply more slowly. Examples of such commands would be MD5 on a very large file, or generating the deltas for a very large file. In cases where these commands take longer than the default 30 minutes, this value should be increased. The default is 1200 seconds or 30 minutes. The minimum value that may be applied for the Extended Read Timeout is 600 seconds, or 10 minutes.
Max Retries
The number of times HotFolder will attempt to reconnect to the server if the network connection fails.
Wait Retry
The length of time HotFolder will wait between retries if the network connection fails.
Adding A FileCatalyst Workflow Site
Any transfer task using a FileCatalyst Workflow site will not only transfer files to the server, but also send out an email notification with a download link. The recipient may then download the files by following this link. The FileCatalyst Workflow application needs to be licensed before HotFolder can connect to it this way. Contact FileCatalyst support or sales for further information. Configuration of FileCatalyst Workflow is beyond the scope of this document.
Setting up the HotFolder follows the same principle as setting up any other site except you choose the FileCatalyst Web option under the Site Type. The user name and password should match the username and password that has been configured in FileCatalyst Workflow.
The Site will verify itself during the creation process and provide you with errors if there are any issues. Once created you will be able to send files using the HotFolder Task FC Web tab (shown below).
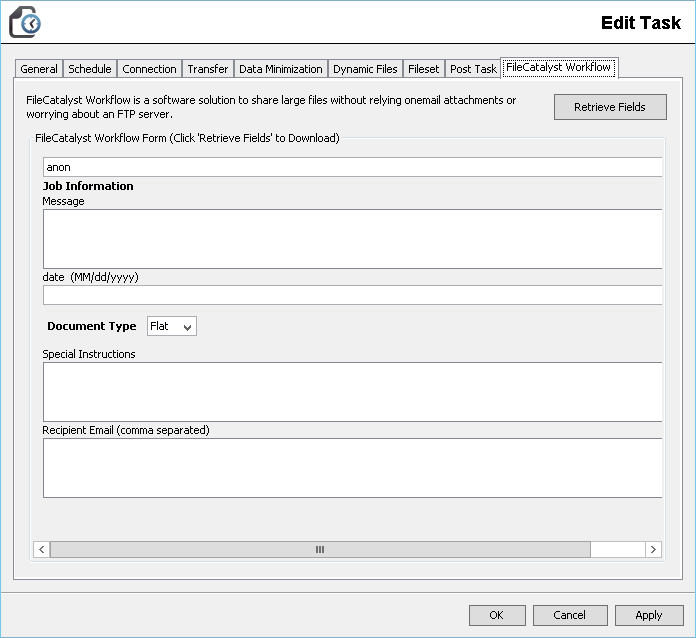
In the above example, you will be able to specify a recipient email address and short note, in addition to being able to configure the rest of the task.
Using Quick Connect
Once a site has been added to the File Catalyst Server, it is possible to use the connect option to transfer data between the file system and the user's directory on the site.
Note: Quick connect from the HotFolder uses between 2-6 connections. One is for browsing and directory listings, and up to 5 connections may be used to transfer files, depending on licensing.
To open the quick connect, click on the connect text inside the panel.
After connecting, you may navigate to the files you wish to move and the location you wish to move them using the directory trees, listings and path text fields. In order to transfer files, select the files or folders you wish to move and drag them across to the other side.
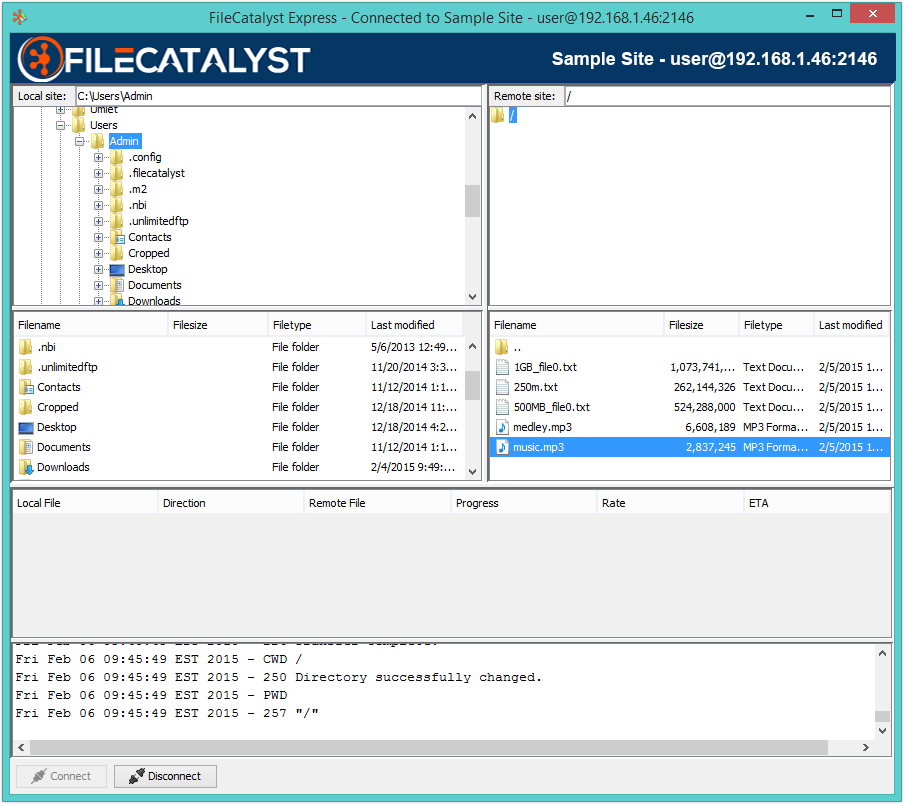
Once the transfer has begun, the progress and status of each file transfer is visible in the panel below the file listings.

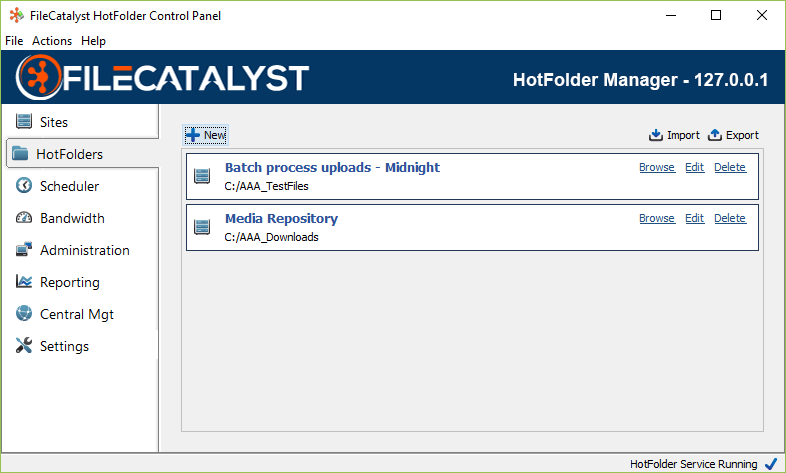
Creating and Managing HotFolders
Overview
*Note* The browse functionality is unsupported in Linux.
Creating a New HotFolder
To create a new HotFolder location, browse to the HotFolders menu and click “New”. This will initialize the HotFolder wizard, and take you through the steps to create a new HotFolder on your system.
Managing Existing HotFolders
To change, update, or delete existing HotFolders, browse to the HotFolders menu and click on the HotFolder to select it. Then right click and select an option, or click the “Delete” or “Edit” text inside the panel. “Edit” button will open HotFolder configuration where you can change paths and names.
Import/Export HotFolders
To import or export your HotFolders to an XML file, browse to the HotFolder panel and click the “Import” or “Export” button as appropriate. Then select or enter a valid filename.
HotFolder Settings
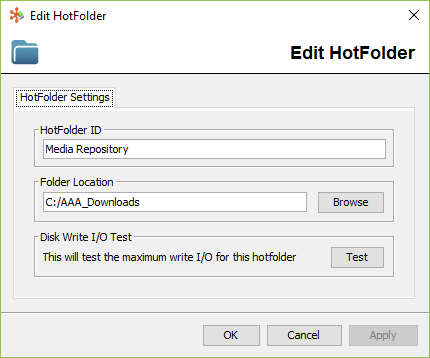
HotFolder ID
A unique ID used to define and identify this HotFolder.
HotFolder Location
The full directory path for the HotFolder. Edit the field or use the “Browse” button to select a valid path.
Disk Write IO Test
Performs a sequential write operation to the HotFolder directory. Specifying a small file size will likely demonstrate only system/hardware cache availability. Enter a larger file size to test and show true disk write speeds.
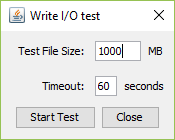
You may set a maximum timeout value (in seconds) to ensure that the IO test stops after a specified time. If the test is not completed, the last speed before stopping will be used and all IO resources will be released.
Note: The test will create a temporary file on the disk. Ensure enough space is available.
Creating and Managing Transfers
Task Overview
Task Schedule
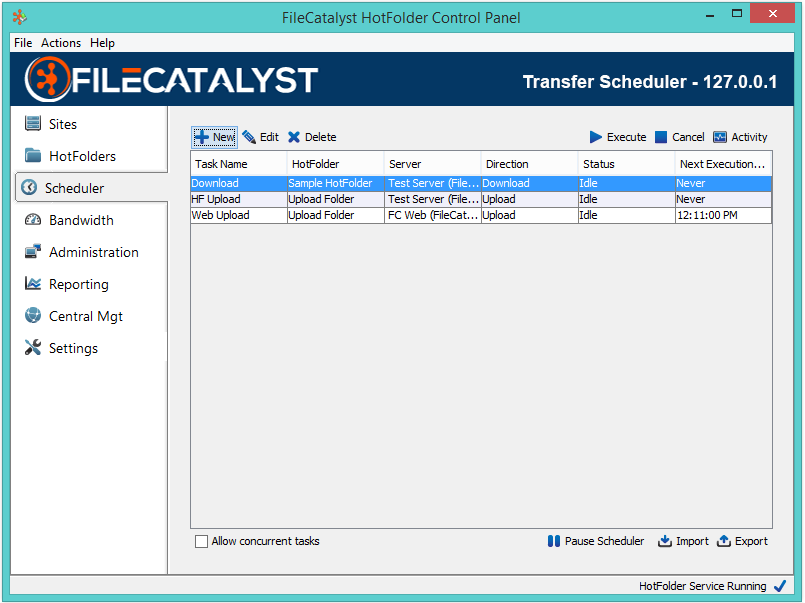
The task schedule displays all of the current tasks in FileCatalyst HotFolder. It shows the HotFolder, Server, and direction (upload or download), as well as the Status (Idle, Transferring, Queued), and the date and time of the next execution.
Creating a New Task
You must have defined at least one Site and one HotFolder prior to adding a task. To create a new task from the scheduler menu, click the “Add New Task” button. You may follow the task wizard until completion, or click “Finish” partway through and continue creating the task manually. Once a task is configured, perform a test by right clicking on the task and selecting “Test Task Settings”.
Managing Existing Tasks
To edit, delete, or modify an existing task (including advanced settings not found in the initial creation wizard), browse to the scheduler menu and select the task you wish to work with. From there, either click the “edit” or “delete” buttons, or right click and select from the options on the sub-menu that appears. If a single task is selected, you may use this menu to edit, duplicate, delete, test, execute, cancel, disable, enable or view the activity of the selected task. If multiple tasks are selected, you may use the menu to duplicate, delete, execute, cancel, enable, or disable all of the tasks that are currently selected.
Note: Duplicated tasks are created disabled by default.
Execute a Task
To execute a task, either highlight a task and click the “Execute” button or right click the task and select “Execute”.
Cancel a Task
To cancel a task, either highlight a task and click the “Cancel” button or right click the task and select “Cancel”.
View Task Activity
To view a tasks activity, either highlight a task and click the “Activity” button or right click a task and select “View Activity”. A window will open displaying the current file being transferred, activity graph and logs for that specific transfer.
Pause/Resume Scheduler
Clicking “Pause Scheduler” will prevent any further scheduled task execution. However, any tasks in progress will complete their execution. You may resume the scheduler by clicking on the “Resume Scheduler” button.
Concurrent Tasks
The HotFolder can be configured to support execution of multiple tasks at a time. To do this, check the “Allow Concurrent Tasks” checkbox. To disable execution of concurrent tasks, uncheck the checkbox.
Import/Export Tasks
To import or export your Tasks to an XML file, browse to the Scheduler panel and click the appropriate import or export button. You will have to select or enter a file in which to load from or save the Tasks to.
Task Settings
Press the “Edit Task” button to reach these settings (The “General” tab will be visible by default).
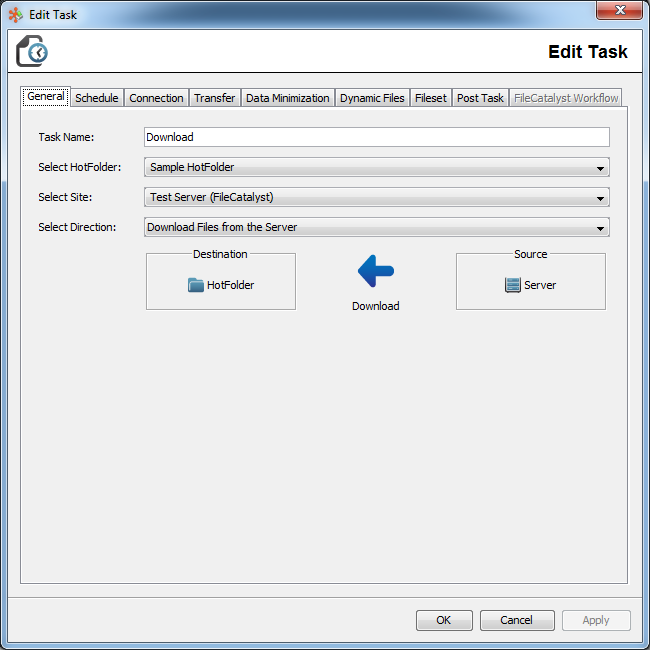
Task Name
The name of the task.
HotFolder
The HotFolder used by this task.
Site
The Site used by this task
Transfer Direction
Specifies whether to upload from this HotFolder to the server, or download files from the server into this HotFolder.
Schedule
After selecting “Edit Task”, select the “Schedule” tab.
Frequency Options
A set of five radio buttons allows you to select the frequency of this task:
User Triggered
The default "user triggered" option requires the user to open the HotFolder interface, select a task, and click "execute". This default prevents accidental execution of tasks while the user is still configuring their HotFolder, but is typically changed to one of the scheduling options below.
Once
Selecting this option will enable corresponding fields allowing you to specify a date and time for a single execution. The task remains in the scheduler, allowing you to specify a new date or to manually execute.
Every minute
This is the most common choice. The scheduled task will check every minute to see if a new file transfer is required.
Always On + File System Events
As soon as the task completes, it will repeat. Selecting this option will automatically check the “Monitor File System Events” box at the bottom of the page.
Note 1: The "Always On + File System Events" option is made available by enabling "Advanced View" on the HotFolder
NOTE 2: Using "File System Events" on network drives (Samba, CIFS, NFS, ATP) is not recommended. Any task transferring to or from mounted network drives should instead use a normal transfer schedule (ie: once a minute).
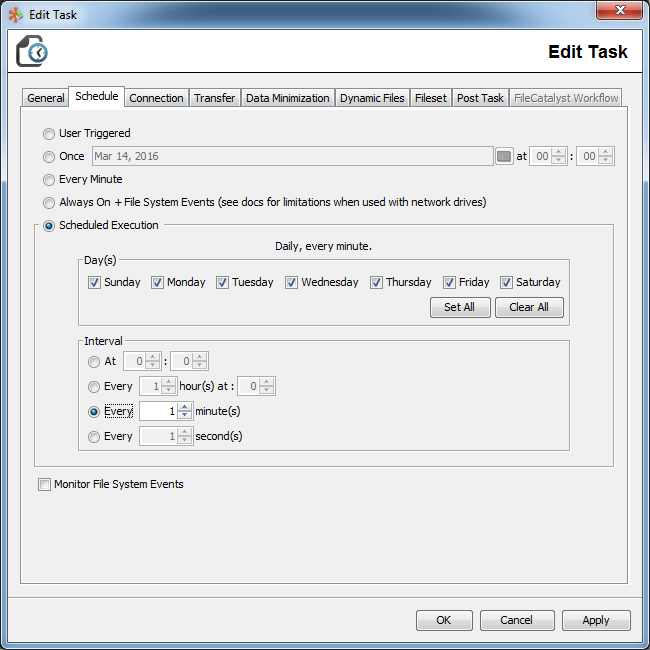
Scheduled Execution
Selecting this option enables a range of fields to create a repeated task. As the scheduled task is created, a plain-language representation of the task is updated at the top of the section.
After selecting the “Day(s)” for execution, you must select an interval. This may be:
- Once, at a particular time of day.
- Every X number of hours, at the specified minute past the hour.
- Every X number of minutes.
- Every X number of seconds.
Monitor File System Events
When this option is enabled, the task will first complete transfer of all files, and will then enter a “monitoring” state. When in the monitoring state, HotFolder will watch the file system at the source (local folder on uploads, and server folder on downloads) for events such as file creation, modification, deletion, and rename. When these events occur, the task will immediately transfer, delete, or rename the affected file(s).
Once the task enters monitoring mode, it will stay in this mode indefinitely or until it is canceled or an error occurs. The task is still considered to be running while in this state.
This option is useful when dealing with very large file sets that must be kept in sync. For a scheduled task, recursive listings, comparisons, and filtering determine which files have changed. On large file sets this process may takes several minutes and consume resources. However, with file system event monitoring enabled, recursive listings are not needed and resources will only be used when a file is changed.
Note on Monitoring Network storage: In many cases FileCatalyst is used to monitor directories that do not reside on the same physical machine but rather on a network attached storage. Depending on the OS and protocols used, the FileCatalyst software may not be notified of events that are triggered at a network location. For example, if a Linux machine is running FileCatalyst Server and has a user home directory pointing at a mounted directory (i.e. /mnt/network_dir), and changes are made to that directory from yet another machine pointing at that same directory, the events may not be registered.
Note: The "Monitor File System Events" checkbox is made available by enabling "Advanced View" on the HotFolder
Note: Because of how the multi-client manages itself, a multi-client transfer will identify as idle when Monitoring.
Connection
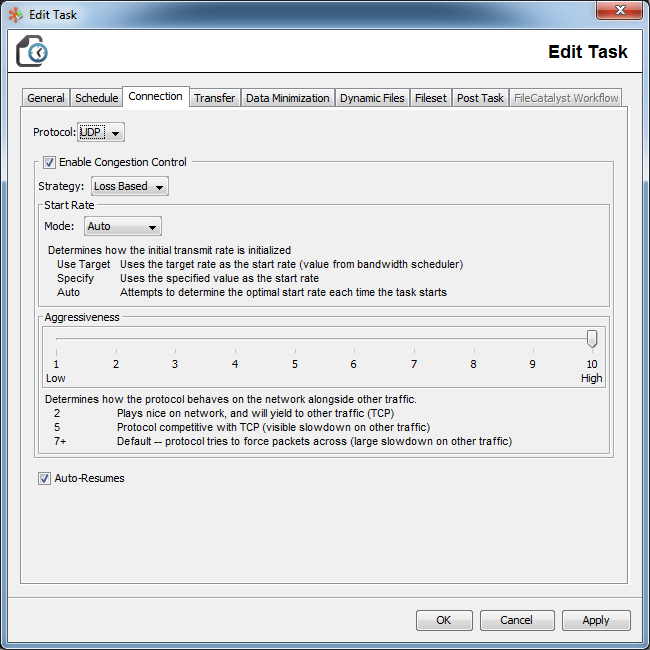
Protocol
This option allows you to specify the transfer mode you wish to use to connect and transfer files to/from the server. Options are UDP, TCP, HTTP (when Tunneling Servlet is enabled), and Auto Detect. By selecting Auto Detect, the HotFolder will cascade from UDP to multi-stream TCP to single-stream TCP and finally to HTTP in order to find the optimal mode.
Congestion Control
When Congestion Control is enabled, FileCatalyst will attempt to dynamically modify its transmission rate in accordance with changing network conditions. This is useful if the end to end link speed is not known, or if the network is also being used by other applications with which FileCatalyst would otherwise interfere. The congestion control mechanism is based on the RTT between the FileCatalyst Client and FileCatalyst Server machines. FileCatalyst will measure and average RTT value when no transfers are taking place, and use this as a benchmark to compare RTT values when the transfer starts and for the entire duration of the transfer. FileCatalyst will then increase/decrease speed depending on whether the current RTT is within a certain range above or below the initial RTT.
Start Rate
The rate at which FileCatalyst will begin transmitting data. It will then attempt to speed up the transmission rate until it either hits congestion (the RTT becomes too high compared to the initial RTT), or it reaches the target rate specified in the bandwidth scheduler.
Three options are available:
- Use Target: Attempt to transfer at maximum speed allocated by the task. Will slow down if congestion is detected, but initial rate may adversely effect network link if it cannot sustain the transfer speed.
- Specify: Manually specify a start rate for transfer speed. Recommend a maximum of 1/10th of the known line speed if this is not a dedicated line. You may also run a quick auto-detection test to determine line speed. Rates higher than the value of the bandwidth scheduler are ignored.
- Auto: Have the transfer automatically launch an auto-detect when the task starts. Best solution for single file transfers. Not recommended for multi-file session transfers, as each client will attempt to auto-detect transfer speed.
Congestion Control Strategy
RTT-based Strategy
RTT-based strategy works by establishing a baseline average RTT before the data starts to flow. Once the transmission begins, RTT is monitored continuously. While the RTT stays within a certain range of the baseline RTT, the speed of the transfer will be increased. Once the RTT begins to go above a certain range, the speed is decreased. How much the RTT is allowed to spike above the baseline average is controlled by the Congestion Control aggression setting FileCatalyst provides.
This type of congestion control works well on wireless or satellite links where there is packet loss from other sources besides congestion. TCP will slow down, for example, when a packet is lost due to interference or being too far from a cellular tower. When FileCatalyst is using the RTT based congestion control it ignores individual packet losses and focuses only on RTT. For these scenarios, FileCatalyst continues to maintain high speeds through the kinds of packet loss “hiccups” that would trigger decreases speeds under TCP.
Loss-based Strategy
There are circumstances in which this RTT based may not work properly. For example, when a router's queue is very small, the RTT may never spike when there is congestion. The RTT will remain low, and therefore FileCatalyst would continue to increase its transmission rate even when there is congestion present. For these scenarios, the only way to detect the congestion is using a packet loss approach. As outlined previously, packet loss may come from other sources besides congestion, so this mode is best used on terrestrial or land based networks where all packet loss is due to real congestion.
Loss-based congestion control mode reacts to packet loss by slowing down (just like TCP); however, FileCatalyst is not nearly as aggressive as TCP. The primary reason for using a UDP-based file transfer solution like FileCatalyst is because TCP is so aggressive in its congestion avoidance that it often ends up under-utilizing your link. The FileCatalyst loss-based congestion control algorithm was designed such that it is able to maximize link utilization while still avoiding congestion. Like the RTT-based congestion control, the loss-based mode can be tuned to be more or less aggressive. More aggressive settings allow for a higher percentage of packet loss before slowing down, while for more passive settings the opposite is true.
Rate-based Strategy (Labs)
There are circumstances in which both Loss and RTT will not work properly. If UDP packets are buffered in stacks instead of queues (last in first out vs. first in first out), this interferes with the RTT strategy as the RTT can skip along the top of the stack buffers since it is last in first out. Stack buffering interferes with the Loss-based strategy as loss detection is based on packet ordering and stacks reverse packet order.
Rate-based congestion control mode compares the rate we are sending packets to the rate we are receiving them. If we are receiving slower than we are sending, then we know that the network, at that time, cannot handle the current send rate, and we slow down.
Aggressiveness
This setting allows the threshold (or range) that is used when comparing the current RTT to the initial RTT to be increased or decreased. If aggression is increased, the current RTT will be allowed to increase to a higher level before it is considered to be congestion. Conversely, if the aggression is lowered, smaller increases in RTT will be considered as congestion and transmission rates will slow down. In this way, the congestion control may be tuned to the sensitivity of the network on which the transfers are being performed.
Auto-Resumes
With this option enabled, FileCatalyst HotFolder will automatically recover from failed network connections. This setting takes precedence over the transfer files with unique name option found within the incremental setting. If a file can be resumed and auto-resumes are enabled, the destination file will be resumed and a unique file will not be created at the destination location.
Transfer
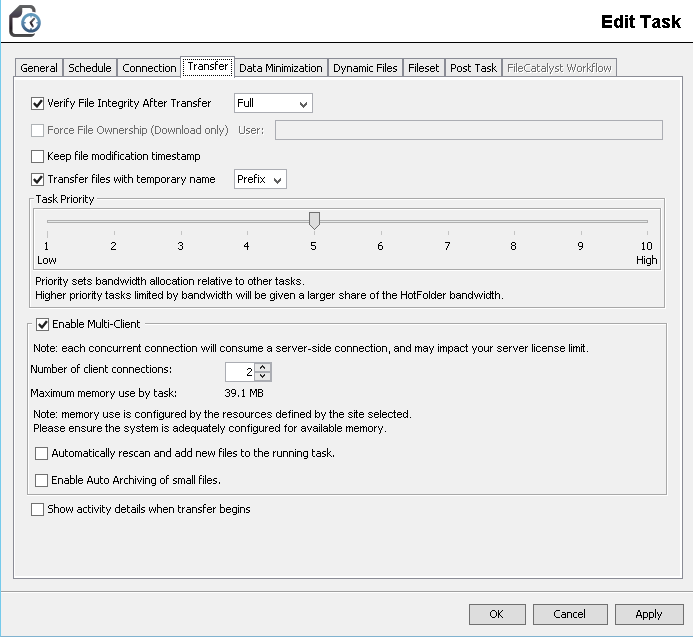
Verify File Integrity After Transfer
During all UDP transfers, as blocks of data are transferred, they are verified using MD5 against the same block in the source file. This is done on-the-fly, and incurs no delay after a transfer completes. This provides a very high level of protection against corruption. Note that FTP/TCP mode transfers are verified on-the-fly as well, but it is built into the TCP protocol. FileCatalyst also provides additional options for further protection against corruption by performing a full MD5 checksum after each transfer.
By checking the "Verify File Integrity After Transfer" option, integrity of the transferred file will be verified byte by byte on storage using MD5 after the transfer is complete. This option can be used in one of three modes:
Full
This will perform a byte by byte comparison of the entire file when the transfer is complete. Although this consumes less CPU on an ongoing basis, there is a delay between files being transferred as the checksum is calculated. If the files are large, it may cause delays of several seconds or even minutes depending on the speed of the I/O on the sending and receiving machines.
Concurrent
This will open up a separate session to perform checksums without interrupting the file transfer. For very fast transfers, disk I/O bottlenecks (competing between ongoing transfers and MD5 checksums) may result in lowered throughput.
Partial
Partial MD5 verification occurs after the file is completed, however it only compares certain portions of the file, and only at logical intervals that coincide with the transfer characteristics. This vastly decreases the time to perform the MD5 check. Note however that this check does not 100% guarantee that file. It is a trade off between speed and a high likelihood that the file is not corrupt.
Note: Partial MD5s are not available against servers that are older than 3.7. If partial MD5s are still selected at the time of transfer, then full MD5s will be used instead.
Force File Ownership (Download Only)
By selecting this option on a download task, all files transferred will have their operating system user ownership set to the value specified.
Note 1: On Linux or Mac OSX, an additional field allows configuring group ownership.
Note 2: If the Maintain UID/GID system property is enabled, the user and group data will be updated to accept user and group identifiers. Please note that this functionality is only on Linux and Mac OSX operating systems.
Note 3: If Keep File Permissions is enabled when Force File Ownership is enabled, the "Keep File Permission" option is automatically deselected.
Keep File Modification Timestamp
If this item is selected, the modification date and time will be preserved when files are transferred to the server.
When multi-client is enabled, folders are also maintained. This behaviour is different from our legacy single client transfers. If you desire the legacy behaviour, it can be reverted via setting this system property: unlimited.fc.legacy_timestamp
Transfer with Temporary Name
If this option is enabled, FileCatalyst will always upload or download files using a temporary name, and rename it back to the original name when the transfer is complete and verified. FileCatalyst Server will not report these temporary files when other HotFolder or FTP clients request file lists. This prevents them from downloading partial files. You may choose to either prepend the ".fctmp." prefix, or append the ".tmp" suffix to the files until they are finished transferring.
Task Priority
This allows you to specify the priority of a task. By default, bandwidth is split evenly between all running tasks. Setting the priority of a task will increase/decrease the weight of a task when bandwidth allocation is performed.
Enable Multi-Client (multiple concurrent file transfers)
HotFolder allows a single transfer task to utilize more than one transfer connection in order to push files across concurrently.
Useful when transferring dynamic file sets (where data is being added in real-time to multiple files in a directory). This feature, when combined with progressive transfers, allows multiple growth files (log files, video transcoding, etc) to be sent from one directory.
Note that as you are utilizing more than one transfer connection to a server, this may potentially impact server-side license restrictions. It will also utilize more resources (memory, ports) as expected when more work is being done at a time.
Multi-Client does not currently support FCWeb. Selecting specifying an FCWeb server will automatically execute the task as a Single Client Transfer.
Automatically rescan and add new files to the running task
By default, the HotFolder scheduler will not re-execute a task if it is currently running (only one instance of the same task is allowed to run at a time).
Because multi-file sessions are ideally suited for transfers of growth files (ie: live streaming video) which may take an extended period of time to complete (2+ hour event), rescheduling allows you to rescan a directory even if the original transfer has not yet completed (live video event still on-going). New static files (or growth files) will get picked up by the task at scheduled intervals.
NOTE: Transfer cache is enabled and locked when this feature is used. Files will be sent only once when using this feature. Transfer cache can be manually cleared in the Fileset tab.
NOTE: When transferring a progressive file that grows much slower than our transfer rate, a situation occurs where we are always waiting for a file to grow before sending the next chunk. We call this chasing the tail. When this is happening a progressive file might not grow for a long enough time that we think it has finished growing and consider the transfer complete. With reschedule enabled, the next scan will pick up the file if it has indeed grown. Since we cannot know if the file has just grown, been replaced, or been edited, we need to treat it as a new transfer. This only affects our statistics displayed as we will increment the amount of data and number of files transferred. However this can be corrected increasing the time a progressive transfer will wait for the file to grow, see progressive transfers
Enable Auto Archiving of small files.
This option will group together small files (5MB or less in size) archiving them and sending them over as a single transfer. Use this feature if your transfers will contain many small files. The maximum size for an individual archive is 100MB, after which a new one will be created. Previous archives are transferred and extracted while new ones are being created.
Multi-Client changes from single client and limitations
Due to the nature of how parallel transferring works, it is highly recommended to use the AutoArchive of Small Files option in MultiManager. This will keep the overhead of HTTP POSTs to a minimum during a transfer with a larger data set.
Changes from single client
Multi-Client has an added layer of redundancy, if an individual client fails a transfer, that transfer is pushed back onto an internal transfer queue to be attempted by a different client a set number of times before actually failing. This means that in cases where Single Client failed consistently, multi-client may succeed. Multi-Client can use auto archiving, incremental and compression simultaneously. Small files will still be auto archived and use the compression settings, ignoring the incremental while the larger, non archived files, will use incremental and compression. Normally archiving and incrementals are mutually exclusive for single client transfers. Note that while multi-client is enabled, some compression options in the Data Minimization pane will be disabled as they are handled by the auto archiving algorithms.
Limitations
Multi-Client transfers are not compatible with FCWeb so multi-client settings are ignored for transfers to an FCWeb site.
Show Activity Details When Transfer Begins
When set, the Activity window will automatically be seen when the task is launched.
Keep File Permissions (OSX/Linux/Solaris Only)
When this item is checked, file permissions will be saved when files are transferred.
Data Minimization
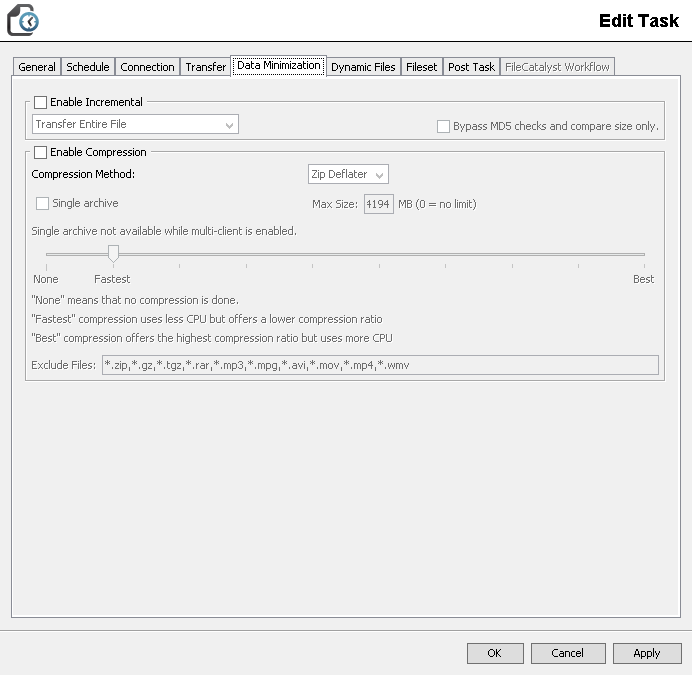
Enable Incremental
This option limits transfer to files that are new or have been modified. This works in conjunction with “Do nothing with source files” option on the Post Task tab to allow you to treat the HotFolder as a working directory with only your modified files being transferred.
Transfer Entire File
Transfer the entire file if the remote file and the source file do not match.
Transfer File Deltas
Transfer the portions of the file that have changed (the "deltas"). These changes are then merged in with the file on the target to recreate the source file.
Transfer Entire File with Unique Name
Transfer the entire file, but renamed with a unique identifier. The unique name will use the following pattern:
<filename>_X.<extension>
Where X is a unique integer value.
NOTE:: If auto-resumes are enabled within the current task, the transfer file with unique name incremental option will only occur if the destination file cannot be successfully resumed.
Transfer File Deltas with Unique Name
This option will only transfer the portions of the file that have changed. These changes are then merged in with the file on the target to recreate the source file, however it will be renamed such that is has a unique name. The unique name will use the following pattern:
<filename>_X.<extension>
Where X is a unique integer value.
NOTE: Incremental delta transfers are bypassed under circumstances where it is more beneficial to sending the file directly than through a delta process. This includes:
- If either files (source or destination) is smaller than 200KB in size.
- If the destination file is less than the square root of the source file size.
- If the minimum delta file will be larger than transferring the entire file.
When Enable Incremental is enabled, the user also has the option to remove MD5 checks and only check the size of the file.
There are possible side effects using deltas in conjunction with Progressive transfers noted in this knowledge base article here.
Enable Compression
Compressing files as they are being sent to the server may reduce transfer time. However, if all files are already in compressed formats, it will only serve to add additional overhead to the transfer. Once you understand the following options, you will know which method (if any) is right for your situation.
Two compression methods are available: Zip Deflater and LMZA.
Zip Deflator
Zip Deflator is the standard compression library utilized by FileCatalyst, and is used for on-the-fly compression and for single zip archive (bundles multiple files together before transferring).
LMZA
LMZA is an additional compression method available for on-the-fly compression (single archive is not supported), and allows a very high level of compression. The algorithm is very CPU and memory intensive for the sender. Profiling the transfer via HotFolder or Server visualization window and configuration of threads (block sender threads for transmitter, writer threads for receiver) may be required for achieving high speed transfers.
Compress files into single archive
When sending several small files, there is an overhead to initiate the transfer of each file. With a high RTT, this means that far more time is spent “setting up” the transfer compared to actual data transmission. Furthermore, due to small file sizes, the transfer task never reaches full speed.
With the “compress files into single archive” option enabled, HotFolder will put all the files into a single package, transfer to the server, then extract it. This eliminates set-up and teardown, and allows the transfer task to reach its maximum speed.
Note: Single archive transfers are not compatible with Multi-Client transfers and will be disabled if Multi-Client transfers are enabled.
Note: If progressive transfers are disabled while enabling archiving, the archive file (tar/zip) must first be created locally before being transmitted. This may cause a noticeable delay before the transfer begins, but the total time for the transfer should still be significantly less.
Note: The maximum size of an individual zip file is 4GB, as is the maximum size of any single file contained in the zip file. For file sets exceeding 4GB in total size, please use the “Archive size limit” feature (described in the next section) to limit the size of each zip file created to under 4GB. If the zip file size is over 4GB due to no limit or a single file over 4GB in size, the zip file will not be able to be unzipped and will cause an error.
Archive size limit
This feature will limit the size of the zip archives to the specified value (in MB) when possible. If a file set is too large to fit in a single zip of the specified size, multiple zip archives will be created. These zip archives are automatically extracted and cleaned up as they are transferred. At most 5 archives will be created at one time. Additional archives are generated only after the oldest file is deleted. This helps reduce disk space required. The following values may be set in fchf.conf to configure the autozip.
FC.hotfolder.config.autoarchive.filesize_threshold=5242880
This value configures the maximum file size to be zipped. It defaults to 5MB.
FC.hotfolder.config.autoarchive.zipfilesize_limit=104857600
This value configures the maximum file for a zip chunk. It defaults to 100MB.
Compression Level Settings
This slider will allow you to select the level of compression to be applied when compression is enabled. Depending on the types of files and bandwidth constraints, it may be desirable to use more or less compression. For example, on a high bandwidth connection where volume of data transfer is not measured or is otherwise not a concern, it may be faster to send the data either uncompressed or with low compression. However, on a low bandwidth satellite network it may be more optimal to use maximum compression.
Exclude Files
Any files in the HotFolder directory or server matching the given expression will be excluded from compression. You may specify multiple file filters delimited by a comma. This option also supports wildcards (*). For example, if you wish to ignore all Zip files, you would set this value to "*.zip". If you wish to ignore all Zip files, and MP3 files, you would set this field to "*.zip, *.mp3".
Note: The compression option is only available for either UDP or TCP based transfers. HTTP based transfers currently do not support this option.
Dynamic Files
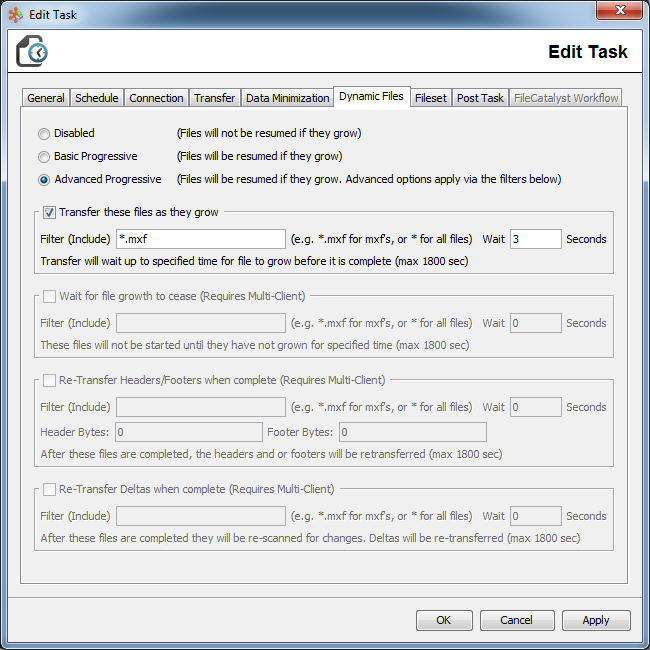
Disabled
This option turns off progressive transfers. Files will not continue to transfer as they grow.
Basic Progressive
Files will transfer as they grow. This is the most basic of progressive features. This is our former "Enable Progressives" feature.
Advanced Progressive
If Advanced Progressive is enabled, one of the four sub-options (described below) must be selected. If one of these sub-options is not selected, the transfer will default to Basic Progressive. Note that in single client transfers only the "Transfer these files as they grow" sub-option will be permitted, as the other options are multi-client specific.
For each selected sub-option, an inclusive filter must be specified (e.g. "*.mxf" for mxf files) to indicate which file types the functionality should be applied to. Files that do not match this filter will be transferred as per Basic Progressive. A wait time (in seconds) may also be specified for each sub-option to modify how long the client waits to check if a file has grown.
Transfer these files as they grow:
These transfers will check for files matching this particular filter within the specified number of seconds. If no changes to the file have occurred within the set time, the file growth will be considered complete. This option is useful for files that grow in intervals with pauses, or if a hard drive is heavily taxed and the actual growth of the file is slower than normal.
Wait for file growth to cease:
These transfers will check for files matching this particular filter within the specified number of seconds. If no changes to the file have occurred within the set time, the file growth will be considered complete. The transfer will only happen after the file growth is considered complete. This option ensures only complete files are being transferred and not ones that are still growing.
Re-Transfer Headers/Footers when complete:
These transfers will wait for a specified amount of time, then the header and footer bytes (as configured) will then be sent and patched into the destination file. This option is useful when the file behaviour is specifically known to change the headers and footers during file growth, it is a low impact, focused delta transfer. The default byte limit of header and footer is 1MB and it can be configured (using FC.hotfolder.config.max.headerfooter.bytes) in fchf.conf.
Re-Transfer Deltas when complete:
These transfers will wait for a specified amount of time, then the entire file will be checked for deltas. This option is useful in files where the growth behaviour is unknown but atypical. Checking the entire file has considerably more overhead than the "re-transfer headers/footers"; however, this option works well with a broader range of media files.
Limitations
Firstly, it is important to note that if the process that is growing the file locks said file (as is the case with Windows File Copy), progressive transfers will not work and the file will not transfer until it is unlocked.
This feature is designed to handle different types of file growth and/or change during the course of a transfer. Some files grow in a predictable pattern, such as tail-appending log files, while other files may grow and/or change in ways that require more advanced options, such as slow growth files or media files with multiple parts (e.g. multiple audio channels or audio/video files).
Due to the fact that the way a file grows is completely out of our control, if you have growth files, you must configure these options to properly represent that growth or the results can be undefined. For example, if you have a progressively growing file that changes once every 10 seconds but you set up a timeout delay for only 3 seconds, this can fail in a number of different ways depending on when the new data is appended, how it is appended and where we are in the transfer process.
Finally, since some of the dynamic file options will re-transfer all or parts of a file after it is completed, if After Transfer is selected under Verify File Integrity, the verification is moved to after the above options execute.
Fileset

Remote Folder
By specifying a Remote Folder name, a folder by this name will be created or found on the FileCatalyst Server and all files will be transferred to and from that folder.
Enable Dynamic Folders
Selecting this will force the HotFolder to dynamically replace tags in the Remote Folder path when uploading. It supports the following tags:
- <%HOSTNAME%> is replaced with the hostname of the machine running the HotFolder.
- <%TIME%> is replaced with the time in the format: HH.mm.ss
- <%DATE%> is replaced with the date in the format: yyyy.MM.DD
File Filter
FileCatalyst HotFolder tasks allow you to define a filter which can be used to include or exclude particular files from the transfer. This filter is applied at the beginning of the transfer and can be configured through a wide range of available options that allow you to tune your fileset as needed.
Filter Phrase:
This option allows you to define a text phase that will filter any files in the HotFolder directory or on the Server that match the expression. To disable file filters entirely, leave this option blank.
Filter Mode:
This option allows you to define the type of filter that you wish to use. The available filter modes are as follows:
-
Exclude Filter: Will exclude any files that match the given wildcard expression. The format for the expression is a comma-delimited list of files names, using a standard wildcard (“*”) character.
-
Include Filter: Will only include files that match the given wildcard expression. The format for the expression is a comma-delimited list of files names, using a standard wildcard (“*”) character.
-
Regular Expression Filter: This option allows you to build a complex regular expression to select which file(s) you want to include in a transfer.
For additional documentation to how Java implements regular expressions, the following sources may be used:
- https://docs.oracle.com/javase/8/docs/api/java/util/regex/Pattern.html
- http://www.sitepoint.com/article/java-regex-api-explained/
Construct Matches x The character x \\ The backslash character \0n The character with octal value 0n (0 <= n <= 7) \0nn The character with octal value 0nn (0 <= n <= 7) \0mnn The character with octal value 0mnn (0 <= m <= 3, 0 <= n <= 7) \xhh The character with hexadecimal value 0xhh \uhhhh The character with hexadecimal value 0xhhhh \t The tab character ('\u0009') \n The newline (line feed) character ('\u000A') \r The carriage-return character ('\u000D') \f The form-feed character ('\u000C') \a The alert (bell) character ('\u0007') \e The escape character ('\u001B') \cx The control character corresponding to x Character classes [abc] a, b, or c (simple class) [^abc] Any character except a, b, or c (negation) [a-zA-Z] a through z or A through Z, inclusive (range) [a-d[m-p]] a through d, or m through p: [a-dm-p] (union) [a-z&&[def]] d, e, or f (intersection) [a-z&&[^bc]] a through z, except for b and c: [ad-z] (subtraction) [a-z&&[^m-p]] a through z, and not m through p: [a-lq-z](subtraction) Predefined character classes . Any character (may or may not match line terminators) \d A digit: [0-9] \D A non-digit: [^0-9] \s A white space character: [ \t\n\x0B\f\r] \S A non-whitespace character: [^\s] \w A word character: [a-zA-Z_0-9] \W A non-word character: [^\w] POSIX character classes (US-ASCII only) \p{Lower} A lower-case alphabetic character: [a-z] \p{Upper} An upper-case alphabetic character:[A-Z] \p{ASCII} All ASCII:[\x00-\x7F] \p{Alpha} An alphabetic character:[\p{Lower}\p{Upper}] \p{Digit} A decimal digit: [0-9] \p{Alnum} An alphanumeric character:[\p{Alpha}\p{Digit}] \p{Punct} Punctuation: One of !"#$%&'()*+,-./:;<=>?@[\]^_`{|}~ \p{Graph} A visible character: [\p{Alnum}\p{Punct}] \p{Print} A printable character: [\p{Graph}] \p{Blank} A space or a tab: [ \t] \p{Cntrl} A control character: [\x00-\x1F\x7F] \p{XDigit} A hexadecimal digit: [0-9a-fA-F] \p{Space} A whitespace character: [ \t\n\x0B\f\r] Classes for Unicode blocks and categories \p{InGreek} A character in the Greek block (simple block) \p{Lu} An uppercase letter (simple category) \p{Sc} A currency symbol \P{InGreek} Any character except one in the Greek block (negation) [\p{L}&&[^\p{Lu}]] Any letter except an uppercase letter (subtraction) Boundary matchers ^ The beginning of a line $ The end of a line \b A word boundary \B A non-word boundary \A The beginning of the input \G The end of the previous match \Z The end of the input but for the final terminator, if any \z The end of the input Greedy quantifiers X? X, once or not at all X* X, zero or more times X+ X, one or more times X{n} X, exactly n times X{n,} X, at least n times X{n,m} X, at least n but not more than m times Reluctant quantifiers X?? X, once or not at all X*? X, zero or more times X+? X, one or more times X{n}? X, exactly n times X{n,}? X, at least n times X{n,m}? X, at least n but not more than m times Possessive quantifiers X?+ X, once or not at all X*+ X, zero or more times X++ X, one or more times X{n}+ X, exactly n times X{n,}+ X, at least n times X{n,m}+ X, at least n but not more than m times Logical operators XY X followed by Y X|Y Either X or Y (X) X, as a capturing group
Filter Target
This option allows you to specify the type of item that the file filter will apply to. The currently available options are as follows:
-
Directory and file name: Applies the file filter to both file names and directory names.
- Note 1: If a directory does not match the current filter settings, its contents will not be searched for other files that would have otherwise matched.
- File name: Applies the file filter to only file names. All directories that are found by the filter are automatically explored for other files that may match the current filter settings
-
File path: Applies the file filter to the file path for a given file.
- Note 1: Path-based filtering is relative to the source location currently defined by the transfer's current direction. If the task has an upload direction, then all path-based filter checks will be made relative to the current HotFolder location. If the task is a download, then all path-based filter calls will be made within the context of the currently defined remote folder. If no remote folder is currently defined, then the path based filter calls will be relative to the Server's home directory.
- Note 2: If the task is a download task and the filter phrase starts with a leading slash, then all path based filter checks will be made within the context of the site's established home directory.
Filter Examples
Here are some example settings that can be used to help filter out necessary files in a transfer:
-
Example 1:
Filter Settings:
Mode: Exclude
Target: File name
Phrase: *.pdfResult of settings:
Single phrase filter that transfers all files that do not end with the '.pdf' extension -
Example 2:
Filter Settings:
Mode: Exclude
Target: File path
Phrase: folder1/**/*.docx,folder3/**/*.pngResult of settings:
Two phrase filter that transfers all files expect '.docx' files found in folder1, and '.png' files found in folder3 -
Example 3:
Filter Settings:
Mode: Include
Target: File name
Phrase: *.mov,*.mp4Result of settings:
Two phrase filter that transfers all files that end with the '.mov' or '.mp4' extensions -
Example 4:
Filter Settings:
Mode: Include
Target: File path
Phrase: **/videoProduction/**/4K Footage/**/*.mkvResult of settings:
Single phrase filter that transfers all '.mkv' files that exist within the '4K Footage' sub-folders contained inside the 'videoProduction' parent folder. -
Example 5:
Filter Settings:
Mode: Reg Expr
Target: File name
Phrase: ".*?\.dat$"
Regular Expression Definitions:
Expression Section Description ".*?" Any character, 0, 1, or multiple times with reluctant matching "\." Followed by a period (you must escape the dot character or it will be treated as a wildcard) "dat" The exact characters 'dat' all lowercase "$" Must be at end of the line Result of settings:
Filter that transfer only files that end with ".dat". Windows wildcard equivalent of "*.dat" -
Example 6:
Filter Settings:
Mode: Reg Expr
Target: File name
Phrase: ".*?[0-9]+?.*?\.(mp3|wav)$"
Regular Expression Definitions:
Expression Section Description ".*?" Any character, 0, 1, or multiple times with reluctant matching "[0-9]+?" Any numerical digit one or more times with reluctant matching ".*?" Any character, 0, 1, or multiple times with reluctant matching "\." Followed by a period (you must escape the dot character or it will be treated as a wildcard) "(mp3|wav)" Characters may match exactly "mp3" OR "wav" "$" Must be at end of the line Result of settings:
Filter that transfer sound files (.mp3 or .wav) with numbers in the title -
Example 7:
Filter Settings:
Mode: Reg Expr
Target: File name
Phrase: "^.*\.(?!tmp$)[^.]+$"
Regular Expression Definitions:
Expression Section Description "^.*" Matches starting characters, 0, 1, or multiple times. "\." Followed by a period (you must escape the dot character or it will be treated as a wildcard) "(?!tmp$)" Negative lookahead that excludes files with the extension "tmp" "[^.]+" Match everything not eliminated by the previous negative lookahead. "$" Must be at end of the line Result of settings:
Filter that transfer everything except temporary files ending in ".tmp" -
Example 8:
Filter Settings:
Mode: Reg Expr
Target: File path
Phrase: "^.*\.(?!(html|js|png)$)[^.]+$"
Regular Expression Definitions:
Expression Section Description "^.*" Matches starting characters, 0, 1, or multiple times. "\." Followed by a period (you must escape the dot character or it will be treated as a wildcard) "(?!(html|js|png)$)" Negative lookahead that excludes extensions that match "html", "js", or "png" "[^.]+" Match everything not eliminated by the previous negative lookahead. "$" Must be at end of the line Result of settings:
Filter that transfers everything except files ending in ".html", ".js", or ".png"
Transfer Files Based on Size
This option allows you to specify whether the HotFolder should transfer all files or only files within the specified size limits.
Transfer Files Newer than X days
This option allows you to specify that only files newer than the given value (in days) will be transferred. This is based on the current modification time of the file, not when it was placed into the folder.
Filter Test
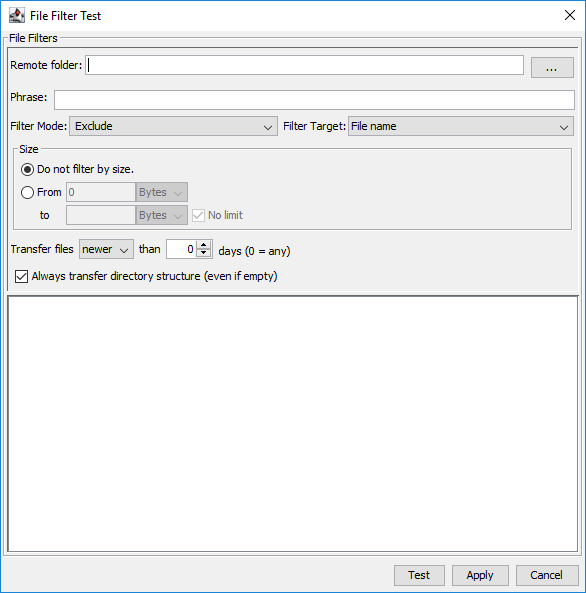
The filter tester will allow you to view the files that will be transferred with the given filters before applying them to the task. This is especially useful when experimenting with complicated regular expressions. Using the "Test" button will populate the text field with all of the files that will be allowed under the given filter, "Apply" will save your settings to the "Fileset" panel but will still need to be applied via the "Fileset" "Apply" button.
Note that this list will be sorted alphabetically and case sensitive for lists of less than 50,000 items. To maintain performance, lists of over 50,000 items will revert to the default sorting of the source operating system.
Transfer Cache
The file transfer cache is a history of all the files you have uploaded/downloaded from the server for this task. This is used to indicate whether a file has changed on the server and has been flagged for upload or download again. File changes are tracked using the size and the last modified timestamp. These values are updated when a change is detected and the file is redownloaded. Thus, even if you remove the files from the local directory, they will not be downloaded again unless the cache is cleared. When this cache is deleted, it will re-download all files from the server. In the case of upload tasks, only files that have been changed locally will be uploaded again.
Note: Transfer cache is enabled and locked if multi-file transfers is selected and requeueing of running task is allowed.
The cache database directory is saved in the cache directory as .fcdb by default. To save it somewhere else, specify the path in fchf.conf file with the following parameter key:
FC.hotfolder.config.file.cache.root=CACHEPATH
where CACHEPATH is replaced with the path of your target directory.
Clear Cache
Clears the current transfer cache entries. Files will be re-transferred even if they have previously been transferred.
Generate Cache
Generates the transfer cache without performing a transfer. This option is useful if both source and destination are already in sync. Cache generation occurs upon next task execution.
Remove File
When clicked, the user will have the ability to select a file for removal from the transfer cache. A
browse dialog is presented showing the files in the source folder for this task.
When a file is selected, if it is present in the transfer cache, it will be removed. If there was an
error removing the file from the cache (i.e. it was not present), an error will be shown.
Note: When connecting to HotFolder service via remote admin, and attempting to remove
a file from the transfer cache in an upload task, the full path of the file to be removed must be
entered manually.
Always transfer directory structure (even if empty)
Empty directories are not transferred unless this is selected. If a filter hides all files in a directory, it is considered empty.
Transfer in priority sequence
This will apply a order the sequence of file transfers.
Oldest
Transfers files by last modified from oldest to newest.
Newest
Transfers files by last modified from newest to oldest.
Largest
Transfers files by size from largest to smallest.
Smallest
Transfers files by size from smallest to largest.
Synchronization Options
Delete files on destination not existing on source.
This option forces the source (HotFolder on uploads, Server on downloads) to make sure that both directories contain exactly the same fileset. This includes deletion of files which do not appear on the source.
File details (send details for Upload tasks, get details for Download tasks).
These flags are for a special configuration where two HotFolders want to synchronize files with each other with a server in between acting as a transit point (small temporary cache, not permanent file storage).
By enabling this feature, the source HotFolder will forward file listing information from the source in addition to the files themselves, allowing the destination HotFolder to download both the files and the listing and take appropriate actions.
The following options should be enabled to get this configuration setup:
On the Source HotFolder:
- "Transfer Cache" should be enabled (ensuring the same file is not sent up twice on the server)
- "Send details for Remote HotFolder synchronization" should be enabled.
On the Destination HotFolder:
- "Get remote HotFolder synchronization details" should be enabled.
- In Post Task tab, "Delete source file(s)" should be enabled.
This ensures that the destination HotFolder remain in-synch (Source HotFolder acting as the master repository), and that even through a Server acting as an intermediary, file creating and deletion events will be synchronized to the destination HotFolder.
Delete files on Destination that do not exist at source
When this item is checked, any files that exists on the destination that does not exist at the source will be deleted. In this way, the destination folder will always be kept in sync with the source folder because any new files added will be set to the destination, while anything removed will be deleted.
File Priority Settings
If this option is enabled, FileCatalyst allows you to specify which files should be transferred first. FileCatalyst will make a best effort attempt to transfer in the given priority with no significant impacton performance.
Post Task
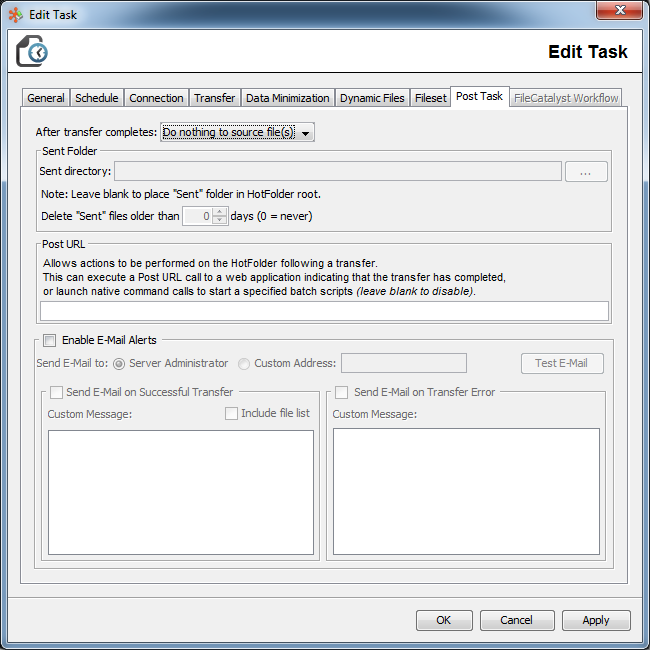
After a Transfer is Complete
Allows the user to select what to do with the files after they have been transferred. You can choose either to do nothing, move to a sent folder (Uploads only), or delete them.
If you choose to move to a sent folder and do not specify a location, the application will generate a folder named "Sent" in the root of the specified HotFolder. If a relative path such as "foo" is specified, the HotFolder will again be used as the parent folder. If an absolute path is specifed ("C:\" or "\\abc" in Windows, or starts with "/" in Linux/Solaris/MacOSX), the files will be saved to the specified location. If the folders do not exist, they will be created.
Note 1: If a file or folder is excluded from transferring (For example, a file filter has been configured to exclude the file from the transfer), it will not be moved or deleted if either of the 'Move source file(s) to "Sent" directory' or 'Delete source file(s)' options have been selected.
Note 2: When connecting to HotFolder service via remote admin, and attempting to set a 'Sent Directory' in an upload task, the path for the sent directory must be entered manually.
Post URL
To allow integration with web applications, HotFolder can perform an HTTP POST to a URL or launch a local script following the completion of a task.
If this field is set to a URL, the contents of the HTTP POST will include the following parameters:
- "f"- contains a | (pipe) delimited list of the full remote paths that were transferred up until a cancelation. Files never transferred will not appear in this list.
- "lf" - contains a | (pipe) delimited list of the full local paths that were transferred or schedule to be transferred
- "s" - contains a | (pipe) delimited list of the sizes of each file
- "status" - Status of each file transferred. "0" = File transfer was not attempted, "1" = File transfer was successful, "2" = File transfer was cancelled, "3" = File transfer failed with an error. For example, if the transfer included 5 files, and all files were transferred successfully, you would see status=11111. If the transfer was cancelled during the 3rd file, you would see status=11200.
- "allfiles"- contains a | (pipe) delimited list of the full paths that were transferred or schedule to be transferred, this list has a 1 to 1 relationship with the status value where each status value corresponds to each value in allfiles
If this field is set to a script, the script will be called upon completion of the task. There are 4 arguments that can be passed to the script by FileCatalyst.
- <remotefiles> - contains a | (pipe) delimited list of the full remote paths that were transferred or schedule to be transferred
- <localfiles> - contains a | (pipe) delimited list of the full local paths that were transferred or schedule to be transferred
- <sizes> - contains a | (pipe) delimited list of the sizes of each file
- <statuscodes> - Status of each file transferred. "0" = File transfer was not attempted, "1" = File transfer was successful, "2" = File transfer was cancelled, "3" = File transfer failed with an error. For example, if the transfer included 5 files, and all files were transferred successfully, you would see status=11111. If the transfer was cancelled during the 3rd file, you would see status=11200.
- <allfiles>- contains a | (pipe) delimited list of the full paths that were transferred or schedule to be transferred, this list has a 1 to 1 relationship with the status value where each status value corresponds to each value in allfiles
As an example, you may set the Script to:
/home/user/script.sh <remotefiles> <localfiles> <sizes> <statuscodes> <allfiles>
and FileCatalyst will automatically insert the proper values into the command line before execution.On Windows you may execute a batch file like this:
cmd /c start c:\\file.bat <remotefiles> <localfiles> <sizes> <statuscodes> <allfiles>
Note 1: If the Post URL field is set to a script, and the script is called upon completion of a task, the task will block until the script fully completes. This completion includes the originating script and any sub-processes that the script creates when it executes.
Enable E-Mail Alerts
If this is enabled and the client specifies to send an e-mail on completion of a transfer, then an e-mail will be sent to the address provided whenever a transfer is finished.
Note: E-mail messages will only be sent if the Server has properly configured SMTP settings, and has enabled the e-mail alerts setting. If you wish to have e-mail alerts for your task, please contact your Server administrator to verify that the Server's SMTP settings are correct, and that the e-mail alerts option is enabled.
E-Mail Address
Email destination: If Server Administrator is selected, the email will be sent to the administator address configured on the Server. Otherwise you can sellect Custom Address and enter an email address. If you wish to send email to multiple addresses, they must be separated with a semicolon(;).
Send E-Mail on Successful Transfer
Indicates whether or not to send an e-mail on successful transfers.
Custom Message Text on Successful Transfer
This message is sent as the e-mail notification on a successful transfer.
Send E-Mail on Transfer Error
Indicates whether or not to send an e-mail when a transfer error occurs.
Custom Message Text on Transfer Error
This message is sent as the e-mail notification when a transfer error occurs.
Note: With the introduction of Alarms to HotFolder, it is recommended that FileCatalyst Central be instead used for capturing transfer faults. Network outages or user authentication errors are not handled by Task e-mail notifications.
Bandwidth Management
Overview
Why Manage Your Bandwidth?
Your network is used for email, applications, web site access and any other form of corporate communication. All of these tools utilize and require a percentage of your overall bandwidth. If each of these tasks does not have sufficient bandwidth, they will begin to feel slow and unresponsive.
FileCatalyst is capable of maximizing usage of your allocated bandwidth. For example, if your organization has a 1 Gbps link, FileCatalyst will be able to transfer at a full 1 Gbps. However, this may not be practical during peak periods of the day when FileCatalyst may need to share available bandwidth with other applications.
Users themselves may manage and schedule their bandwidth usage by using the Bandwidth scheduler (see below). The user may even specify periods during which there should be no transfer activity by choosing "No Transfers" for the selected time.
Selecting an Appropriate Rate
The bandwidth scheduler allows users to limit or cap the level of bandwidth usage for a period of time. Example: if you have a 1 Gbps connection, you may wish to allocate 500 Mbps of data transfer during the day and leave the remaining 500 Mbps for office use. However, at 6:00 PM you may wish to fully allocate 95% or 950 Mbps of bandwidth for data transfer. It is up to the users and the FileCatalyst administrator(s) to create an appropriate schedule.
Note: Congestion Control also automates the FileCatalyst transfer rate as networks become congested. As additional network traffic comes on-line and creates congestion, FileCatalyst will slow down or throttle back the transfer rate. It will remain in this state until the network is no longer congested. At which point the transfer will speed up until it resumes its set rate. This is a selectable feature which is enabled by editing individual tasks.
Bandwidth Scheduler

Some of the optimizations described above depend on the Bandwidth Scheduler. This is found on the “Bandwidth” panel. To change the rate at a time slot (or variety of time slots), select the cells corresponding to the date/time of day you wish to change, and either right click and select the maximum rate, or click the Select Rate button and select the maximum rate for that time period. Rates specified in the Bandwidth Scheduler are in Kbps (Kilobits per second).
Central Management
Allows a FileCatalyst HotFolder to connect to FileCatalyst Central (formerly known as MonitoringAgent or MonitoringConsole).
Enable Monitor
Connections to FileCatalyst Central must be initiated by the service (HotFolder or Server). Fill in the information to connect to Central (address/port/monitor username/password), as well as indicate what IP this server is known as and an alias that can be used to recognize this specific service.
Enabling connection to FileCatalyst Central will also initiate report generation, so that Central can download transfer activities to it's database.
Trigger Alarms on Transfer
In addition to Service Down alarms (which are on by default if Alarm Monitoring is enabled), HotFolder can also send three types of notifications depending on whether a task finishes successfully, is canceled, or has an error. These options allow alarms to be configured for each state.
Reporting
Overview
FileCatalyst provides defined reports that contain important information that is gathered during transfers. These reports are stored within a database located within the report location directory, and inside of that database, there are two kinds of reports.
The first of these reports are the file transfer data reports that contain a record for every individual file transfer that takes place. The reports are written at the end of each file transfer and contain important information such as file size, transfer time, mode, status, average rates, and destination addresses.
The second type of reports are the bandwidth reports which contain records that include the transmit and receive rate of a session at a given time. These reports also contain the username of the user transferring as well as a timestamp of when the report was created. The frequency of these records is determined by adjusting the report snapshot interval. If there are no active transfers at the time of the snapshot, there will be no record written. If there is data in the snapshot, a record will be written for each user that is currently transferring, as well as a record that is the sum of all transmit and receive rates for all users.
It is also important to note that both report types can be exported into a CSV file that may be consumed by third-party applications. To download these reports as a CSV, navigate to the HTML administration web application, and click on the reporting tab. Within the reporting panel, you will see a section called "Run Report" which contains options that can be used to filter out reports from the CSV export . Once all the information for your export has been set, click on the "Export CSV" button and then the CSV file will automatically download to your system.
Settings
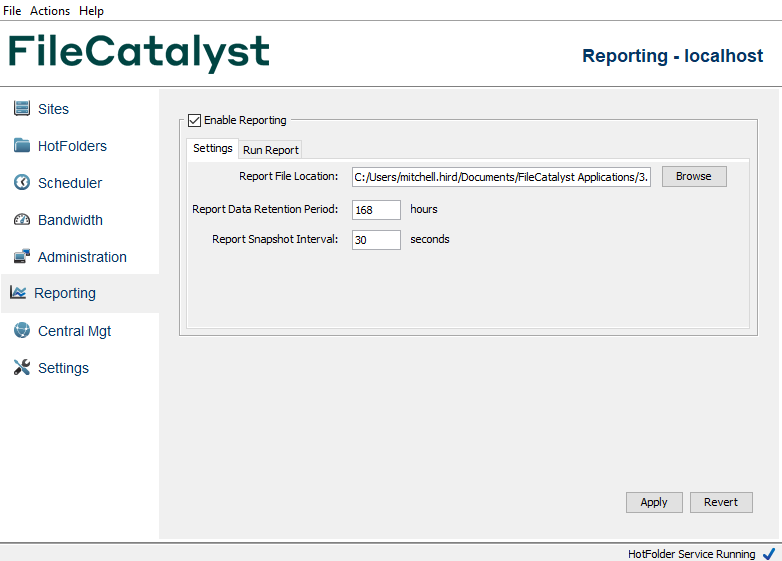
Click the checkbox to enable reporting and press Apply. Define the location for reports in the first field, followed by the Retention Period and the Snapshot interval. The Retention Period is used to define how long logs are kept for before they are purged. Report Snapshot Interval refers to the granularity of the bandwidth data information being captured. Shorter intervals provide the most information, but at the cost of system performance and report file size.
Run Report
FileCatalyst HotFolder provides 2 basic graphical reports; one for the amount of data transferred over a time period, and another that displays snapshots of the transmit and receive rates at defined intervals for the all transfers combined.

Select a type of report and a range of time. Click "Run Report" to generate a graph of the statistics requested. The blue line indicates the total receive rate of the HotFolder (that is files being downloaded from the server). Here are a few sample reports:

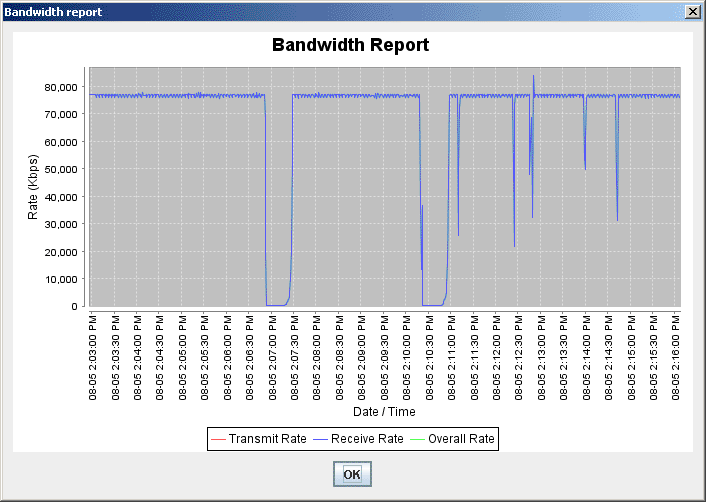
FileCatalyst allows you to zoom in on the reports as well. If for example you run a report such as the one below, you can click in the top left of the area on which you want to zoom and drag the mouse curser to the bottom right of the area on which you want to zoom. Here is an example of the full report, and the section to be zoomed on has been highlighted.
As per the legend, the red line indicates the total transmit rate (that is files being uploaded to the server). The green line is the total rate (that is combination of the transmit and receive).

And once you release the mouse button, the highlighted section will fill the entire graph area as illustrated below:

In order to zoom out, hold the mouse cursor anywhere on the graph, click and drag it to the left, and the release.
Report File Format
FileCatalyst report files are currently written using a CSV (Comma-separated values) file format. The first line of the file will always contain the headers for each field. The format for both the Data report and the Bandwidth report are as follows.
Data Report Information
| Fields | Values |
|---|---|
| Report Create Time | A positive 64-bit integer value representing milliseconds since 1970 |
| HotFolder | The name for the HotFolder that initiated the transfer |
| Transfer Type | ‘UDP’, ‘FTP’ representing the protocol used for the transfer |
| Direction | ‘UPLOAD’, ‘UPLOAD_RESUME’, ‘DOWNLOAD’, ‘DOWNLOAD_RESUME’ representing direction of transfer |
| Local ID | The Local Agent ID assigned by FileCatalyst Central. |
| Location | The IP address of the HotFolder. |
| Remote ID | The Agent ID assigned by FileCatalyst Central to the FileCatalyst Server at the other end of the transfer. |
| Remote Location | The IP address of the server. |
| Session ID | A value created in a transfer with a FileCatalyst HotFolder which identifies which transfer task a particular file transfer is associated with |
| Transfer ID | The transfer ID assigned to this by the FileCatalyst HotFolder |
| Status | ‘SUCCESS’, ‘CANCEL’, ‘ERROR’ representing the state of the transfer upon completion |
| File Size | A positive 64-bit integer value representing the total size of the source file to be transferred |
| Data Transferred | A positive 64-bit integer value representing the amount of data actually transferred (less than total if cancelled or error) |
| Transfer Start time | Date/Time of transfer start in format yyyy/MM/dd HH:mm:ss.SSS (i.e. 2008/07/30 16:09:10.037) |
| Transfer Stop time | Date/Time of transfer stop in format yyyy/MM/dd HH:mm:ss.SSS (i.e. 2008/07/30 16:09:10.037) |
| Average Rate | A positive 32-bit floating point value representing the average data transmit/receive rate (Kbps)for the duration of the transfer |
| Peak Rate | A positive 32-bit floating point value representing the peak data transmit/receive rate (Kbps) over the duration of the transfer |
| Effective Rate | A positive 32-bit floating point value representing the effective data transmit/receive rate (Kbps) over the duration of the transfer |
| Packet Loss % | A positive 32-bit floating point value representing the packet loss percentage over the duration of the transfer |
| Remote Host | The IP address of the remote client which initiated this transfer |
| File Path | The local path which the file was transmitted or received |
| Username | The username for the server account |
| Task ID | An identifier assigned to the task that created the entry. |
| Task Name | The assigned name of the task that created the entry. |
| Report Archive Time | A positive 64-bit integer value representing milliseconds since 1970. |
Sample data report CSV file contents:
"1506545974617","My HotFolder","UDP","DOWNLOAD","915f81799658fe33","localhost.filecatalyst.net","880d126ec25347db", "127.0.0.1","M527724947687208-8-NULL","38638847","SUCCESS","35634045","0","2017/09/27 16:59:34.617","2017/09/27 16:59:34.617","0.0","0.0", "0.0","0.0","","\Koala.jpg","user","1505848701786_21712","My Task","1506546196428"
Bandwidth Report Information
| Fields | Values |
|---|---|
| TimeStamp | A positive 64-bit integer value representing milliseconds since 1970 |
| HotFolder | The HotFolder that is managing the transfer. |
| Remote Host | The IP address of the remote client which initiated this transfer. Value will be blank for the global sum user. |
| Report Time | Date/Time of this bandwidth snap shop in format yyyy/MM/dd HH:mm:ss.SSS (i.e. 2008/07/30 16:09:10.037) |
| Transmit Rate | A positive 32-bit floating point value representing the transmit rate (Kbps) at time of snapshot |
| Receive Rate | A positive 32-bit floating point value representing the receive rate (Kbps) at time of snapshot |
Sample bandwidth report CSV file contents:
"1217350587500","user","127.0.0.1","2008/07/29 12:56:27.500","0","85000"
Administration Settings
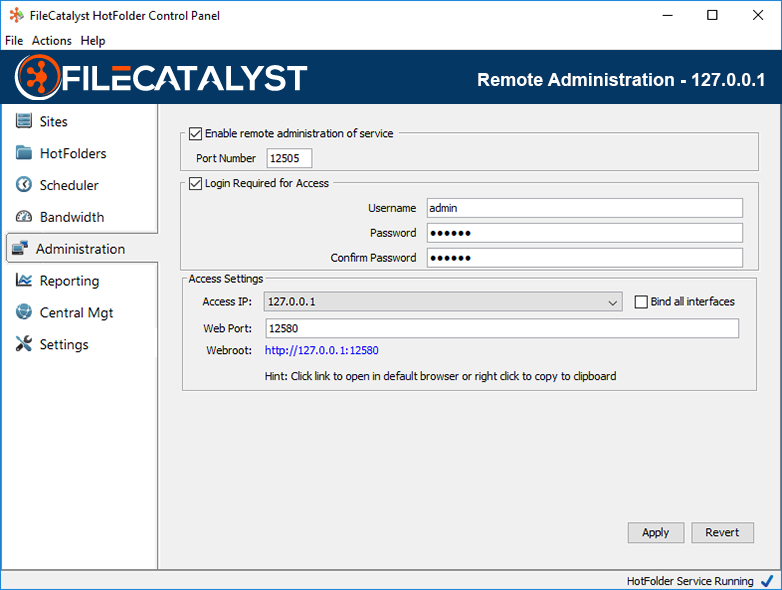
Remote Administration Port
Specifies the port used by remote users to connect to this HotFolder.
Login Required for Access
Specifies whether or not to allow connections from computers outside of 'localhost'. If enabled, a username and password must be specified and used to connect to HotFolder from any system outside of the local machine.
Access Settings
The access settings will allow internet access to the administration of the FileCatalyst HotFolder. The web port can be customized as needed (by default it is port 12580). Choose the IP format based on internal or external access to the administration URL. Enable Remote Connections must be selected for Web Access to be available.
Note 1: Ports for Administration Settings and Web Port need to be opened on the firewall if one is in place. If the ports are configured to be closed on 3 the firewall, then no data transfer will be possible. With no data transfer possible, no internet applications will be able to access the FileCatalyst HotFolder.
Note 2: If the Bind all Interfaces option is selected, the FileCatalyst HotFolder will accept all internet access requests that have an IP format listed within the available dropdown. If the option is not selected, then only access requests matching the specified IP will be accepted by the HotFolder application.
The 'Webroot' URL is the entry point for web access the administration of the FileCatalyst HotFolder.
Using Web Access
The entry point HTML page accessed by clicking the 'Webroot' URL presents the user with a button labeled, 'Manage Application':
The 'Manage Application' button leads to FileCatalyst HotFolder's Web Administration tool. A detailed explanation on how to use the Web Administration tool can be found here
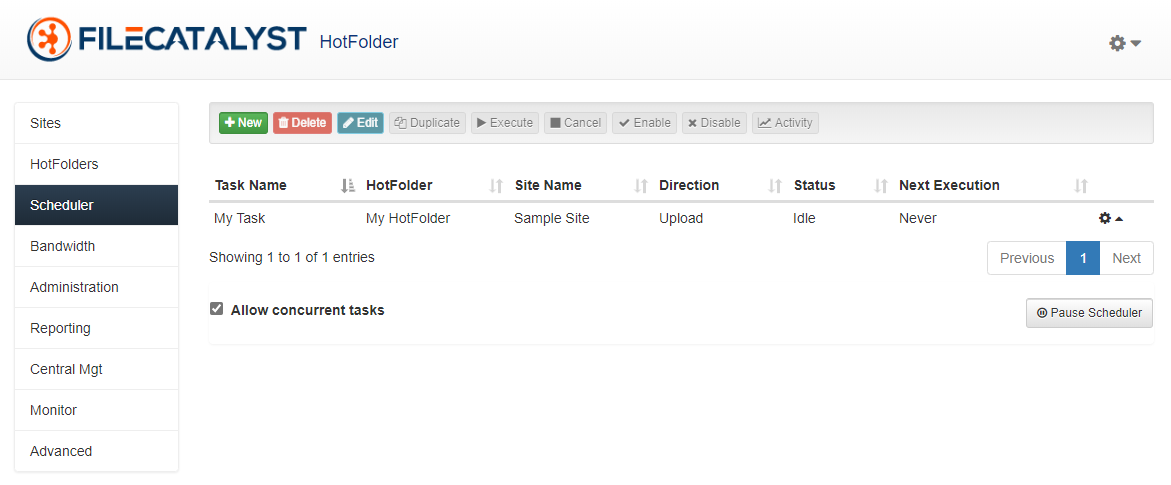
General Settings
UDP Resources
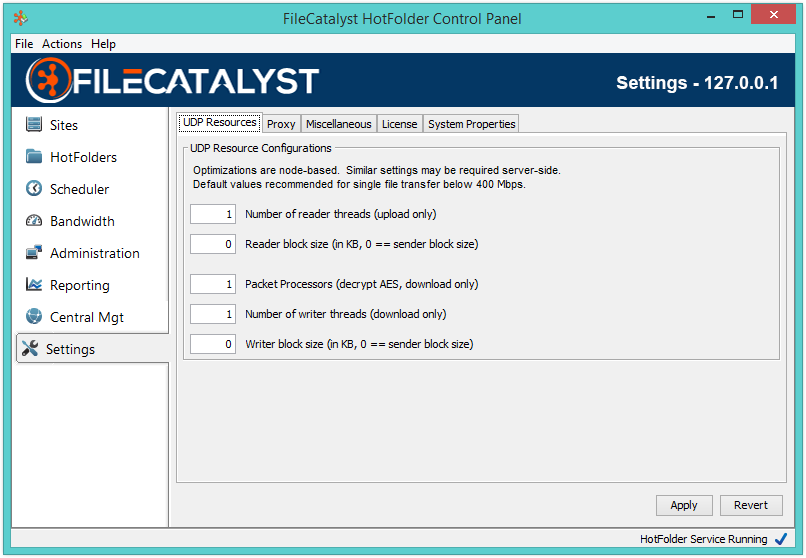
When configuring the FileCatalyst HotFolder to achieve high speed levels (500Mbps - 10Gbps for a single connection), several optimizations must be done in order to make sure the system is able to utilize multiple cores of a machine. These include configuring the number of reader threads per connection, packet processors (used for decoding AES packets on the receiver side), and the number of block writers.
# Reader threads
Number of threads PER CONNECTION spawned to read blocks off the disk and place them into the sender queue ready for transport. On the HotFolder, setting this value will only affect uploads. Most systems perform optimally when you configure only 1 thread to perform reading. There are two scenarios where this value should be moved up: when IO tests have shown that adding threads increases throughput for your storage device, or when utilizing high CPU load (more sender threads than CPU cores, or utilizing high CPU options such as AES encryption or LMZA compression), a single thread doing the block reads may be pushed down in priority and be CPU starved, causing a slowdown in transfer speeds. Multiple threads may help both of these scenarios.
Reader block size
By default, the block size used for each read operation is the same size specified by the client in the network block size. This can be adjusted for improved performance. Please run the advanced IO testing tool to see what works best for your system.
Packet processors
Packet processors are responsible for taking packets off the network socket, decrypting them, and preparing them for the block writers. When using AES at speeds greater than 200Mbps, it may be required to increase the number of packet processors on the receiving end to ensure multiple CPU's are utilized to decrypt the incoming data.
On the HotFolder, setting this value will only affect downloads. If uploading data to the server, similar settings should be set on the server applications.
# of Writer threads
Number of threads PER CONNECTION spawned to write blocks off the disk. On the HotFolder, setting this value will only affect downloads. Writer threads in FileCatalyst perform the following tasks:
- Uncompress data block (if using on-the-fly compression)
- Perform MD5 checksum on block (if using on-the-fly Verification)
- Write block data to disk
For systems using LMZA compression or possibly high speed transfers (> 1Gbps), setting multiple block writers may allow higher performance for single high speed connections.
Writer block size
By default, the block size used for each write operation is the same size specified by the client in the network block size. This can be adjusted for improved performance. Please run the advanced IO testing tool to see what works best for your system.
These values should be modified only after running through some performance IO testing.
Proxy
Depending on your network configuration, it may be necessary to configure HotFolder to use a proxy for some or all of the protocols that it uses for transferring files. The Proxy tab allows you to configure how HotFolder accesses the Internet.
By default HotFolder uses the system defaults however, you can configure the application to not use proxies at all or to specify particular proxies for the protocols used by HotFolder. If you are manually configuring specific values for the different protocols, please check with your system administrator for the correct values.
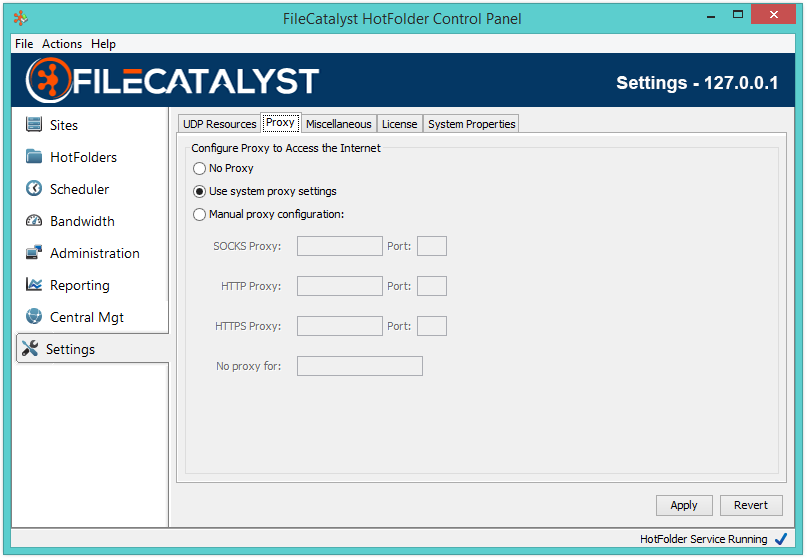
Proxy information can be input here if you want HotFolder to do HTTP/HTTPS transfers through a proxy.
Note that the "No proxy for" field will accept a list of hosts for which the proxy will be bypassed. Mulitple hosts must be separated with a "|".
Miscellaneous
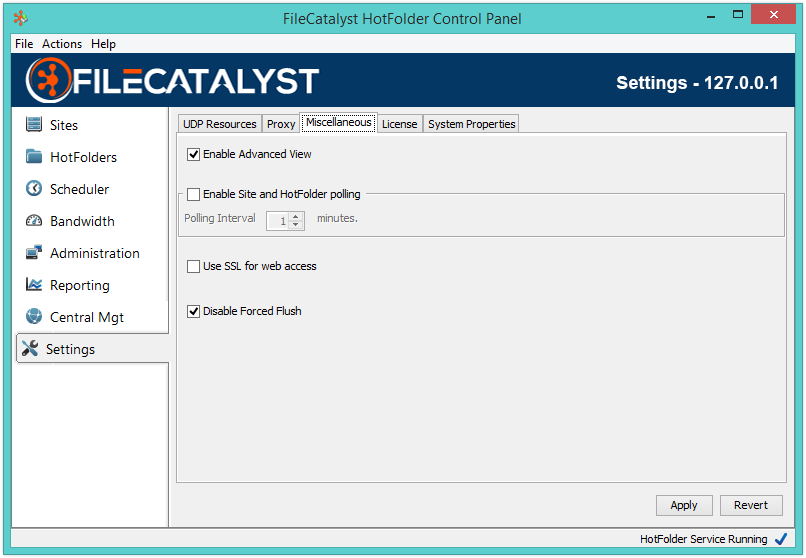
This tab allows the user to modify a number of advanced and regular option.
Enable Advanced View
Toggles hiding some more advanced features from the application. Enabling this will show all features the HotFolder can be configured with.
Polling
HotFolder will periodically wake up and poll all Sites and HotFolder directories to make sure that they are on-line and available. Should a Site or HotFolder become unavailable (server not seen on the network, mount point not available), the application will let the user know via a warning label on the Site or HotFolder list.
SSL Configuration
FileCatalyst HotFolder has an embedded web server used for remote administration via a web browser. Enable this option to use SSL encryption (HTTPS) when loading the remote administration from your browser.
Disable Force Flush
By default, write operations automatically flush both data and meta data to file system for all IO calls. Disabling force flush allows Java to utilizes the OS file cache (RAM). This option is only visible in advanced mode.
HotFolder License
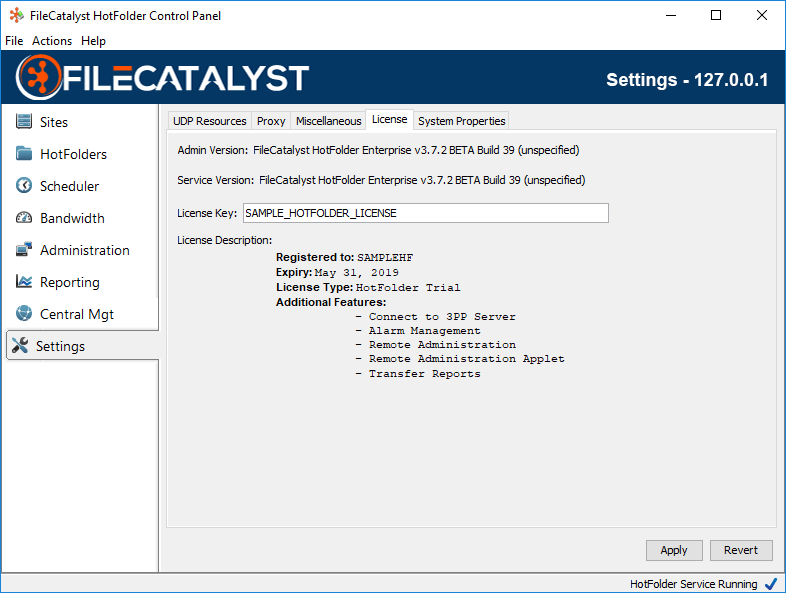
By default, HotFolders do not require a license key to run. Certain advanced features however require that a license key be purchased and installed for them to work. These include:
- Remote HotFolder Administration
- Transfer Reports
- Connection to non-FileCatalyst FTP server
System Properties
Used for debugging purposes to set advanced system properties. System properties are case sensitive. Please contact support before attempting to use these features.
HotFolder or Server may require a restart for these values to take effect.
| System Property | Product | Default value | Known values | Description |
| filecatalyst.embedded.webserver.enable.cache | All clients | true | true,false |
System property that determines whether or not browsers should be caching files that are supplied by
the internal web server.
In networks with high amounts of latency, enabling this property will reduce the amount of time that it takes for web browsers to load the web-based resources after they have been successfully loaded for the first time. |
| java.io.tmpdir | All | blank | File system path to a temp directory. | The java.io.tmpdir system property indicates the temporary directory used by the Java Virtual Machine (JVM) to create and store temporary files. The default value is typically "/tmp", or "/var/tmp" on Unix-like platforms. On Microsoft Windows systems the java.io.tmpdir property is typically "C:\WINNT\TEMP". When creating zip archives, the FileCatalyst Server creates the archives in the java.io.tmpdir. If this is not desirable, the java.io.tmpdir can be set to a more suitable location. |
| java.net.socks.password | HotFolder | blank | String value password | Password value for SOCKS proxy authentication. |
| java.net.socks.username | HotFolder | blank | String value username | Username value for SOCKS proxy authentication. |
| lmza_dict | HotFolder, Server | 16 | 0-28 |
2n value for dictionary size (16 represents 64K dictionary)
7-ZIP library specifies the following in their documentation: -d{N}: set dictionary - [0,28], default: 23 (8MB)Default value was lowered to allow faster throughput per core and keep RAM requirements reasonable. |
| lmza_fb | HotFolder, Server | 8 | Integer, 5-273 |
Change the value of LMZA fast bytes.
7-ZIP library specifies the following in their documentation: -fb{N}: set number of fast bytes - [5, 273], default: 128Default value was lowered to allow faster throughput per core and keep RAM requirements reasonable. |
| lmza_mf | HotFolder, Server | 1 | 0 (EMatchFinderTypeBT2), 1 (EMatchFinderTypeBT4) |
Set Match Finder. Default: bt4
7-ZIP library specifies the following in their documentation: -mf{MF_ID}: set Match Finder. Default: bt4.Default value was lowered to allow faster throughput per core and keep RAM requirements reasonable. |
| tc_masquerade_local_ssl.address | Server | false | true, false | Server switch to enable masquerade only if local, and only if SSL. |
| unlimited.core.io.ftptransfer.receive.bufsize | HotFolder, Server | 40960 | Any positive integer value | Use this value to control the size if the receive buffer (in bytes) for FTP transfers. This value also controls the size of storage write operations. Increasing this value may increase write performance, particularly when writing against object storage. This value should be kept in sync with the "unlimited.core.io.ftptransfer.transmit.bufsize" value on the transmit side of the FTP transfer. |
| unlimited.core.io.ftptransfer.transmit.bufsize | HotFolder, Server | 40960 | Any positive integer value | Use this value to control the size if the transmit buffer (in bytes) for FTP transfers. This value also controls the size of storage read operations. Increasing this value may increase read performance, particularly when reading object storage. This value should be kept in sync with the "unlimited.core.io.ftptransfer.receive.bufsize" value on the receive side of the FTP transfer. |
| unlimited.fc.allowRestrictedCharacters | All clients | false | true,false |
System property that allows filenames/paths to use characters restricted on windows.
Due to the fact you can never really know what OS is managing mounted network storage, we skip (and log the skip) file paths that would fail in windows. |
| unlimited.fc.allowServerOverrideBandwidth | HotFolder | false | true, false | When enabled, the FileCatalyst Server will have the ability to manually override the bandwidth value set in the HotFolder bandwidth scheduler for a single session or file. |
| unlimited.fc.allowEmptyTransferSuccessEmail | HotFolder | false | true, false | When disabled, the HotFolder will not send an email when a successful transfer transfers no files (for example due to filtering). |
| unlimited.fc.autoUnzip | HotFolder | true | true, false | When using the compress into single archive option, if this value is set to false, the zip files will not automatically be extracted. |
| unlimited.fc.cancelOnBlackout | HotFolder | false | true, false | When the bandwidth scheduler would not allow transfers, current transfers are also cancelled. |
| unlimited.fc.delete_filesonly_after_transfer | HotFolder | false | true, false | When the HotFolder task uses the feature delete source files after transfer, it also normally removes the directory structure as well. This flag tells the HotFolder to maintain the source directory tree. This is only available in single client downloads. |
| unlimited.fc.deployment.security.enforcement.strict | All clients | false | true, false | Strict SSL. This feature blocks SSL connections to the FileCatalyst server from being established if the server certificate is not trusted by your client. This feature is only applicable when SSL is enabled. When this is set to true on your client, the SSL certificate configured on the server must be trusted by your client. Your client must be stopped and restarted for this property to take effect. |
| unlimited.fc.deployment.security.enforcement.truststore | All clients | <not set> | Path to truststore file | Strict SSL - additional option. This setting is optional and only applicable when strict SSL is enabled. If you choose to provide a custom truststore file to assert the trust of the certificate you have configured in the server, you can specify the path to your truststore file with this property. If not set, the default truststore file provided by the your Java Runtime Environment is used. Your client must be stopped and restarted for this property to take effect. |
| unlimited.fc.diagnostics.captureHeapOnShutdown | All | false | true, false | This is an optional value that will generate a diagnostic when the application is shut down.. |
| unlimited.fc.diagnostics.maxOptionalFileSize | All clients | 200 | Max size of logs pulled into diagnostics file in MB | This is an optional value that can change the default maximum size of files pulled into the diagnostics zip file. |
| unlimited.fc.diagnostics.maxOptionalFileAge | All clients | 86400000 | Max age of the last modified stamp on the file | This is an optional value that can change the default maximum age of files pulled into the diagnostics zip file. |
| unlimited.fc.direct.disk_backed | HotFolder, Server | false | true, false | When performing transfers of very large file sets, the data must be loaded into memory. A 4GB heap can handle roughly 3 million files. In cases where increasing memory is not an option, setting this option to true will move the data structures to disk to save memory. In this case even a small heap is able to handled very large numbers of files. This will incur a performance hit because values must be retrieved from disk instead of memory. |
| unlimited.fc.direct.forceClientSideFilter | HotFolder | false | true, false | Isolated case where server-side filtering (downloads) was not working for customer. This switch brings back older behaviour of Server returning entire remote file list and forces client to then filter through the files it needs. |
| unlimited.fc.direct.num_clients_connect | HotFolder | 5 | positive integer value | Controls the number of concurrent clients that will be used in the Connect feature of HotFolder. |
| unlimited.fc.direct.udp_receive_timeout | HotFolder, Server | 60 | integer value 60 or larger in seconds | By default, the application will wait 60 seconds waiting for packets to be received before declaring that packets are being blocked by a firewall or network has dropped. This values allows someone to increase it beyond 60 seconds. Values below the default 60 seconds are discarded. |
| unlimited.fc.direct.useCreateTimeForFilter | HotFolder, Server | false | true, false |
This feature works with the "Transfer files older/newer than" feature on the HotFolder task "File
Set" tab. When this feature is enabled, the filter will use the creation time rather than the
modified time when comparing and deciding if a file should be transferred. If you are doing downloads, this property needs to be added to the Server (since filtering happens server side when it is getting the list of files to download). For uploads it needs to be added to the HotFolder. |
| unlimited.fc.direct_mem.disabled | All | false | true, false |
Forces application to create regular byte buffers instead of direct memory byte buffers. Performance
may
degrade when this is used, but is helpful when constrained by platform or memory limitations.
Java8 API description: A byte buffer is either direct or non-direct. Given a direct byte buffer, the Java virtual machine will make a best effort to perform native I/O operations directly upon it. That is, it will attempt to avoid copying the buffer's content to (or from) an intermediate buffer before (or after) each invocation of one of the underlying operating system's native I/O operations. |
| unlimited.fc.direct_speedDetectionCacheEnabled | All clients | true | true, false | The speed detection cache enables faster startup of client connections by allowing them to re-use previously detected values. This property allows the speed detection cache to be disabled. This property is enabled by default. |
| unlimited.fc.direct_speedDetectionCacheExpiryMinutes | All clients | 1 | positive integer (minutes) | When using the speed detection cache (enabled by default), this value allows the adjustment of the cache retention by expiring cached values after a period of time. |
| unlimited.fc.direct_tcp_keepalive | HotFolder | Varies on JVM | true, false |
Triggers the Java Socket SO_KEEPALIVE value for the client control channel.
Java8 API description: When the keepalive option is set for a TCP socket and no data has been exchanged across the socket in either direction for 2 hours (NOTE: the actual value is implementation dependent), TCP automatically sends a keepalive probe to the peer. This probe is a TCP segment to which the peer must respond. One of three responses is expected: 1. The peer responds with the expected ACK. The application is not notified (since everything is OK). TCP will send another probe following another 2 hours of inactivity. 2. The peer responds with an RST, which tells the local TCP that the peer host has crashed and rebooted. The socket is closed. 3. There is no response from the peer. The socket is closed. The purpose of this option is to detect if the peer host crashes. Valid only for TCP socket: SocketImpl |
| unlimited.fc.disableGlobalByteBufferPool | Server, HotFolder | false | true, false | Disables use of a global byte buffer pool in the application. |
| unlimited.fc.disableMD5OnTheFly | HotFolder, Server | false | true, false | By default, during UDP transfers, FileCatalyst will verify each block using MD5. Value needs to be set in the product doing the transmitting (ie: Server for downloads, HotFolder for uploads). To disable this option set this property to true and restart the product. |
| unlimited.fc.doFullMD5WhenReconnected | HotFolder | false | true, false | If set to true, when doing a progressive transfer, if the connection is lost, upon reconnection the entire destination file will be verified using MD5 before attempting to append. |
| unlimited.fc.doMD5onProgressiveAppend | HotFolder | false | true, false | If set to true, when doing a progressive transfer, for each append the previous block will be verified using MD5 to ensure integrity. If set to false, this check is only performed if the connection was lost. |
| unlimited.fc.immediatelyRunMissedTransfers | HotFolder | false | true, false | If set to true, a task that didn't run because the HotFolder was not running during it's scheduled execution time will run on start up. If set to false, it will run at it's next scheduled opportunity. |
| unlimited.fc.fastio.disable_attribute_cache | HotFolder, Server | false | true, false |
FileCatalyst caches recently accessed file attributes (size, modification time, etc) to speed up
file system performance. Disabling this value may slow down directory listings on larger structures,
but
will ensure that we hit the native file system directly rather then rely on cached metadata.
This setting may be toggled if the HotFolder is not picking up file changes fast enough for frequently executed tasks (less than 30 minutes). |
| unlimited.fc.fastio.max_cache_age | HotFolder, Server | 120000 | integer, age of cache in ms |
FileCatalyst caches recently accessed file attributes (size, modification time, etc) to speed up
file system performance. This value determines the length of time the cached value is stored before
expiring it.
The default value of 2 minutes (120000 ms). |
| unlimited.fc.force.ownership_throw_on_error | Server, HotFolder, TransferAgent, Command Line | true | true, false | If this value is set to true, the force file ownership feature will cause all failed force file ownership operations to mark the transfer as a failure. If the value is set to false, then failed force file ownership operations will be logged, but the file will continue to transfer as normal. When the transfer completes, the destination file will have the same user ownership of the FileCatalyst application. |
| unlimited.fc.follow_symlinks | HotFolder, TransferAgent, Command Line | true | true, false | If this value is set to false, the HotFolder will not follow symbolic links. If this value is set to true, the HotFolder will follow symbolic links instead of ignoring them. This does not prevent access to files outside of the users home directory and files may end up being pulled from outside of the user's sandbox. This value defaults to true. This feature is not compatible with the "Move to Sent". This was previously called unlimited.fc.allow_symlink_download and this label is backwards compatible. *NOTE* disabling this feature when there is a large data set on a network drive can greatly improve performance. |
| unlimited.fc.globalMD5RateLimit | All | 0 | Integer value for rate in Kbps, ie: 10000 | When set, all MD5 checks will be limited in speed to the specified rate. Default is 0 (no limit). |
| unlimited.fc.idleBandwidthShareRatio | HotFolder | 4 | 1-99 | Value indicates 1/n bandwidth that idle clients will be given compared to active clients. Setting to a lower value (ie: 1/20) may slow down transfers which toggle between states (moving from idle to active will not receive any new bandwidth until the next bandwidth reallocation broadcast every second). Should only be used to fine tune for optimal performance. |
| unlimited.fc.iptos_tcp | HotFolder, Server | 0 | An integer value between 0 and 255 inclusive | Sets the DSCP traffic class or type-of-service octet in the IP header for packets sent using TCP sockets in FileCatalyst. As the underlying network implementation may ignore this value, it should only be considered a hint to the OS. |
| unlimited.fc.iptos_udp | HotFolder, Server | 0 | An integer value between 0 and 255 inclusive | Sets the DSCP traffic class or type-of-service octet in the IP header for packets sent using UDP sockets in FileCatalyst. As the underlying network implementation may ignore this value, it should only be considered a hint to the OS. |
| unlimited.fc.legacy_timestamp | HotFolder | false | true, false | If this value is set to true, when we maintain time stamps we will only maintain on files and not folders. This feature only works for multi-client and is for backwards compatibility purposes, when using Single Client you can consider this feature always on. |
| unlimited.fc.logFileIDTag | HotFolder | false | true,false | Append a unique file ID, based off of the local path, to the end of any clientID log during multi-client transfers. This is used for easy file tracking to see every log it was involed with. |
| unlimited.fc.log_client_when_testing_control | All clients | true | true,false | Causes the client to log client (version, OS and Java version) info when it logs server info. |
| unlimited.fc.log_file_listing_growth | All | 20000 | Integer value | Used by application for logging progress of large sorts of data items. By default, the application will output logs every 20000 items during filtering or sorting of larger directory structure. This value may be tuned up or down as needed. |
| unlimited.fc.maintain_modtime_rootfolder | HotFolder | false | true, false | Ability to force parent folders date/time from the source to the destination when transferring. |
| unlimited.fc.maintain_uid_gid | Server, HotFolder, CommandLine and Transfer Agent | false | true, false | When set, use UID/GID rather than user name/group name. This will require the property to be set on the client side for uploads, and the server side for downloads. It is recommended to set the property on both sides to make it work for both upload and download. |
| unlimited.fc.no_so_linger | HotFolder, Server | false | true, false |
Force to not use SO_LINGER property on the socket. Setting to true will remove the SO_LINGER.
Java8 API description |
| unlimited.fc.output_timestamp | CLI | false | true, false | Run-time flag added in specifically for 10gbps statistic measurements. Timestamp will reflect transfer time, not setup time and output an easily parseable string value containing transfer time in seconds. |
| unlimited.fc.packetlossThreshold | HotFolder, Server | 2 | Integer, 2-10000 | Advanced setting for congestion control. Indicates how many packets may be skipped (gotten out of sequence) before the congestion control considers it a packet loss event. |
| unlimited.fc.partialmd5.checkInterval | HotFolder | 4096000 | Valid integer value | When using "Verify After (Partial)" mode to check file integrity, this value indicates the interval at which bytes will be checked in the file. For example, if it is set to 4MB, it will first check bytes at offset 0. then 4096000, then 8192000, etc.... |
| unlimited.fc.partialmd5.checkLength | HotFolder | 10240 | Valid integer value | When using "Verify After (Partial)" mode to check file integrity, this value indicates how many bytes to check at each interval when performing the MD5 calculation. |
| unlimited.fc.postURL.encodeAllPathsParameter | HotFolder, TransferAgent, Server | false | true, false | A system property that allows the FileCatalyst application to URL encode the "allFiles" parameter that is sent to web applications when performing HTTP based Post URL operations. If the value is set to false, the "allFiles" parameter will be non-encoded and will contain the raw text of all files that were transferred. If the value is set to true, each file in the "allFiles" parameter will be URL encoded in the same manner as the remote paths and local paths parameters. |
| unlimited.fc.preallocation | HotFolder, Server | false | true, false | FileCatalyst does not pre-allocate files to their full size when transferring. It relies on the underlying file system to optimize file write operations. If you wish to pre-allocation the entire file, set this value to true. |
| unlimited.fc.progressiveDelayBeforeAppending | HotFolder | 0 | Delay value, in seconds | When performing an advanced progressive transfer, if this value is set, after each progressive append the transfer will delay X seconds to allow more growth before continuing with another append. |
| unlimited.fc.remoteSynchSafeMode | HotFolder | false | true, false | For multi-client only, when "Delete files on destination not existing on source" is enabled. Will only delete files after successful transfer, if a single file fails to transfer, the feature will not trigger. |
| unlimited.fc.showHiddenFiles | HotFolder, Server, Transfer Agent,Express | false | true, false | FileCatalyst has the ability to toggle hidden files as a system property so that customers can modify behaviour based on their needs. By default, value is set to false (we hide hidden files). |
| unlimited.fc.shutdownStateEmailRecipient | HotFolder | blank | email address | If an email address is provided, the HotFolder will attempt to use configured sites to send an email to that address with the details of the shutdown. It will stop after the first success. |
| unlimited.fc.shutdownStateEmailRecipient.FileListSize | HotFolder | 0 | positive integer | If the shutdown email service has been enabled with an address, setting this value to a positive number will include this many files from any active transfer's file listing. Multi-Client will limit this list to unsent files, but the Single-Client will take names from the set of all files reached by the transfer. |
| unlimited.fc.streaming.maxSortBuffer | HotFolder | 10000 | positive integer | Defines the sorted buffer size while maintaining transfer priority. The larger the buffer, the better the priority sorting, but the lower the performance. |
| unlimited.fc.transferCacheThreshold | HotFolder | 0 | Positive millisecond value | When comparing time stamps for the Transfer Cache feature, using certain combinations of Java, File System and OS, the time stamp granularity may be inconsistent. Some platforms return 1 second granularity, whereas others return millisecond granularity. This can result in the transfer cache reporting a file has changed when it has not. Setting this value allows you to compensate for these differences. For example, if you set this property to 1000, then the time stamp of the file may differ by +/- 1 second and still be considered unchanged. |
| unlimited.fc.udpbuffersize | HotFolder, Server | 32768000 (default 8388608 if AIX detected) | Integer value, in bytes |
Sets the UDP socket buffer for sender/receiver, in bytes.
Java8 API description ReceiveBufferSize Java8 API description SendBufferSize Value is normally overridden by operating system settings to be smaller. IBM JVM on AIX only allows buffer sizes of 1MB, 4MB, and 8MB. It is important to match these up with values on the OS level. See support knowledge base article for details. |
| unlimited.fc.use.fast.md5 | Server, HotFolder, Central, TransferAgent | true | true,false | When attempting to verify the integrity of a given transfer, an MD5 checksum is calculated for both the source and destination files. If this property is enabled when the MD5 is generated, the application will use an MD5 implementation that is usually much faster than standard Java-based implementations. If this property is disabled when the MD5 is created, then a slower MD5 generation algorithm will be used to generate the MD5 checksums. |
| unlimited.fc.verifySizeAfterTransfer | HotFolder | false | true, false | If set to true, upon completion of a transfer, the size of the source and destination file will be compared. The transfer will fail if the size does not match. |
| unlimited.fc.waitForSourceFileToBeStatic | HotFolder | 0 | Integer, time value in seconds | This value if set, will not transfer a file unless it has been static for up to X seconds. Must also set "unlimited.fc.waitForSourceFileToBeStaticFilter" for this feature to work. |
| unlimited.fc.waitForSourceFileToBeStaticFilter | HotFolder | blank | String value of file filter, ie: *.mxf | When set, will apply the "unlimited.fc.waitForSourceFileToBeStatic" only to files that match the specified include filter. This is GLOBAL, meaning it affects all tasks. Default is blank. If you are using the dynamic files feature "Wait for file growth to cease" is being used in a task, using the same file filters in this feature would cause the matched files to wait the sum of both configured delays. |
SSL Cipher Restrictions
FileCatalyst HotFolder allows the selection of specific SSL ciphers which are considered appropriate for encrypted communication. By default, the entire Java SSL/TLS set is utilized. To modify the default values (example: enforce a minimum 128-bit encryption cipher), manual configurations may applied to fchf.conf.
The following steps illustrate how to configure so that only strong ciphers are utilized:
- Shutdown FileCatalyst HotFolder: As this is a manual fchf.conf file modification, the HotFolder must be shutdown before changes can be made to the server.
- Restrict the Cipher List: The following lines should be added onto
the fchf.conf file to restrict ciphers:
## SSL Cipher restriction
# By default, accepted SSL ciphers are specified as part of the standard Java JRE.
# These can be modified to exclude less secure ciphers.
FC.HotFolder.config.ssl.restrict.ciphers=true
- Restart the HotFolder & Verify Logs for Supported Ciphers: Because
there is no specific cipher list defined yet in fchf.conf,
the HotFolder will recognize the lack of allowed encryption
algorithm and immediately shut down. By examining the HotFolder logs, the complete list of
supported ciphers for the platform is listed.
The following is an example captured using Amazon Corretto OpenJDK version 1.8.0_242 on Windows Server 2019 Standard.
Thu Mar 26 14:34:03 EDT 2020 - System: Windows Server 2019 10.0 amd64 - Java(tm) OpenJDK 64-Bit Server VM 1.8.0_242
Thu Mar 26 14:34:04 EDT 2020 - Waiting for SSL Context to initialize...
Thu Mar 26 14:34:04 EDT 2020 - SSL Context initialized.
Thu Mar 26 14:34:04 EDT 2020 - No ciphers listed are currently supported by the JVM.  Please revise the allowable ciphers in the configuration.
Thu Mar 26 14:34:04 EDT 2020 - Available SSL cipher supported by JVM: (0) TLS_ECDHE_ECDSA_WITH_AES_256_CBC_SHA384
Thu Mar 26 14:34:04 EDT 2020 - Available SSL cipher supported by JVM: (1) TLS_ECDHE_RSA_WITH_AES_256_CBC_SHA384
Thu Mar 26 14:34:04 EDT 2020 - Available SSL cipher supported by JVM: (2) TLS_RSA_WITH_AES_256_CBC_SHA256
Thu Mar 26 14:34:04 EDT 2020 - Available SSL cipher supported by JVM: (3) TLS_ECDH_ECDSA_WITH_AES_256_CBC_SHA384
Thu Mar 26 14:34:04 EDT 2020 - Available SSL cipher supported by JVM: (4) TLS_ECDH_RSA_WITH_AES_256_CBC_SHA384
Thu Mar 26 14:34:04 EDT 2020 - Available SSL cipher supported by JVM: (5) TLS_DHE_RSA_WITH_AES_256_CBC_SHA256
Thu Mar 26 14:34:04 EDT 2020 - Available SSL cipher supported by JVM: (6) TLS_DHE_DSS_WITH_AES_256_CBC_SHA256
Thu Mar 26 14:34:04 EDT 2020 - Available SSL cipher supported by JVM: (7) TLS_ECDHE_ECDSA_WITH_AES_256_CBC_SHA
Thu Mar 26 14:34:04 EDT 2020 - Available SSL cipher supported by JVM: (8) TLS_ECDHE_RSA_WITH_AES_256_CBC_SHA
Thu Mar 26 14:34:04 EDT 2020 - Available SSL cipher supported by JVM: (9) TLS_RSA_WITH_AES_256_CBC_SHA
Thu Mar 26 14:34:04 EDT 2020 - Available SSL cipher supported by JVM: (10) TLS_ECDH_ECDSA_WITH_AES_256_CBC_SHA
Thu Mar 26 14:34:04 EDT 2020 - Available SSL cipher supported by JVM: (11) TLS_ECDH_RSA_WITH_AES_256_CBC_SHA
Thu Mar 26 14:34:04 EDT 2020 - Available SSL cipher supported by JVM: (12) TLS_DHE_RSA_WITH_AES_256_CBC_SHA
Thu Mar 26 14:34:04 EDT 2020 - Available SSL cipher supported by JVM: (13) TLS_DHE_DSS_WITH_AES_256_CBC_SHA
Thu Mar 26 14:34:04 EDT 2020 - Available SSL cipher supported by JVM: (14) TLS_ECDHE_ECDSA_WITH_AES_128_CBC_SHA256
Thu Mar 26 14:34:04 EDT 2020 - Available SSL cipher supported by JVM: (15) TLS_ECDHE_RSA_WITH_AES_128_CBC_SHA256
Thu Mar 26 14:34:04 EDT 2020 - Available SSL cipher supported by JVM: (16) TLS_RSA_WITH_AES_128_CBC_SHA256
Thu Mar 26 14:34:04 EDT 2020 - Available SSL cipher supported by JVM: (17) TLS_ECDH_ECDSA_WITH_AES_128_CBC_SHA256
Thu Mar 26 14:34:04 EDT 2020 - Available SSL cipher supported by JVM: (18) TLS_ECDH_RSA_WITH_AES_128_CBC_SHA256
Thu Mar 26 14:34:04 EDT 2020 - Available SSL cipher supported by JVM: (19) TLS_DHE_RSA_WITH_AES_128_CBC_SHA256
Thu Mar 26 14:34:04 EDT 2020 - Available SSL cipher supported by JVM: (20) TLS_DHE_DSS_WITH_AES_128_CBC_SHA256
Thu Mar 26 14:34:04 EDT 2020 - Available SSL cipher supported by JVM: (21) TLS_ECDHE_ECDSA_WITH_AES_128_CBC_SHA
Thu Mar 26 14:34:04 EDT 2020 - Available SSL cipher supported by JVM: (22) TLS_ECDHE_RSA_WITH_AES_128_CBC_SHA
Thu Mar 26 14:34:04 EDT 2020 - Available SSL cipher supported by JVM: (23) TLS_RSA_WITH_AES_128_CBC_SHA
Thu Mar 26 14:34:04 EDT 2020 - Available SSL cipher supported by JVM: (24) TLS_ECDH_ECDSA_WITH_AES_128_CBC_SHA
Thu Mar 26 14:34:04 EDT 2020 - Available SSL cipher supported by JVM: (25) TLS_ECDH_RSA_WITH_AES_128_CBC_SHA
Thu Mar 26 14:34:04 EDT 2020 - Available SSL cipher supported by JVM: (26) TLS_DHE_RSA_WITH_AES_128_CBC_SHA
Thu Mar 26 14:34:04 EDT 2020 - Available SSL cipher supported by JVM: (27) TLS_DHE_DSS_WITH_AES_128_CBC_SHA
Thu Mar 26 14:34:04 EDT 2020 - Available SSL cipher supported by JVM: (28) TLS_ECDHE_ECDSA_WITH_AES_256_GCM_SHA384
Thu Mar 26 14:34:04 EDT 2020 - Available SSL cipher supported by JVM: (29) TLS_ECDHE_ECDSA_WITH_AES_128_GCM_SHA256
Thu Mar 26 14:34:04 EDT 2020 - Available SSL cipher supported by JVM: (30) TLS_ECDHE_RSA_WITH_AES_256_GCM_SHA384
Thu Mar 26 14:34:04 EDT 2020 - Available SSL cipher supported by JVM: (31) TLS_RSA_WITH_AES_256_GCM_SHA384
Thu Mar 26 14:34:04 EDT 2020 - Available SSL cipher supported by JVM: (32) TLS_ECDH_ECDSA_WITH_AES_256_GCM_SHA384
Thu Mar 26 14:34:04 EDT 2020 - Available SSL cipher supported by JVM: (33) TLS_ECDH_RSA_WITH_AES_256_GCM_SHA384
Thu Mar 26 14:34:04 EDT 2020 - Available SSL cipher supported by JVM: (34) TLS_DHE_RSA_WITH_AES_256_GCM_SHA384
Thu Mar 26 14:34:04 EDT 2020 - Available SSL cipher supported by JVM: (35) TLS_DHE_DSS_WITH_AES_256_GCM_SHA384
Thu Mar 26 14:34:04 EDT 2020 - Available SSL cipher supported by JVM: (36) TLS_ECDHE_RSA_WITH_AES_128_GCM_SHA256
Thu Mar 26 14:34:04 EDT 2020 - Available SSL cipher supported by JVM: (37) TLS_RSA_WITH_AES_128_GCM_SHA256
Thu Mar 26 14:34:04 EDT 2020 - Available SSL cipher supported by JVM: (38) TLS_ECDH_ECDSA_WITH_AES_128_GCM_SHA256
Thu Mar 26 14:34:04 EDT 2020 - Available SSL cipher supported by JVM: (39) TLS_ECDH_RSA_WITH_AES_128_GCM_SHA256
Thu Mar 26 14:34:04 EDT 2020 - Available SSL cipher supported by JVM: (40) TLS_DHE_RSA_WITH_AES_128_GCM_SHA256
Thu Mar 26 14:34:04 EDT 2020 - Available SSL cipher supported by JVM: (41) TLS_DHE_DSS_WITH_AES_128_GCM_SHA256
Thu Mar 26 14:34:04 EDT 2020 - Available SSL cipher supported by JVM: (42) TLS_ECDHE_ECDSA_WITH_3DES_EDE_CBC_SHA
Thu Mar 26 14:34:04 EDT 2020 - Available SSL cipher supported by JVM: (43) TLS_ECDHE_RSA_WITH_3DES_EDE_CBC_SHA
Thu Mar 26 14:34:04 EDT 2020 - Available SSL cipher supported by JVM: (44) SSL_RSA_WITH_3DES_EDE_CBC_SHA
Thu Mar 26 14:34:04 EDT 2020 - Available SSL cipher supported by JVM: (45) TLS_ECDH_ECDSA_WITH_3DES_EDE_CBC_SHA
Thu Mar 26 14:34:04 EDT 2020 - Available SSL cipher supported by JVM: (46) TLS_ECDH_RSA_WITH_3DES_EDE_CBC_SHA
Thu Mar 26 14:34:04 EDT 2020 - Available SSL cipher supported by JVM: (47) SSL_DHE_RSA_WITH_3DES_EDE_CBC_SHA
Thu Mar 26 14:34:04 EDT 2020 - Available SSL cipher supported by JVM: (48) SSL_DHE_DSS_WITH_3DES_EDE_CBC_SHA
Thu Mar 26 14:34:04 EDT 2020 - Available SSL cipher supported by JVM: (49) TLS_EMPTY_RENEGOTIATION_INFO_SCSV
Thu Mar 26 14:34:04 EDT 2020 - Available SSL cipher supported by JVM: (50) TLS_KRB5_WITH_3DES_EDE_CBC_SHA
Thu Mar 26 14:34:04 EDT 2020 - Available SSL cipher supported by JVM: (51) TLS_KRB5_WITH_3DES_EDE_CBC_MD5
Thu Mar 26 14:34:04 EDT 2020 - null
Thu Mar 26 14:34:04 EDT 2020 - HotFolder shutting down
- Enable Cipher List on the HotFolder: There are multiple on-line forums
describing the exact makeup of each cipher. In the case where
only strong ciphers are required (encryption levels >= 128 bit), the following lines
are entered into fchf.conf. Only these specific ciphers will be used by the application
server socket. If clients connecting does not have a match, the connection will be logged
and dropped.
# If the restrict.cipher == true, you must supply a list of acceptable ciphers
# the application can utilize when opening up SSL server sockets.
# Each cipher listed should have a unique number assigned (start with ".00"), with the preferred
# cipher set to the lowest numerical value.
FC.HotFolder.config.ssl.allowed.ciphers.00=SSL_RSA_WITH_RC4_128_MD5
FC.HotFolder.config.ssl.allowed.ciphers.01=SSL_RSA_WITH_RC4_128_SHA
FC.HotFolder.config.ssl.allowed.ciphers.02=TLS_RSA_WITH_AES_128_CBC_SHA
FC.HotFolder.config.ssl.allowed.ciphers.03=TLS_DHE_RSA_WITH_AES_128_CBC_SHA
FC.HotFolder.config.ssl.allowed.ciphers.04=TLS_DHE_DSS_WITH_AES_128_CBC_SHA
FC.HotFolder.config.ssl.allowed.ciphers.05=SSL_RSA_WITH_3DES_EDE_CBC_SHA
FC.HotFolder.config.ssl.allowed.ciphers.06=SSL_DHE_RSA_WITH_3DES_EDE_CBC_SHA
FC.HotFolder.config.ssl.allowed.ciphers.07=SSL_DHE_DSS_WITH_3DES_EDE_CBC_SHA
- Restart the HotFolder and Verify HotFolder Logs If SSL ciphers are
restricted, server logs provide a list of ciphers enabled.
Mon Sep 21 15:23:44 EDT 2009 - Initializing SSL Administrative Socket on port 12680
Mon Sep 21 15:23:45 EDT 2009 - SSL ciphers restricted by configuration.
Mon Sep 21 15:23:45 EDT 2009 - SSL cipher enabled: (0) SSL_RSA_WITH_RC4_128_MD5
Mon Sep 21 15:23:45 EDT 2009 - SSL cipher enabled: (1) SSL_RSA_WITH_RC4_128_SHA
Mon Sep 21 15:23:45 EDT 2009 - SSL cipher enabled: (2) TLS_RSA_WITH_AES_128_CBC_SHA
Mon Sep 21 15:23:45 EDT 2009 - SSL cipher enabled: (3) TLS_DHE_RSA_WITH_AES_128_CBC_SHA
Mon Sep 21 15:23:45 EDT 2009 - SSL cipher enabled: (4) TLS_DHE_DSS_WITH_AES_128_CBC_SHA
Mon Sep 21 15:23:45 EDT 2009 - SSL cipher enabled: (5) SSL_RSA_WITH_3DES_EDE_CBC_SHA
Mon Sep 21 15:23:45 EDT 2009 - SSL cipher enabled: (6) SSL_DHE_RSA_WITH_3DES_EDE_CBC_SHA
Mon Sep 21 15:23:45 EDT 2009 - SSL cipher enabled: (7) SSL_DHE_DSS_WITH_3DES_EDE_CBC_SHA
Current Activity
Overview
For any given task in the Scheduler view, you may either select and click the “Activity” button, or right-click and select “View Activity”. This will open a separate window containing transfer statistics and logs for the task.
Different views are provided based on if your transfer is utilizing a single client connection (default) or if you are using multi-client connections for transfers.
Transfer Usage (single client)

This graph indicates the task's data transfer rates. The red line indicates the current network transfer rate, the green line represents the current goodput, and the blue line shows the average goodput. The term “goodput” refers to the effective rate, taking data minimization (eg. compression) into account.
Progress (all files)
A progress bar indicating the percentage complete of all files in this task. Progress is also represented numerically to the right of the bar.
Progress (current file)
A progress bar indicating the percentage complete of the current file. Progress is also represented numerically to the right of the bar.
Time Elapsed
How long the transfers have taken so far.
ETA (all files)
The approximate time remaining for the transfer of all files in this task.
ETA (current file)
The approximate time remaining for the current file.
Filename
The current file being transferred/verified. The current file number of the total transfer batch is shown in parentheses.
Transfer Rate
If a transfer is currently in progress, this will show you the average transfer rate in Kbps.
Current RTT
Latency observed on the link (round trip time, in ms)
Packet Loss
The current file being transferred/verified. The current file number of the total transfer batch is shown in parentheses.
Visualization View
This window presents statistics to the internal resources used by FileCatalyst during transfer.
Statistics are divided broken up into the following main data:
- Reader: Resources (threads) reading block of data from the disk for specified transfer.
- MD5: Resources performing MD5 on-the-fly on data blocks. Visible only if MD5-on-the-fly is enabled and is hidden until data is available.
- Zip: Resources performing compression (zip) on data blocks. Visible only if compression is enabled and is hidden until data is available.
- Sender: Resources (threads) sending data out onto the network. Sender threads currently also provide MD5 and compression of data blocks before sending data out.
- Receiver: Resources (threads) reading data packets from network sockets.
- Processor: Resources (threads) processing data (AES decryption) and placing them in buffers.
- Unzip: Resources (threads) unzipping blocks of data. Visible only if compression is enabled.
- MD5: Resources (threads) validating MD5 checksums on data blocks. Visible only if MD5-on-the-fly is enabled.
- Writer: Resources (threads) writing data blocks to disk.
- Usage: How many threads are dedicated to this process are in parenthesis. Value of 0.05 (seen for avg reader) indicates thread is only reading data 5% of the time.
- Speed: How fast is each process able to handle data in the queue. Scale will vary from Kbps, Mbps, Gbps based on highest throughput value.
- Ratio: Found only for zip process, how much compression ZIP algorithm is increasing performance (1:30 indicates 30x compression gain).
- now: Indicates the current value.
- avg: The average value for this transfer.
- pk: The peak value for this transfer.
Note: Receiver usage levels are normally close to full as most JVMs do not allow us to determine how much time is spent in a locked read state (waiting for data to come on the wire) as opposed to processing data off the socket layer.
Note: Values turn red when over 100% of utilization of threads. Time slicing on various operating systems however can provide inaccurate values (usage over 1 even if only 1 thread is available).
Transfer Usage (Multi-Client)
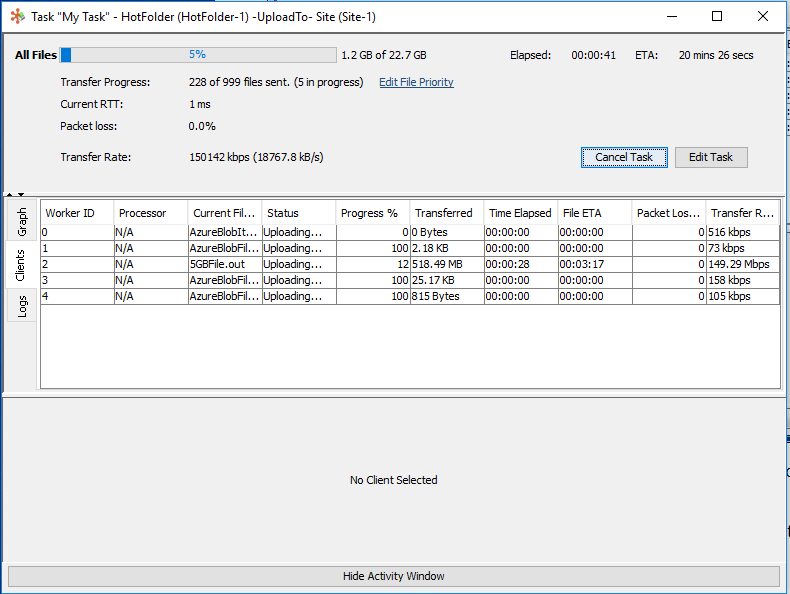
The multi-client transfer activity window has the following Task level controls.
Execute/Cancel Task
Clicking this button will either start the task manually or cancel the task if it is running. The button text alternates accordingly.
Edit Task
Clicking this button will open the task editor.
Edit File Priority
Clicking this button will open the "Increase File Priority" dialog:

The "Increase File Priority" dialog shows up to 100 files currently queued up but not actively transferring. Selecting a file and pressing "Increase Priority of Selected File" will guarantee that it is picked up by the next available transfer client. Entries with their priorities "advanced" in this way are shown in bold. Use the search field above the entries to narrow your search results (up to 100 entries).
Compiled Statistics
The multi-client transfer activity window contains 3 tabs with the compiled statistics of all active clients currently transferring files.
Graph
Contains a visual representation of the current throughput of all clients combined.
Clients
Contains table data of each active client (clients without files to transfer are not shown). Selecting a specific client allows more information to be visible in the lower pane. Most of the column values should be self evident. For clarification, the Process column contains the current pre or post processor (if any) currently operating on the file.
Logs
Contains combined log files of all clients for the given task.
Actions
Start Transfer
To manually start a transfer, select the Schedule option from the left-hand menu and select the task you wish to execute. Using the right mouse button, select this task and click the “Execute Task” option.
Pause/Resume Scheduler
Allows you to pause or resume scheduler. When the HotFolder is Paused, the menu item will change to Resume, and vice versa. This will not cancel the existing transfer, but will prevent the scheduler from starting up new transfers. To cancel the current transfer, press the Cancel button.
Running at Startup
Windows
FileCatalyst HotFolder can be configured to run as a service. Clicking the File menu option Run at Startup will install the FileCatalyst HotFolder as a service. On next startup, FileCatalyst HotFolder will start automatically. When run as a service, upon restarting the server, the administration will not be available through a Graphical User Interface (GUI). In order to use a GUI the application will need to be accessed via either the HTTP Web Admin or the HotFolder Remote Administration tool.
Mac OSX
Note:Mac service installation is only available on 64-bit Mac OSX. Installation on a 32-bit OSX machine will provide you with a warning about not being able to run on an Intel-based MAC (the error is actually due to the OS trying to load a 64-bit native preference library in a 32-bit system).
To install the application as a service on Mac OSX, you will need to open up the System Preference
window.
Under the "Other" group, select the FileCatalyst HotFolder icon.

Enabling the checkbox to run as a service will prompt for your login
password to verify your actions. Afterwards, the service will startup
when the machine boots up.

Note: Configuration files for service are under:
while running the HotFolder standalone (not as a service) stores files in:"/Library/Application Support/FileCatalyst/HotFolder/"
"/Users/<username>/Library/Application Support/FileCatalyst/HotFolder/"
Administrators should be aware that switching between running as a service and running stand-alone may result in different configuration files being accessed by the HotFolder application.
In addition, when running as a service on macOS, the application will have different access permissions. It may be necessary to enable Full Disk Access for the application in the security settings if you are having issues.
Linux, Solaris, AIX
Installation on Linux or Solaris follows the same commands. More information can be had by looking at the files included in the tar bundle: ./README and ./service_wrapper/SERVICE_WRAPPER_README
Note: Ubuntu servers require additional packages installed. Please refer to the packaged SERVICE_WRAPPER_README files for details.
- FIRST STEPS: Install application, install license, enable remote administration
- Create application folder: /opt/utechsoft/hotfolder/
- Download FileCatalyst HotFolder(Unix GZip/TAR bundle)
- Unzip/Untar bundle
cd /opt/utechsoft/hotfolder
gunzip ./fc_hotfolder.tar.gz
tar -xvf ./fc_hotfolder.tar
- Edit fchf.conf, enter in licensing information if required.
- Enable remote administration on the HotFolder.
./jre/bin/java -jar FileCatalystHotFolder.jar -setadmin
- CONFIGURE application to run as a run-time daemon
- Run the following commands as the root user to install the service:
sudo su -
cd /opt/utechsoft/hotfolder/service_wrapper
chmod +x *.sh
- Edit the fc_env file if necessary (installation directory, java path, etc)
- Install the service
./install.sh
- Run the following commands as the root user to install the service:
- At this point, you should be able to start the service. You can now login using the HotFolderRemoteAdmin to configure the application.
- Logs can be examined in /opt/utechsoft/hotfolder/wrapper.log
Uninstallation can be done by running the /opt/utechsoft/hotfolder/service_wrapper/uninstall.sh script as the root user.
Performance Tuning
The FileCatalyst Performance Tuning documentation can be found here
Administration Via Command Line
Enabling remote admin
Remote Admin is stand alone application that can run on a machine that has GUI or XWindows and can connect to either a FileCatalyst HotFolder running on a headless Linux machine or to manage a FileCatalyst HotFolder service. To enable remote admin, you must edit fchf.conf, and enable the following settings:
        			FC.hotfolder.config.admin.enable=true

					FC.hotfolder.config.admin.passwordrequired=false

					FC.hotfolder.config.admin.port=12505

					FC.hotfolder.config.admin.user=admin

					FC.hotfolder.config.admin.passwd=
To change the remote administration password, run the following command:
./jre/bin/java -jar FileCatalystHotFolder.jar -passwdadmin
Command Line Usage
Command-line usage for FileCatalyst HotFolder

Usage:

  ./jre/bin/java -jar FileCatalystHotFolder.jar [COMMANDS] [options]


HELP COMMANDS:

  -help                           --> prints this help to console

  -version                        --> prints out the Version number


OPTIONS:

  -systray                        --> Launches the HotFolder Remote Admin GUI in addition to the HotFolder.

  -reinitialize                   --> Ask the HotFolder to re-initialize config data

  -fconfig <path>                 --> Specify alternate configuration (fchf.conf, etc) path

  -webroot <root www folder>      --> Specify alternate webroot path to use at run-time


ADDITIONAL COMMANDS:

  -shutdown                       --> Asks a running FileCatalyst HotFolder to shut down

  -diagnostic                     --> Asks a running FileCatalyst HotFolder do generate a diagnostic report


INTERACTIVE COMMANDS:

  The following commands prompts the user for more input to perform actions.

  FileCatalyst HotFolder  should be shut down first before running.


  -passwdadmin                    --> Force HF GUI to require user password

  -setadmin                       --> Set remote administration parameters for HotFolder

  -testIO                         --> Execute a write IO test for the HotFolder

  -testReadIO                     --> Execute a read IO test for the HotFolder
Firewall Setup
Configuring for the Control Connection
In all but the strictest of environments, the client side's firewall does NOT need to be configured. If your environment has outgoing TCP blocked (extremely rare), the IT department will need to allow outgoing TCP connections on port 21, or whatever other port has been set as the server listen port in the server configuration. You can test connection by clicking the "Test settings" button.
Configuring for the Data Connections
Again, client-side firewall configuration is rare. In the "Transfer Options" tab of the Task Edit view, incoming UDP is set to port "0", which is an alias for "passive". In other words, HotFolder will tell FileCatalyst Server which port to use in order to make the data connection. The most common scenario requiring firewall configuration is UDP-based download. If the client-side is failing on UDP download, the next step is to specify a data port. In the "Transfer Options" tab, specify an arbitrary available port.
Security Settings
Setting Encryption Method
In order to help keep sensitive configuration information secure, the application encodes data in the settings files. The default setting may be overridden to use either a salted AES or a salted DES encryption. To set the value, you must edit your fchf.conf file. Find the line:
FC.hotfolder.config.encoding.format=DEFAULT
Changing the value of this setting to AES, DES, or DEFAULT will cause all encoded values to be re-encoded and saved with the new algorithm. If you are upgrading from a version where encoding did not take place, these values will be encoded and saved.
The default settings are:
FC.hotfolder.config.deployment.security.defaultTransport=TLSv1.3
FC.hotfolder.config.deployment.security.SSLv2Hello=true
FC.hotfolder.config.deployment.security.SSLv3=false
FC.hotfolder.config.deployment.security.TLSv1=false
FC.hotfolder.config.deployment.security.TLSv1.1=false
FC.hotfolder.config.deployment.security.TLSv1.2=true
FC.hotfolder.config.deployment.security.TLSv1.3=true
Supported protocols include:
- SSLv2Hello
- SSLv3
- TLSv1
- TLSv1.1
- TLSv1.2
- TLSv1.3
REST Services
Enabling REST services
HotFolder is capable of accepting REST service calls in order to configure and control the HotFolder. REST services are required and automatically enabled when you connect the HotFolder to be managed by FileCatalyst Central, but may also be used to build a remote control application external to the HotFolder.
To manually enable REST services, you need to allow web access (see Administration tab). This will open up the web server port (default 12580), and allow access to REST services.
REST services security
All REST services require user authentication to run them. User credentials are passed in using HTTP headers. There are two ways to pass in user credentials.
-
Using the RESTAuthorization header.
This HTTP header can be used to pass in user credentials. The user credentials are Base 64 encoded and follow the following format: username:password
JSON Example assuming the administration username and password is admin:system
                    URL: http://localhost:12580/rs/sites


                    Method: GET


                    Accept: application/json


                    RESTAuthorization: YWRtaW46c3lzdGVt
Returned JSON:
{"site":[...]} -
Using the RESTSessionSecret header
This is the more secured (and recommended) version for using the REST services. At least one call needs to be called using the above mentioned HTTP Header (RESTAuthorization). A POST call to the /rs/AuthorizationSession REST service with the above header and the user credentials in the data content is required to get back a session secret. Once the session secret is known, it can then be used for all subsequent calls using the RESTSessionSecret header. The session secret will be valid for as long as the session stays alive on the server.
JSON Example assuming username/password is admin/system:
URL: http://localhost:12580/rs/AuthorizationSessionReturned JSON:
Method: POST
Accept: application/json
Content-Type: application/json
RESTAuthorization: YWRtaW46c3lzdGVt
Content:
{"authorization":"YWRtaW46c3lzdGVt"}
{"sessionSecret":"644783159662526094"}
JSON Example using RESTSessionSecret:
                    URL: http://localhost:12580/rs/sites


                    Method: GET


                    Accept: application/json


                    RESTSessionSecret: 644783159662526094
Returned JSON:
{"site":[...]}
REST services documentation
Documentation on the REST services provided by the HotFolder application can be viewed here
Alternatively, the documentation may be downloaded from here
REST example using Swagger
In addition to the REST documentation, a web application built on the Swagger UI framework has been provided.
By using this application, you will be able to view all of the available REST services within the application, as well as examples of responses and requests that a particular call may produce or consume. In addition to these examples, the Swagger application supports the ability to configure REST call and make them directly against the application. Upon executing a REST call, the application will present you with the response for the call, as well as a small CURL example of the request that was made.
How to view the Swagger UI application
If you are viewing this document from a web-based connection, this application may be viewed by clicking here.
If you are viewing this document from a local connection, this application may be viewed at the following URL: http://{hotfolder.web.ip}:{hotfolder.web.port}/help/HotFolder/restDocs/ui/index.html
Frequently Asked Questions and Troubleshooting
1) When I click "Test settings" it says "Server settings are not correct or server is not accessible". What does this mean?
You should contact the server administrator to make sure the values you have entered are correct. Also ensure that the server is running.
2) When I click "Test settings" it says the server is configured properly, but I get errors when I try to transfer files.
The server is likely not configured properly, or there is a firewall blocking the UDP data connections. Your firewall or router must allow outgoing UDP traffic to allow FileCatalyst to function properly. It is also possible that the problem lies on the server. If the server firewall is not configured to allow incoming UDP, the transfer will fail. Another possibility is that the server disk is full, or it does not have the proper permissions to write files to disk. In any case, contact the server administrator and they can address this issue.
3) My files transfer properly, but my computer seems to be slow while a transfer is taking place, what can I do?
If you are running an older computer, the default settings may be too intensive. On the Bandwidth scheduler, you should try lowering the transfer rate. You should also consider decreasing the block size so FileCatalyst will use less memory.
4) No matter what I set the maximum transfer rate to, it never achieves the rate I set. Why?
There are a few reasons. First, your internet connection may not be fast enough to transfer at the rate you specified. Second, your computer may not be fast enough to encode at the specified rate. Third, the maximum rate you specify is ultimately dictated by the maximum rate for which FileCatalyst server is licensed. If the server is licensed for 5000 Kbps, then you will never be able to transfer faster than that until the server license is upgraded.
5) When I start a transfer my email and web browser run very slowly, what can I do to correct this issue?
FileCatalyst will transmit data at the maximum speed of your internet connection. If you wish to use other internet applications, you should determine the maximum rate of your connection, and set the Maximum transmit rate to a value lower than that of your internet connection. For example, most DSL or Cable connections are limited to uploads at 384 or 768 Kbps. If this is the case, you should limit uploads to 300 or 700 Kbps respectively, to allow the remaining bandwidth to be used by other applications. You can also enable Congestion Control, which will cause FileCatalyst to start transferring at a lower rate, and adjust based on other network traffic.
6) When I start a transfer my internet connection is lost, and I need to reset my router. Why is this happening?
If the value you have specified in the bandwidth scheduler is set higher than the speed of your internet connection, and you have not enabled congestion control, it is likely you will flood your router with packets it can not send. This may cause some routers to become inaccessible for a period of time until they can clear their packet queue and recover. To stop this from happening, ensure the rate specified in the bandwidth scheduler is not set higher than the available bandwidth, or make sure to enable congestion control.
7) I thought this was supposed to be faster than FTP?
FileCatalyst will be faster and more reliable than FTP on networks that have latency and/or packet loss. For FileCatalyst to be faster than FTP, in general you should be working with line speeds T1 with 300ms or more of latency, or T3 with 10ms or more of latency. In general the higher the bandwidth available, and the higher the latency and packet loss, the more you will see speed gains over FTP. For example, with a T3 line and 60ms latency, FileCatalyst would be roughly 10X faster (or more) than FTP. On an OC3 line, with 10ms of latency FileCatalyst will transfer 50X faster (or more) than FTP. If the TCP congestion window size is not set to its maximum (65536), speed gains will be even more pronounced. You can also set FileCatalyst to automatically detect which mode to transfer with, depending on network conditions.
8) Will a hub affect my performance?
Hubs are more susceptible to collisions at high speeds which will result in an additional packet loss. As you increase the unit size, the UDP packets FileCatalyst sends will no longer fit in an ether frame. The OS will fragment our Jumbo packets into many smaller fragmented packets that match the MTU of your network (usually 1500 bytes). Therefore the larger the packet, the more pieces it is broken into.
9) Are there additional bottlenecks that I should be aware of?
If your connection speed is 100 Mbps and FileCatalyst server is storing data to network storage on a 100Mbps or lower switch, this will cause FC to compete with itself for bandwidth when receiving and writing. The transfer rate using this network topology would be approximately 50Mbps or lower.
Performance may be further affected if you are connected to a 100 Mbps or lower hub as this is a potential source of packet loss due to congestion. If replacing the hub with a fast switch is not an option, do not attempt to send at the full capacity of the hub with a larger unit size than 1024 or significant performance degradation could occur.
10) I am experiencing poor performance on my ATM network when I increase the packet size.
ATM has a 64 byte native cell size. The cell is ATM's version of a packet. While there are various adoption layers (like AAL5) that aggregate multiple cells into, say, a larger IP packet, these adoption layers all rely on the underlying 64 byte cells.
The problem here is that if any of the 64 byte cells in, for instance, your 32768 byte packet are lost, then it's the same as if EVERY cell in the 32768 byte packet is lost. Consider this: if your ATM cell loss is above 64/32768 (or about 0.2%) then you'll have 100% loss of these 32768 byte jumbo frames. Use a packet size that is a good balance not just for the first hop in your network, but for the smallest fragment size in your network, when looked at end-to-end. Consider using 1472 byte or smaller packet, so that modest ATM cell loss doesn't discard huge numbers of packets.
11) I have Oracle or Multiple Java Virtual Machines Installed, and Starting as a Service is Not Working
For users who have Oracle installed, an older JRE may be in front of the newer FileCatalyst JRE in the path after an install of the Oracle Run-Time client. To correct this error: reset the path in Windows to the newer JRE to be in front of the Oracle one and reboot.
12) I've enabled FileCatalyst HotFolder to run at startup, but no icon appears in the system tray.
When running as a service, the tray icon will appear after the HotFolder Administrator is run. You can confirm you're running as a service in Windows by going to Control Panel-->Admin Tools -->Services. You can then start HotFolder Administrator by going to Start-->All Programs-->FileCatalyst HotFolder Administrator.
On Mac, you can start as a service by clicking on the HotFolder icon in system preferences. Then, click on the start FileCatalyst button. HotFolder Administrator could then be invoked through Applications.
13) I cannot see mapped network drives while running Windows 8 or higher
Windows machines which have mapped network drives may not being visible to the HotFolder due to Microsoft's implementation of User Access Control (UAC) starting with Windows Vista.
There are examples online on how to disable this or set the system to allow drives to be visible to services.
To implement a workaround:
- Unzip the file enablelinkedconnections.zip in the application directory (C:\Program Files\FileCatalyst HotFolder\)
- Run the registry entry enablelinkedconnections.reg to enable the HotFolder to see mapped network drives.
- A reboot will be required for this to take effect
- To uninstall, run the undo.reg the same way as enablelinkedconnections.reg, a restart is also required on uninstall
14) Where are my logs?
On Window or Linux, the logs can be found in the logs directory in the application's install directory. On OS X, the logs will be found in logs folder of the appropriate application foder in "Library/Application Support/FileCatalyst" for the user running the application, or in the root library if the application is being run as a service. The path to the logs can also be found in the configuration file as log.location.
About FileCatalyst
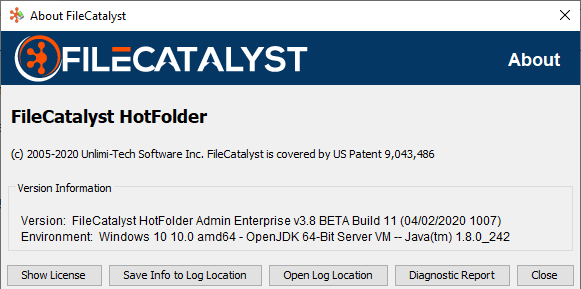
Save Info to Log Location
This will gather some basic info about your application version, Java version and OS
Diagnostic Report
The Diagnostic Report button collects state, logs, and configuration information about your application that will be useful to FileCatalyst engineers for analysis and troubleshooting. The information is assembled into a zip archive under the diagnostics subfolder of your application installation directory, from where it can be forwarded to the FileCatalyst support team if desired.
Generating diagnostics is a background activity, there will be limited visual feedback to the user when the Diagnostic Report button is pressed, and regular product usage can be resumed immediately. The diagnostics archive can take a few minutes to generate, depending on how busy the product is with other operations. In order to keep times short and the resulting zip file small, the logs are filtered based on time and size. Some temporary files may appear in the diagnostics folder during this time. When the archive is complete and ready to send, it will appear in the diagnostics folder with a name similar to "FileCatalyst<product>_<date×tamp>_diagnostics.zip".
Please login to the Support Portal (https://support.filecatalyst.com/) to submit a ticket and upload diagnostics and other relevant ticket files. If you already have a Ticket ID, you can also use Support2U (https://support2u.filecatalyst.com/) to send this diagnostics file directly.
Support
Support System
Visit our support website at https://support.filecatalyst.com to view the knowledge base and to submit a ticket (Available 24/7).
If you have already submitted a Ticket and would like to send us your case files please go to https://support2u.filecatalyst.com to upload them. A valid Ticket ID will be required.
Support Information
For support contact information, support hours and live chat: Visit our website at https://support.filecatalyst.com