Native HTTP Upload - User Guide
Introduction
FileCatalyst specializes in managed and accelerated file transfers, a process which uses user-installed tools such as FileCatalyst HotFolder or FileCatalyst TransferAgent. If you have need of acceleration or management, please contact your administrator to arrange obtaining these tools. If you need the simplicity of standard browser-based transfers, the HTTP Upload tool will allow you to transfer files to your FileCatalyst user account without acceleration.
servletLocation not set
If you see a warning that the "servletLocation" has not been set, the administrator has yet to supply one of the required parameters on their end. The upload utility will not function until this is resolved, and there is nothing you can do as an end-user other than contact the administrator to advise them of the error.
Credentials Management

Logging In
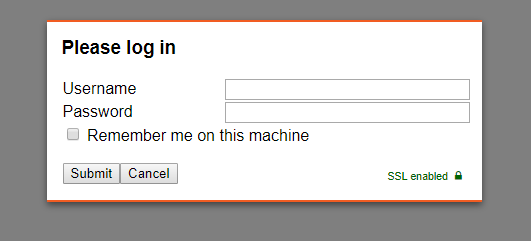
The log-in form shown above may have different fields from instance to instance, and in some cases the form may be bypassed altogether. If the form appears, complete any visible fields (usually just Username and Password) and click "Submit" in order to validate your user account and proceed to the upload area.
NOTE: here, as elsewhere in the application, the footer shows if SSL (Secure Socket Layer) is enabled or disabled. This refers to the connection between the browser and the servlet rather than from the servlet to the file server. The second of these is usually over a localhost connection (the servlet and server are already on the same machine), which is inherently contained and secure. If you have critical requirements and need to know the security level of the servlet-to-server connection, contact your administrator.
Remembering Credentials
When the credentials prompt is shown, the checkbox for "Remember me on this machine" will allow the user to save credentials to their machine. In other words, while using the same machine and browser, the user will no longer be prompted to log in.
Removing Saved Credentials
The footer of the application contains a "Logout" link. Clicking this link will clear any saved credentials and show the login dialog. Navigating away or closing the page will allow the credentials to persist.
Deferred Credential Check
In some cases, the administrator may have configured the application to defer the credential check. In this case, the dialog will not appear until you attempt an upload.
Using the Interface
Depending on your browser and the administrator's configuration, you will see one of two possible interfaces: a modern interface which supports multiple file selection as well as drag-and-drop; or an older "form upload" interface containing one or more "Browse" buttons, each able to select only one file at a time. By far, the most common interface will be the modern one.
Modern Interface
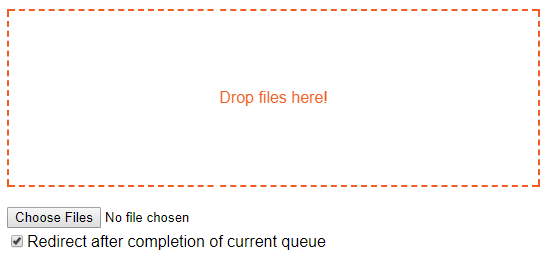
The modern interface initializes with a view similar to this:

File Selection
This interface supports selection in one of two ways:
- Drag-and-drop: The target area labeled "Drop files here!" allows you to drag one or more files from your file explorer into the browser. Upon "dropping" the files, the target area becomes a transfer queue, but remains active as a drop target.
- Native file explorer: click the "Choose Files" button below the drop target area in order to launch a new native file explorer, in which you may then navigate and choose one or more files. Upon "opening" the selected files, they will appear in the transfer queue area. Some browsers will also allow you drag and drop files from this explorer onto the drop target. Though, in Internet Explorer and Chrome, it is not supported.
Starting the Upload
Once files are added to the queue, a "Start Upload" button appears in the area below the queue. Click this button to begin the upload.
File Upload Progress
Once the file upload process is underway, more information will appear within the queue area. The file's progress bar will fill in as more of that file is uploaded. A full bar indicates that that file's data is completely uploaded to the server. To the right of the file name are useful statistics such as transfer rate, estimated time remaining, and the status of the transfer. A "cancel" button appears in the rightmost column.

Auto Redirect
Typically, you will be redirected to a useful summary or an additional process. If you do not wish to be redirected, you may uncheck the "Redirect after completion of current queue" checkbox.
Canceling Transfers
Once the file transfer process has started, an "X" icon appears at the right of each file's status row, allowing the user to cancel upload of that individual file. If the file was mid-transfer, its status will change to "canceled". Otherwise, the file will simply be removed from the list. To cancel ALL transfers, click the "Cancel" button below the "Choose Files" button.
Clearing the File Upload List
Click the "Clear Queue" button inside the queue area to reset the queue.
Form Upload Interface
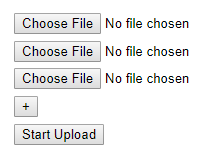
The "form upload" interface is more limited. Seeing this interface means that you are either using an older browser (in which case, updating to a new browser will give you the benefits of the modern interface) or the administrator has explicitly configured the tool to show only this interface. Depending on browser and other factors, the form upload interface will initialize with a view similar to this:

File Selection
A number of "Choose File" buttons are shown; each button, when clicked, allows you to select a single file for upload. You may add more if needed by clicking the "+" button.
Starting the Upload
As before, simply click the "Start Upload" button.
Progress and Cancelation
Once the upload process has started, the initial form will be replaced with a single progress bar and a Cancel button. The bar will update as the upload progresses. Once all files have been uploaded, the user will be redirected to an upload complete status page, as configured by the administrator.
If the user wishes to cancel the uploads, they can click the "Cancel" button in order to stop the upload process. The user will be redirected to a cancel page. Files that have completely uploaded will remain in the destination folder. Files that have not completely uploaded will remain in a partially-uploaded state in the destination folder.
Due to the limitations of this upload method, there is no way to cancel upload of individual files. Also, the cancellation may result in partial uploads being left on the server.
Auto Redirect
The auto redirect checkbox is not available on the form upload interface. If the administrator has enabled redirects, they will always occur for users of this interface.
General Redirect Information
The administrator may have configured one or more redirects which will occur on success, error, or cancelation of the transfer. These redirects often provide important feedback or additional functionality; as a general rule, you should allow the redirects. This ensures proper and expected execution of the web application.