Introduction
As of version 3.5, FileCatalyst Server supports the usage of External File Systems, or EFS. These file systems typically point at cloud based object stores, but could also point to locally hosted memory backed, encrypted, or compressed file systems. See "Supported File Systems" section for a list of file systems currently supported.
Supported File Systems
The following file system types are supported as of FileCatalyst v3.8
Adding new External File System (EFS)
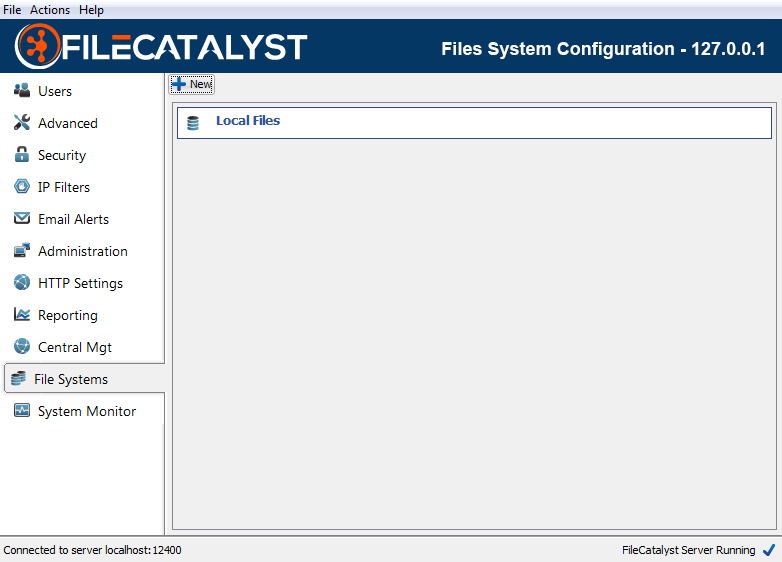
Selecting the File Systems tab will present a list of the currently configured file systems. If this is the first time this feature has been used, only one file system will be listed, "Local Files". This is a placeholder to represent the local file system on your server, and cannot be edited or deleted.
To create a new File System, click the "New" button. A new dialog will appear allowing you to select the Type, Username, Password, and Hostname for the new File System. The Type drop-down menu will be populated with all of the installed file system types.
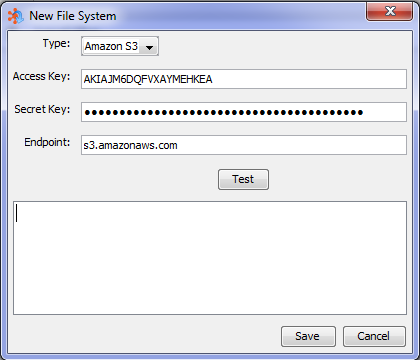
Depending on the Type of filesystem selected, the labels of the subsequent fields may change to "type specific" labels. Amazon S3 for example, uses the terms "Access key", "Secret Key" and "Endpoint" which map to "Username", "Password" and "Hostname" respectively.
Once the credentials have been populated, you may test the File System by clicking on the "Test" button. When the test is complete, you will either see a confirmation that the test passed, or a notification that it failed. In case of a failure, there will be a log message added to the dialog, that describes the error that occurred.
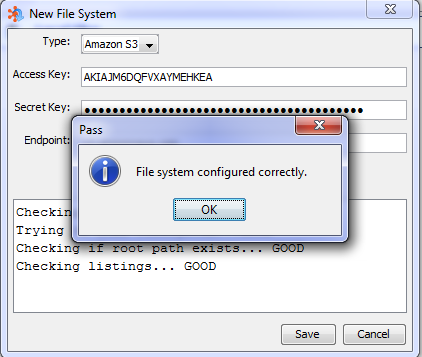
Once the File system test passes, click on the "Save" button. After the File System is saved it will appear in your list of configured file systems.
Note: File systems may still be saved even if the test fails. This is useful in scenarios where the file system may currently be offline, but will be online in the future.

Tip: Only one File System of each type may be defined at any one time. If you attempt to click the New button and all file system types have already been used, you will not be permitted to add another.
Once the newly created File System appears in the list, you may click Browse to list the contents of the file system, click Edit to modify its properties, click Delete to remove it from the list of configured systems, or click Test to retest connectivity to that file system.
If a file system is temporarily offline or is not configured correctly, it will be highlighted in red. If this occurs, click the Test button to see a log message that identifies potential issues. Additionally, if the server is connected to FileCatalyst Central, an alarm will be raised in Central immediately when a configured file system goes offline or is otherwise not accessible.
Assigning an EFS Directory as a User Home Directory
An EFS directory may be assigned as a user home directory. When the user connects, they will see the contents of the assigned directory as their root. As with a local file system, they will not be able to access any directories at a higher level than the directory assigned.
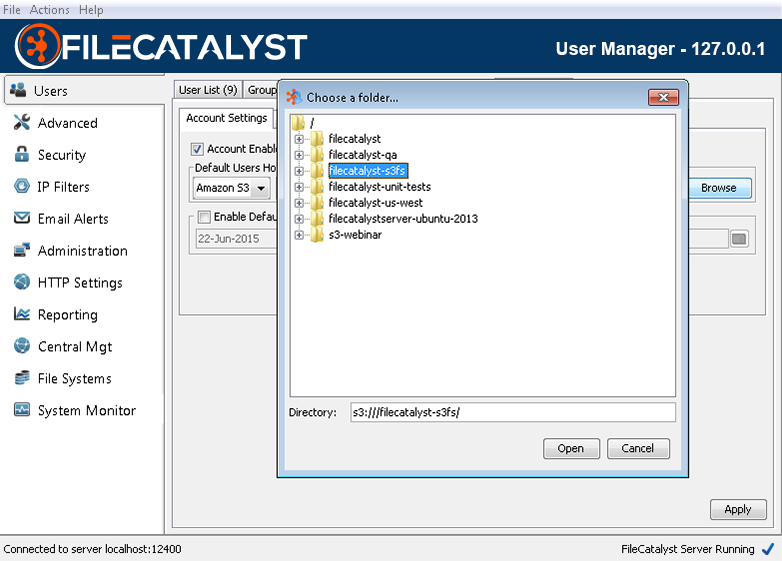
To set an EFS directory as a home directory, you first need to add the file system in question to the list of configured file systems. Once that is done, you will see some new file system options when you either create a new user or edit an existing user. When creating a new user, once you are prompted for the home directory, a file system drop down menu will appear next to the home directory text field. If you are editing an existing user, on the Account Settings tab, a file system drop down menu will appear next to the home directory text field.
Whether creating a new user or editing an existing one, select the desired EFS from the list, and then click the Browse button. Once you select the desired directory, click the Open button.
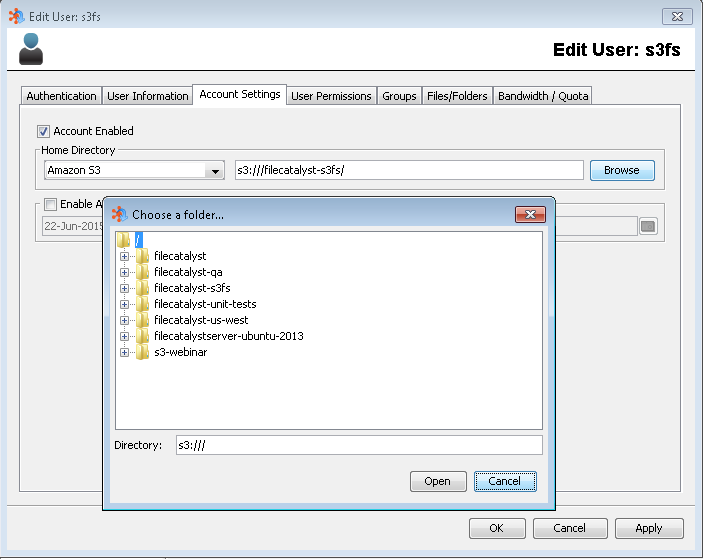
The selected value should now be populated in the Home Directory field. Click the "Apply" button to save the new user home directory.
In the event the file system to which the home directory is pointing becomes inaccessible, it will be highlighted in red. Additionally, if the server is connected to FileCatalyst Central, an alarm will be raised immediately when the home directory became unavailable.
Note: When creating or editing a user, you may enter the URL for the selected file system manually. If you left the "endpoint" blank when creating the external file system, then the path should be s3:///<path>. If an endpoint was used, then path should be s3://<hostname>/<path>
Assigning an EFS Resource as a Virtual File or Folder
An EFS resource may be assigned as a virtual file or folder. In turn, the virtual files and folders may be assigned to a group, or specific user. To do this, select the User tab on the left of the server admin, then select the "File/Folder List" tab. Click on the "New" button to create the new virtual file or folder.
The "Physical Path" section will have a drop-down menu that is populated with all of your defined external file systems. Select the desired file system from the list, and then click the "Browse" button.
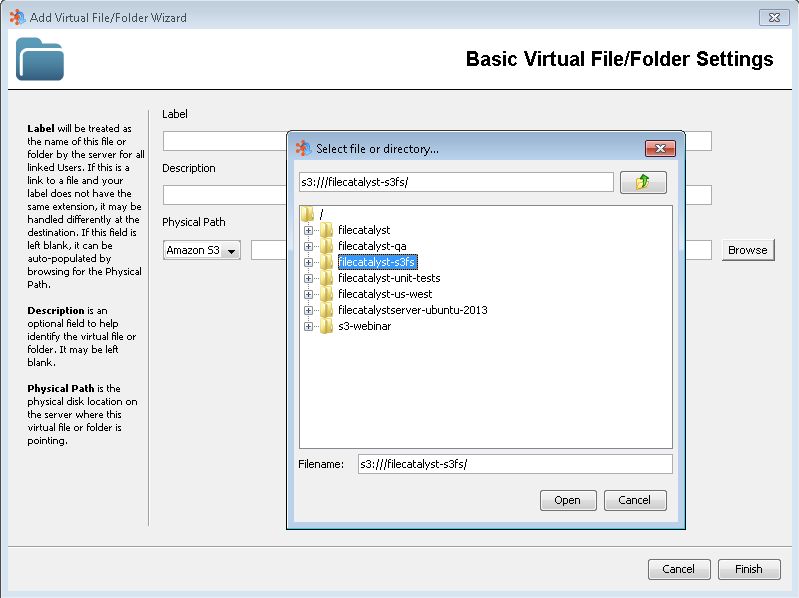
Once the desired file or folder is selected, click on the "Open" button. When the desired Label and Description have been set, click the "Finish" button. The newly created virtual file or folder will now appear in the list under the Files/Folders tab. It may be assigned just like any other virtual file or folder.
In the event the file system to which the virtual folder or file is pointing becomes inaccessible, it will be highlighted in red with the text "target does not exist". Additionally, if the server is connected to FileCatalyst Central, an alarm will be raised immediately when the virtual folder or file became unavailable.
Assigning an EFS Directory as the Default User Home Directory Root
An EFS directory may be defined as the default home directory root for your server. This will pre-populate the user home directory field with the EFS directory + the username (i.e. s3:///bucket/username) when creating new users. It also allows accounts to be auto-provisioned dynamically with home directories located on an EFS.
To assign an EFS directory as the user default home directory, select the User tab on the left of the server admin, then select the "User Defaults" tab. Under "Default Home Directory Root" you will see a drop-down menu that is populated with all of your defined external file systems. Select the desired file system from the list, and then click the "Browse" button.
Once the desired file or folder is selected, click on the "Open" button. Click the Apply button in the lower right of the admin UI so save the new setting.
Defining an EFS Dynamically
As of version 3.6, FileCatalyst Server allows for the definition of file systems dynamically. This is accomplished by providing user credentials in the URL. This feature applies to user home directories, virtual files/folders and the default user home directory. Defining the EFS dynamically will bypass any EFS that was configured via the File Systems tab. It also allows multiple sets of credentials to be used for a single file system type. For example, you may have multiple users with home directories all using Amazon S3, but with different credentials.
In order to define an EFS dynamically for a user home directory, virtual file/folder or the default user
home directory, you must use the following syntax:
<scheme>://<username>:<password>@<endpoint>/<path>
Note that the endpoint is required for dynamic allocation of an EFS. See the section for the storage provider (Amazon S3, Azure Blob) you wish to dynamically define for its scheme and default endpoint.
As an example, to dynamically define a connection to Azure Blob storage with the account name
"filecatalyst" and account key "mysecretkey", the URL would look like this:
msab://filecatalyst:mysecretkey@core.windows.net/container/path
When viewing Users and Virtual Folders/Files that make use of a dynamically defined EFS in the FileCatalyst Server Admin, the URL will appear to show only the username (also referred to as account name, access key, etc... depending on the provider) in the URL rather than the username and the password. To view the full URL including the password or secret key, you must edit the user or virtual folder/file.
Note: Many passwords for cloud based storages use characters that are illegal in a URL. FileCatalyst will automatically URL encode these values when you apply them.
Performance Considerations
In general, external file systems in FileCatalyst are cloud based object storage. Because of this, there will be latency between the machine on which the FileCatalyst software is running, and the object store in the cloud. To achieve the best possible performance, the FileCatalyst server should be installed on a virtual machine in the same cloud as the object store you are connecting to. For example, when connecting to Amazon S3, best performance would be achieved when FileCatalyst Server is installed on an Amazon EC2 virtual machine.
Configuration Properties
The configuration for external file systems is typically done through the FileCatalyst Server UI. However they can be added or edited manually by editing fcconf.conf, located in the installation directory of FileCatalyst Server.
If an EFS has previously been added, it will likely appear at the very bottom of the configuration file, and will have a format similar to the following:
FCServer.server.config.filesystem.X.type=<type>
FCServer.server.config.filesystem.X.username=<username>
FCServer.server.config.filesystem.X.password=<password>
FCServer.server.config.filesystem.X.host=<hostname>
The configuration property names are kept implementation independent. Values like "username", "password" and "hostname" are generic, and may map to specific values for certain implementations. Amazon S3 for example, uses the terms "Access key", "Secret Key" and "Endpoint" which map to "username", "password" and "hostname" respectively.
The X in the example above, is a numeric value starting with 1, that must be incremented for each new external file system that is added.
For example, a configuration for Amazon S3 may look like this:
FCServer.server.config.filesystem.1.type=s3
FCServer.server.config.filesystem.1.username=BDOPWE6DQCVBNYERCKEA
FCServer.server.config.filesystem.1.password=a8s3pe09R9AsUC3k0s2B0ALlsplNCqz9jix3H
FCServer.server.config.filesystem.1.host=s3.amazonaws.com
To manually add an Amazon S3 configuration, the above could be pasted into your fcconf.conf file (while the server is not running) and modified to use your own access key and secret key.
Note: Although you can edit the config file and enter the password value in clear text, the first time the server is run thereafter, the password will automatically be encrypted.
Note: Although multiple file systems may be added, they must have a unique "type" value. Take care to enter the "type" value correctly, it must match one of the installed drivers.
Implementation: Specific Notes and Limitations
Each External File System has its own unique pre-requisites, steps to get started, and performance limitations. For example, certain file transfer features are not supported with all EFS file system implementations. This section will describe the things you must know before working with the selected EFS, and go into details on how to get up and running. It also discusses specific feature limitations and provides additional behaviour notes for each file system.
Amazon S3
This section assumes that the FileCatalyst server will be installed in Amazon EC2 for the greatest performance. It is possible, though not recommended, to install the server outside of EC2. All that is required if installing outside EC2 is that the machine have HTTP access to the public internet.
Version Support
The following table shows which versions of FileCatalyst officially support the Amazon S3 EFS driver.
| Version | Compatible | Supported |
| 3.5+ | ✔ | ✔ |
Prerequisites
- The Access Key used to define an S3 file system must have the ability to list buckets. This allows the file system to be verified and for a bucket to be selected during setup. If your credentials do not grant bucket listing permissions, you must use the URL Composition method, and expicitly define your bucket.
- To get multi-gigabit speeds between EC2 and S3 run your instance in a VPC (Virtual Private Cloud) within Amazon EC2.
- Ensure that the EC2 Instance Type you choose has sufficient bandwidth for your tests. See here for a table showing instance specs. Under the Network Bandwidth (Gbps) column, anything that shows "Low", "Moderate", or "High" will be limited to 1Gbps or lower. "Up to 10" will allow bandwidth into EC2 between 1 and 10 Gbps (no specific guarantee). Anything higher is noted with exact bandwidth capabilities, i.e. "10, 20, 25" Gbps.
- Ensure that the EC2 Instance has Enhanced Networking enabled for multi-Gbps speeds. See Elastic Network Adapter (ENA).
- Use Amazon Linux where the highest speeds are required, as it is pre-configured for the best network performance. See Amazon Linux.
- Ensure your EC2 Security Group has the appropriate ports open. TCP port 21, 8000-8999, UDP ports 8000-8999 are the minimum ports to transfer files. Optionally, port 990 (SSL) and port 22 (SFTP) may be opened if you have enabled them. If you require remote administration, TCP port 12400 should be open. Note that these are all default ports. The ports you open should reflect any changes you have made to these defaults.
- Ensure the firewall on your EC2 instance is either disabled, or configured to allow the same ports as your EC2 security group
- For best performance, run your EC2 instance in the same region as your S3 bucket
- To access S3 without the need for storing credentials, make sure to run your EC2 instance with an appropriate IAM Role assigned to it
Getting Started
- Install FileCatalyst Server 3.5 or higher
- On first run, install the provided license key from your sales rep
- Modify the IP masquerade address (Under Advanced/Network) to match your EC2 instance Public IP address. Note that the Public IP address of your instance in located on the top right corner of the desktop.
- On File Systems tab, click "New"
- Select "Amazon S3" from the Type drop-down menu. If you are using an IAM Role for S3 access you may skip to step 9
- Enter your Access Key (optional if using IAM role), Secret Key (optional if using IAM role), and Endpoint (optional)
- Click the Test button to ensure that the credentials are entered correctly.
- Click the Save button.
- Make sure File System appears in the list
- Create a new user or Edit an existing user. Under the Home Directory section (located on Account Information panel for New user, or Account Settings when editing an existing user) the File System type drop down should have an option "Amazon S3". Select it and click Browse.
- Select a home directory like you normally would. Note that the top level directories are the S3 buckets. User accounts will only have READ access at the top level, and will have access to all buckets if this is set as the home directory.
You have now successfully setup the FileCatalyst Server to connect to your S3 storage.
Encryption at Rest
As of FileCatalyst v3.7.3, the Amazon S3 EFS driver supports encryption at rest out of the box with no
settings changes. The supported options for encryption at rest
are Server-Side Encryption with Amazon S3-Managed Keys (SSE-S3) and Server-Side Encryption with AWS
KMS-Managed Keys (SSE-KMS).
Currently Server-Side Encryption with Customer-Provided Keys (SSE-C) is not supported. SSE-S3 or SSE-KMS
must be enabled manually for each bucket.
For more information on how to enable encryption on an S3 bucket, click here.
URL Composition
When manually defining an Amazon S3 EFS URL (i.e. not using the Browse button, or when no static File System has previously been defined) as part of a User home directory or Virtual File/Folder path, the following URL composition should be followed.
Scheme: s3
Default Endpoint: s3.amazonaws.com
Full Syntax: s3://<access key>:<secret
key>@s3.amazonaws.com/<bucket>/<path>
Note: The access key and secret key are only required when when no File System is defined
for the
file system you are attempting to connect to.
Limitations
The following features are NOT supported in FileCatalyst 3.5 client applications when connecting to a user account backed by Amazon S3. Features marked with an asterisk (*) will be implemented in a future release.
- Keep File Permissions (OSX/Linux Only)
- Keep file modification timestamp
- Transfer in priority sequence - works only by creation date not modified date
- Creation/Modification time for directories always show (in listings) as current date since they are virtual objects
- Also see Common EFS Limitations
Notes
Your FileCatalyst Server on your EC2 based VM sees S3 as a complete file system. However in the background, it is all using the S3 REST API, hence all communication is done with HTTP. This means reading and writing is not going to be as fast as a local hard drive. There are several performance limitations when dealing with S3. Here is an idea of what you can expect:
- Large individual file uploads - Uploads will be fast, up to 5 Gbps speed for individual files. Files are uploaded in chunks (using parallel HTTP uploads) in the background, and then need to be assembled by S3 at completion. This can cause a pause at the end of each transferred file. The larger the file the longer the pause, though it should not be more than a few seconds for files under 2 GB
- Large individual file downloads - Downloads will be fast, up to 5 Gbps speed for individual files. No pause after download like there is with uploads.
- Upload large groups of smaller files - Large groups of small files will upload more slowly than individual files, but multi-client compensates for this just like on local file systems because several files are in transit at one time.
- Download large groups of smaller files - Large groups of small files will download more slowly than individual files, but multi-client compensates for this just like on local file systems because several files are in transit at one time.
- Renaming files - Renaming a file is slower the larger the file is. There is no concept of renaming a file in S3. FileCatalyst must copy the file to the new name, then delete original. It is handled transparently, but the bigger the file, the longer it takes to copy, and hence rename. This means uploading with temporary file names for example will have delays when being renamed at the end of the transfer. The rename is still fairly fast for smaller files but can take several seconds for multi-GB files; in extreme cases the client might also experience a timeout despite the rename being successful. It is recommended that the "Extended Read Timeout" value of the client be increased to accommodate if this issue arises.
- Renaming folders - Renaming folders is not possible in FileCatalyst as they are virtual, and would require every file under them to be renamed. As per the previous limitation (renaming files), this would be extremely slow. For this reason renaming folders is currently not implemented.
- MD5 checksums - Calculating MD5 checksums requires all bytes of the file to be read by the FileCatalyst Server. Since the files are on S3, and presumably the server is on EC2, the entire file is transferred from S3 to EC2 to calculate the checksum. This means MD5 calculations will take longer than they would on a local file system.
- Resuming interrupted uploads - Resuming (i.e. appending to an existing file) will be slower than a regular upload. The larger the file being appended to, the slower it will be. S3 does not natively support resume, or any modification of existing Objects. FileCatalyst uses some tricks in the background to overcome this shortcoming. This requires some copy operations to take place before the upload begins, and also after completion. Because of these extra operations, resuming a transfer will not be as efficient as a single continuous transfer.
- HTTP Uploads - This feature uploads a file in chunks, appending to the file each time. Because of these appends (see note 7 above), HTTP uploads may be considerable slower against an S3 EFS than against a local file system.
- Upload with Incremental / Deltas - It is highly recommended that this feature be avoided unless bandwidth usage is of higher concern than overall transfer time, as it may be more efficient to re-transfer the entire file than to perform the deltas process. The deltas process performs many small read operations against S3. These small read operations have much lower performance than larger read operations such as downloading an entire file. Subsequently, the deltas process will be considerably slower against an S3 EFS than against a local file system. Furthermore, if this feature must be used, it is strongly recommended that the user adds a 10+ second delay to progressive transfers or disable progressive transfers entirely.
- TCP downloads are slow - FileCatalyst uses HTTP GET with a "range" header in the background when it performs read operations on objects. Because the TCP transfer buffers are small (only 16KB) these read operations are not very efficient, and hence downloads are slow. This will be addressed in a future release.
- LINK feature will not work if user is on the root path - FileCatalyst LINK requires the ability to create a directory FC_OUTBOX to store files uploaded to the server. If the user home directory is stored in the root path of the Amazon S3 account (as opposed to inside a defined bucket), the server will not be able to create the required folder to temporarily hold files. It is recommended that the user home directory be defined inside an existing bucket.
- Disabling HTTPS - The use of HTTPS may be disabled by setting the "unlimited.core.filesystem.s3.usehttp" (for s3 driver) or "unlimited.core.filesystem.swift3.usehttp" (for swift3 driver) system property to "true".
- File size considerations - the maximum size of a single file in Amazon S3 is 5TB.
Microsoft Azure Blob
This section assumes that the FileCatalyst server will be installed on a VM in the Microsoft Azure cloud for the greatest performance. It is possible, though not recommended, to install the server outside of Azure. All that is required if installing outside Azure is that the machine have HTTP access to the public internet.
Version Support
The following table shows which versions of FileCatalyst officially support the Azure Blob EFS driver. Note that FileCatalyst introduced support for EFS in v3.5 (for Amazon S3). Subsequent FileCatalyst versions have added support for other drivers. Newer drivers are designed to be backwards compatible in principle, but are not tested or officially supported in earlier product versions unless specified in the table below.
| Version | Compatible | Supported |
| 3.5 | ✔ | X |
| 3.6+ | ✔ | ✔ |
Prerequisites
- The Account Key used to define an Azure Blob file system must have the ability to list containers. This allows the file system to be verified and for a container to be selected during setup.
- Ensure your Azure VM has the appropriate Endpoints defined. TCP port 21, 8000-8100, UDP ports
8000-8100 are the minimum ports to transfer files. Optionally, port 990 (SSL) and port 22 (SFTP) may be
opened if you have enabled them. If you require remote administration, TCP port 12400 should be open.
Note that these are all default ports. The ports you open should reflect any changes you have made to
these defaults.
Note that Azure limits the number of endpoints to 150 total. Because of this, the default port range in FileCatalyst Server should be reduced accordingly. By default we recommend ports 8000-8100.
Note that only one endpoint may be added at a time through the Azure portal. Because of this limitation, in order to save time mapping ports you can install Azure PowerShell by following the instructions here.
Once PowerShell is installed, you can use the following script to open ports 8000-8100 TCP. You can then replace "TCP" with "UDP" and re-run the script.$i=8000 do { Get-AzureVM -ServiceName "[CLOUD_SERVICE_NAME]" -Name "[VM_NAME]" | Add-AzureEndpoint -LocalPort $i -PublicPort $i -Name TCP$i -Protocol TCP | Update-AzureVM; $i+=1} until ($i -gt 8100) - Ensure the firewall on your Azure VM instance is either disabled, or configured to allow the same ports as your defined endpoints.
- For best performance, run your Azure VM in the same region as your Azure Blob Storage
Getting Started
- Install FileCatalyst Server 3.6 or higher.
- On first run, install the provided license key from your sales rep
- Modify the Data Port Range (Under Advanced/Network) to match the endpoints you defined for you Azure VM (should be 8000-8100 if the pre-requisite steps were followed).
- Modify the IP masquerade address (Under Advanced/Network) to match your Azure VM Public IP address. Note that the Public IP address of your instance in located on the top right corner of the desktop.
- On File Systems tab, click "New"
- Select "Azure Blob" from the Type drop-down menu.
- Enter your Account Name, Account Key, and Endpoint (optional)
- Click the Test button to ensure that the credentials are entered correctly.
- Click the Save button.
- Make sure File System appears in the list
- Create a new user or Edit an existing user. Under the Home Directory section (located on Account Information panel for New user, or Account Settings when editing an existing user) the File System type drop down should have an option "Azure Blob". Select it and click Browse.
- Select a home directory like you normally would. Note that the top level directories are the Azure Blob containers. User accounts will only have READ access at the top level, and will have access to all buckets if this is set as the home directory.
You have now successfully setup the FileCatalyst Server to connect to your Azure Blob storage.
Encryption at Rest
The Azure Blob EFS driver supports encryption at rest out of the box. It is automatically enabled
on your Azure Blob storage and cannot be disabled. You may change the way that keys are managed for the
encryption
through the Azure portal. The supported options are Microsoft Managed encryption keys, or Customer Managed
encryption keys.
For more information on encryption at rest on Azure, and how to manage encryption keys click here.
URL Composition
When manually defining an Azure Blob EFS URL (i.e. not using the Browse button, or when no static File System has previously been defined) as part of a User home directory or Virtual File/Folder path, the following URL composition should be followed.
Scheme: msab
Default Endpoint: core.windows.net
Full Syntax: msab://<account name>:<account
key>@core.windows.net/<container>/<path>
Note: The account name and account key are only required when when no File System is
defined for the
file system you are attempting to connect to.
Limitations
The following features are NOT supported in FileCatalyst 3.6 client applications when connecting to a user account backed by Microsoft Azure Blob. Features marked with an asterisk (*) will be implemented in a future release.
- Keep File Permissions (OSX/Linux Only)
- Keep file modification timestamp
- Transfer in priority sequence - works only by creation date not modified date
- Creation/Modification time for directories always show (in listings) as current date since they are virtual objects
- Also see Common EFS Limitations
Notes
Your FileCatalyst Server on your Azure VM sees Azure Blob Storage as a complete file system. However in the background, it is all using the Azure REST API, hence all communication is done with HTTP. This means reading and writing is not going to be as fast as a local hard drive. There are several performance limitations when dealing with Azure Blob. Here is an idea of what you can expect:
- Large individual file uploads - Uploads will be fast, up to 480 Mbps write speed for individual files. Files are uploaded in chunks (using parallel HTTP uploads) in the background, and then need to be assembled by Azure at completion. This can cause a pause at the end of each transferred file. The larger the file the longer the pause, though it should not be more than a few seconds for files under 2 GB
- Large individual file downloads - Downloads will be fast, up to 480 Mbps write speed for individual files. No pause after download like there is with uploads.
- Upload large groups of smaller files - Large groups of small files will upload more slowly than individual files, but multi-client compensates for this just like on local file systems because several files are in transit at one time. See additional note for Multi-Client.
- Download large groups of smaller files - Large groups of small files will download more slowly than individual files, but multi-client compensates for this just like on local file systems because several files are in transit at one time. See additional note for Multi-Client
- Multi-client transfers - When executing multi-client transfers, the FileCatalyst client may try to initiate many requests in quick succession. If the External File System is unable to process the rapid influx of requests, this may result in some requests being rejected or the UI becoming unresponsive.
- Renaming files - Renaming a file is slower the larger the file is. There is no concept of renaming a file in Azure Blob. FileCatalyst must copy the file to the new name, then delete original. It is handled transparently, but the bigger the file, the longer it takes to copy, and hence rename. This means uploading with temporary file names for example will have delays when being renamed at the end of the transfer. The rename is still fairly fast for smaller files but can take several seconds for multi-GB files; in extreme cases the client might also experience a timeout despite the rename being successful. It is recommended that the "Extended Read Timeout" value of the client be increased to accommodate if this issue arises.
- Renaming folders - Renaming folders is not possible in FileCatalyst as they are virtual, and would require every file under them to be renamed. As per the previous limitation (renaming files), this would be extremely slow. For this reason renaming folders is currently not implemented.
- MD5 checksums - Calculating MD5 checksums requires all bytes of the file to be read by the FileCatalyst Server. Since the files are on Azure Blob, and presumably the server is in Azure cloud as well, the entire file is transferred from Blob storage to you server to calculate the checksum. This means MD5 calculations will take longer than they would on a local file system.
- HTTP Uploads - This feature uploads a file in chunks, appending to the file each time. Because of these appends, HTTP uploads may be slower against an Azure Blob EFS than against a local file system.
- Upload with Incremental / Deltas - It is highly recommended that this feature be avoided unless bandwidth usage is of higher concern than overall transfer time, as it may be more efficient to re-transfer the entire file than to perform the deltas process. The deltas process performs many small read operations against Azure Blob. These small read operations have much lower performance than larger read operations such as downloading an entire file. Subsequently, the deltas process will be considerably slower against an Azure Blob EFS than against a local file system. Furthermore, if this feature must be used, it is strongly recommended that the user adds a 10+ second delay to progressive transfers or disable progressive transfers entirely.
- File size considerations - the maximum size of a single file in Azure Blob is 4.75TB. This is due to a limit in both maximum block size (100MB) and in maximum number of parts per blob (50000).
- TCP downloads are slow - FileCatalyst uses HTTP GET with a "range" header in the background when it performs read operations on objects. Because the TCP transfer buffers are small (only 16KB) these read operations are not very efficient, and hence downloads are slow. This will be addressed in a future release.
- LINK feature will not work if user is on the root path - FileCatalyst LINK requires the ability to create a directory FC_OUTBOX to store files uploaded to the server. If the user home directory is stored in the root path of the Microsoft Azure account (as opposed to inside a defined container), the server will not be able to create the required folder to temporarily hold files. It is recommended that the user home directory be defined inside an existing container.
Google Cloud Storage
This section assumes that the FileCatalyst server will be installed in Google Cloud Compute for the greatest performance. It is possible, though not recommended, to install the server outside of Google Cloud. All that is required if installing outside Google Cloud is that the machine have HTTP access to the public internet.
Version Support
The following table shows which versions of FileCatalyst officially support the Google Cloud Storage EFS driver.
| Version | Compatible | Supported |
| 3.7.3+ | ✔ | ✔ |
Prerequisites
- Ensure that the Google Compute Engine Instance Type you choose has sufficient vCPUs for your tests. The maximum Ingress/Egress bandwidth for a Google Compute Engine instance is discussed here
- Ensure your Firewall has the appropriate ports open. TCP port 21, 8000-8999, UDP ports 8000-8999 are the minimum ports to transfer files. Optionally, port 990 (SSL) and port 22 (SFTP) may be opened if you have enabled them. If you require remote administration, TCP port 12400 should be open. Note that these are all default ports. The ports you open should reflect any changes you have made to these defaults.
- Ensure the firewall on your Google Compute Engine instance is either disabled, or configured to allow the same ports as your Compute Engine security group
- For best performance, run your Google Compute Engine instance in the same region as your Google Cloud Storage container
Getting Started
- Install FileCatalyst Server 3.7.3 or higher
- On first run, install the provided license key from your sales rep
- Modify the IP masquerade address (Under Advanced/Network) to match your Google Compute Engine instance Public IP address.
- On File Systems tab, click "New"
- Select "Google Cloud Storage" from the Type drop-down menu.
- Enter the name of your service credentials JSON file (the file must be saved in the application install directory i.e. "C:\Program Files\FileCatalyst Server"). If you do not have a JSON credentials file, you can follow the steps here to get one. Note that since all connection info is stored in the JSON file, no Password or Endpoint are required.
- Click the Test button to ensure that the JSON credentials work correctly.
- Click the Save button.
- Make sure File System appears in the list
- Create a New user or Edit an existing user. Under the Home Directory section (located on Account Information panel for New user, or Account Settings when editing an existing user) the File System type drop down should have an option "Google Cloud Storage". Select it and click Browse.
- Select a home directory like you normally would. Note that the top level directories are the storage containers. User accounts will only have READ access at the top level, and will have access to all buckets if this is set as the home directory.
You have now successfully setup the FileCatalyst Server to connect to your Google Cloud Storaga.
Encryption at Rest
The Google Cloud Storage EFS driver supports encryption at rest out of the box with no settings changes. The supported options for encryption at rest are outlined here. Currently Client Side Encryption is not supported.
URL Composition
When manually defining a Google Cloud Storage EFS URL (i.e. not using the Browse button, or when no static File System has previously been defined) as part of a User home directory or Virtual File/Folder path, the following URL composition should be followed.
Scheme: gcs
Default Endpoint: googleapis.com
Full Syntax: gcs://<json credentials filename>:<enter any value for
password>@googleapis.com/<container>/<path>
Note: The password and endpoint are required for the URL to be properly parsed, but the
values entered do not matter.
Limitations
The following features are NOT supported in FileCatalyst client applications when connecting to a user account backed by Google Cloud Storage. Features marked with an asterisk (*) will be implemented in a future release.
- Keep File Permissions (OSX/Linux Only)
- Keep file modification timestamp
- Transfer in priority sequence - works only by creation date not modified date
- Creation/Modification time for directories always show (in listings) as current date since they are virtual objects
- Also see Common EFS Limitations
Notes
Your FileCatalyst Server on your Google Compute Engine based instance sees S3 as a complete file system. However in the background, it is all using the Google Cloud Storage REST API, hence all communication is done with HTTP. This means reading and writing is not going to be as fast as a local hard drive. There are several performance limitations when dealing with Google Cloud Storage. Here is an idea of what you can expect:
- Large individual file uploads - Uploads will be fast, up to 1 Gbps write speed for individual files. Files are uploaded in chunks (using parallel HTTP uploads) in the background, and then need to be assembled by S3 at completion. This can cause a pause at the end of each transferred file. The larger the file the longer the pause, though it should not be more than a few seconds for files under 2 GB
- Large individual file downloads - Downloads will be fast, up to 1 Gbps write speed for individual files. No pause after download like there is with uploads.
- Upload large groups of smaller files - Large groups of small files will upload slower than individual files, but multi-client compensates for this just like on local file systems because several files are in transit at one time.
- Download large groups of smaller files - Large groups of small files will download slower than individual files, but multi-client compensates for this just like on local file systems because several files are in transit at one time.
- Renaming folders - Renaming folders is not possible in FileCatalyst as they are virtual, and would require every file under them to be renamed. As per the previous limitation (renaming files), this would be extremely slow. For this reason renaming folders is currently not implemented.
- MD5 checksums - Calculating MD5 checksums requires all bytes of the file to be read by the FileCatalyst Server. Since the files are on Google Cloud Storage, and presumably the server is on Goole cloud as well, the entire file is transferred from cloud storage to compute engine to calculate the checksum. This means MD5 calculations will take longer than they would on a local file system.
- Resuming interrupted uploads - Resuming (i.e. appending to an existing file) will be slower than a regular upload. The larger the file being appended to, the slower it will be. Google Cloud Storage does not natively support resume, or any modification of existing Objects. FileCatalyst uses some tricks in the background to overcome this shortcoming. This requires some copy operations to take place before the upload begins, and also after completion. Because of these extra operations, resuming a transfer will not be as efficient as a single continuous transfer.
- HTTP Uploads - This feature uploads a file in chunks, appending to the file each time. Because of these appends (see note 7 above), HTTP uploads may be considerable slower against a Google Cloud Storage EFS than against a local file system.
- Upload with Incremental / Deltas - Calculating the deltas of a file on Google Cloud Storage may take significantly longer than it would with a local file system. The nature of the deltas process is such that it must do a lot of small read operations against Google Cloud Storage. These small read operations are much lower performance than larger read operations (like downloading an entire file). Subsequently, the deltas process will be considerable slower against a Google Cloud Storage EFS than against a local file system. It is highly recommended that this feature be avoided unless bandwidth usage is of higher concern than overall transfer time. It may be more efficient to re-transfer the entire file than to perform the deltas process.
- TCP downloads are slow - FileCatalyst uses HTTP GET with a "range" header in the background when it performs read operations on objects. Because the TCP transfer buffers are small (only 16KB) these read operations are not very efficient, and hence downloads are slow. This will be addressed in a future release.
- LINK feature will not work if user is on the root path - FileCatalyst LINK requires the ability to create a directory FC_OUTBOX to store files uploaded to the server. If the user home directory is stored in the root path of the Google Cloud Storage account (as opposed to inside a defined container), the server will not be able to create the required folder to temporarily hold files. It is recommended that the user home directory be defined inside an existing bucket.
Backblaze B2
This section assumes that the FileCatalyst server will be installed in close proximity (same geographic region) to your Backblaze B2 storage for best possible performance. All that is required is that the machine have HTTP access to the public internet.
Version Support
The following table shows which versions of FileCatalyst officially support the Backblaze B2 EFS driver.
| Version | Compatible | Supported |
| 3.5 - 3.7.2 | ✔ | X |
| 3.7.3+ | ✔ | ✔ |
Prerequisites
- The Access Key used to define a B2 file system must have the ability to list buckets. This allows the file system to be verified and for a bucket to be selected during setup.
- Ensure that the server you install FileCatalyst server on has sufficient bandwidth for your tests.
- Ensure your Firewall has the appropriate ports open. TCP port 21, 8000-8999, UDP ports 8000-8999 are the minimum ports to transfer files. Optionally, port 990 (SSL) and port 22 (SFTP) may be opened if you have enabled them. If you require remote administration, TCP port 12400 should be open. Note that these are all default ports. The ports you open should reflect any changes you have made to these defaults.
- For best performance, run your FileCatalyst Server should be in the same region as your B2 storage. Try to keep network latency as low as possible.
Getting Started
- Install FileCatalyst Server 3.7.3 or higher
- On first run, install the provided license key from your sales rep
- Modify the IP masquerade address (Under Advanced/Network) to match your FileCatalyst Server Public IP address.
- On File Systems tab, click "New"
- Select "Backblaze B2" from the Type drop-down menu.
- Enter your Access Key, Secret Key, and enter "api.backblaze.com" for the Endpoint
- Click the Test button to ensure that the credentials are entered correctly.
- Click the Save button.
- Make sure the B2 File System appears in the list
- Create a new user or Edit an existing user. Under the Home Directory section (located on Account Information panel for New user, or Account Settings when editing an existing user) the File System type drop down should have an option "Backblaze B2". Select it and click Browse.
- Select a home directory like you normally would. Note that the top level directories are the B2 buckets. User accounts will only have READ access at the top level, and will have access to all buckets if this is set as the home directory.
You have now successfully setup the FileCatalyst Server to connect to your B2 storage.
URL Composition
When manually defining an Backblaze B2 EFS URL (i.e. not using the Browse button, or when no static File System has previously been defined) as part of a User home directory or Virtual File/Folder path, the following URL composition should be followed.
Scheme: b2
Default Endpoint: api.backblaze.com
Full Syntax: b2://<access key>:<secret
key>@api.backblaze.com/<bucket>/<path>
Note: The access key and secret key are only required when when no File System is defined
for the
file system you are attempting to connect to.
Limitations
The following features are NOT supported in FileCatalyst client applications when connecting to a user account backed by Backblaze B2. Features marked with an asterisk (*) will be implemented in a future release.
- Keep File Permissions (OSX/Linux Only)
- Keep file modification timestamp
- Transfer in priority sequence - works only by creation date not modified date
- Creation/Modification time for directories always show (in listings) as current date since they are virtual objects
- HTTP uploads are not supported on B2
- Incremental/Deltas is not supported on B2
- Also see Common EFS Limitations
Notes
Your FileCatalyst Server sees B2 as a complete file system. However in the background, it is all using the B2 REST API, hence all communication is done with HTTP. This means reading and writing is not going to be as fast as a local hard drive. There are several performance limitations when dealing with B2. Here is an idea of what you can expect:
- Large individual file uploads - Uploads will be fast, up to 1 Gbps write speed for individual files. Files are uploaded in chunks (using parallel HTTP uploads) in the background, and then need to be assembled by B2 at completion. This can cause a pause at the end of each transferred file. The larger the file the longer the pause, though it should not be more than a few seconds for files under 2 GB
- Large individual file downloads - Downloads will be fast, up to 1 Gbps write speed for individual files. No pause after download like there is with uploads.
- Upload large groups of smaller files - Large groups of small files will upload more slowly than individual files, but multi-client compensates for this just like on local file systems because several files are in transit at one time. See additional note for Multi-Client.
- Download large groups of smaller files - Large groups of small files will download more slowly than individual files, but multi-client compensates for this just like on local file systems because several files are in transit at one time. See additional note for Multi-Client
- Multi-client transfers - When executing multi-client transfers, the FileCatalyst client may try to initiate many requests in quick succession. If the External File System is unable to process the rapid influx of requests, this may result in some requests being rejected or the UI becoming unresponsive..
- Renaming files - Renaming is inconsistent in B2, and may not work for files larger than 20MB. It is recommended that features that use rename (i.e. transfer with temporary file name) be disabled when using B2 storage.
- Renaming folders - Renaming folders is not possible in FileCatalyst as they are virtual, and would require every file under them to be renamed. As per the previous limitation (renaming files), this would be extremely slow. For this reason renaming folders is currently not implemented.
- MD5 checksums - Calculating MD5 checksums requires all bytes of the file to be read by the FileCatalyst Server. Since the files are on B2 the entire file is transferred from B2 your FileCatalyst Server to calculate the checksum. This means MD5 calculations will take longer than they would on a local file system.
- TCP downloads are slow - FileCatalyst uses HTTP GET with a "range" header in the background when it performs read operations on objects. Because the TCP transfer buffers are small (only 16KB) these read operations are not very efficient, and hence downloads are slow. This will be addressed in a future release.
- LINK feature will not work if user is on the root path - FileCatalyst LINK requires the ability to create a directory FC_OUTBOX to store files uploaded to the server. If the user home directory is stored in the root path of the Backblaze B2 account (as opposed to inside a defined bucket), the server will not be able to create the required folder to temporarily hold files. It is recommended that the user home directory be defined inside an existing bucket.
OpenStack Swift3
This section assumes that the FileCatalyst server will be installed on a machine that is on the same network as your OpenStack Swift object storage for the greatest performance. It is possible, though not recommended, to install the server on another network. All that is required if installing on an outside network is that the machine must have HTTP access to the object store.
Version Support
The following table shows which versions of FileCatalyst officially support the OpenStack Swift3 driver. Note that FileCatalyst introduced support for EFS in v3.5 (for Amazon S3). Subsequent FileCatalyst versions have added support for other drivers. Newer drivers are designed to be backwards compatible in principle, but are not tested or officially supported in earlier product versions unless specified in the table below.
| Version | Compatible | Supported |
| 3.5 | ✔ | X |
| 3.6 | ✔ | X |
| 3.7+ | ✔ | ✔ |
Prerequisites
- The Access Key used to define an OpenStack Swift file system must have the ability to list buckets. This allows the file system to be verified and for a bucket to be selected during setup.
- For best performance, run your FileCatalyst server on the same network as your OpenStack Swift object storage.
- Configure your OpenStack Swift storage with the S3 API (Swift3). The Swift3 middleware emulates the S3 REST API on top of the OpenStack Swfit Object Storage. For more details visit http://docs.openstack.org/juno/config-reference/content/configuring-openstack-object-storage-with-s3_api.html
Getting Started
- Install FileCatalyst Server 3.7 or higher.
- On first run, install the provided license key from your sales rep
- On File Systems tab, click "New"
- Select "OpenStack Swift3" from the Type drop-down menu.
- Enter your Account Name, Account Key, and Endpoint (Endpoint may also include a port i.e. "myswifthost:12345")
- Click the Test button to ensure that the credentials are entered correctly.
- Click the Save button.
- Make sure File System appears in the list
- Create a new user or Edit an existing user. Under the Home Directory section (located on Account Information panel for New user, or Account Settings when editing an existing user) the File System type drop down should have an option "OpenStack Swift3". Select it and click Browse.
- Select a home directory like you normally would. Note that the top level directories are the OpenStack Swift3 containers. User accounts will only have READ access at the top level, and will have access to all buckets if this is set as the home directory.
You have now successfully setup the FileCatalyst Server to connect to your OpenStack Swift3 storage.
URL Composition
When manually defining an OpenStack Swift3 EFS URL (i.e. not using the Browse button, or when no static File System has previously been defined) as part of a User home directory or Virtual File/Folder path, the following URL composition should be followed.
Scheme: swift3
Default Endpoint: blank
Full Syntax: swift3://<account name>:<account
key>@<endpoint>:<port>/<container>/<path>
Notes:
- The account name and account key are only required when when no File System is defined for the file system you are attempting to connect to.
- The port is only required if your Swift3 implementation is running on a non-standard HTTP/S port, i.e. not 443 or 80
Limitations
The following features are NOT supported in FileCatalyst client applications when connecting to a user account backed by OpenStack Swift.
- Resuming transfer is not supported on OpenStack Swift
Note: The OpenStack Swift API on which this EFS is based uses the Amazon S3 specification, and
thus has many of the same limitations as Amazon S3, in addition to some other common EFS limitations.
See Below for details.
See Amazon S3 Limitations.
See Common EFS Limitations.
Notes
See Amazon S3 Notes.
Wasabi
This section assumes that the FileCatalyst server will be installed on a machine in close proximity (low RTT) to the Wasabi object storage for the greatest performance. It is possible, though not recommended, to install the server on a machine that is not in close proximity (high RTT). In either case, the FileCatalyst server must have HTTP access to the Wasabi storage to function properly.
Version Support
The following table shows which versions of FileCatalyst officially support the Wasabi driver. Note that FileCatalyst introduced support for EFS in v3.5 (for Amazon S3). Subsequent FileCatalyst versions have added support for other drivers. Newer drivers are designed to be backwards compatible in principle, but are not tested or officially supported in earlier product versions unless specified in the table below.
| Version | Compatible | Supported |
| 3.5 | ✔ | X |
| 3.6 | ✔ | X |
| 3.7 | ✔ | X |
| 3.8+ | ✔ | ✔ |
Prerequisites
- The Access Key used to define an Wasabi file system must have the ability to list buckets. This allows the file system to be verified and for a bucket to be selected during setup.
Getting Started
- Install FileCatalyst Server 3.8 or higher.
- On first run, install the provided license key from your sales rep
- On File Systems tab, click "New"
- Select "Wasabi" from the Type drop-down menu.
- Enter your Account Name, Account Key, and Endpoint (Endpoint may also include a port i.e. "s3.wasabisys.com:12345")
- Click the Test button to ensure that the credentials are entered correctly.
- Click the Save button.
- Make sure File System appears in the list
- Create a new user or Edit an existing user. Under the Home Directory section (located on Account Information panel for New user, or Account Settings when editing an existing user) the File System type drop down should have an option "Wasabi". Select it and click Browse.
- Select a home directory like you normally would. Note that the top level directories are the Wasabi buckets. User accounts will only have READ access at the top level, and will have access to all buckets if this is set as the home directory.
You have now successfully setup the FileCatalyst Server to connect to your Wasabi storage.
URL Composition
When manually defining a Wasabi EFS URL (i.e. not using the Browse button, or when no static File System has previously been defined) as part of a User home directory or Virtual File/Folder path, the following URL composition should be followed.
Scheme: wasabi
Default Endpoint: blank
Full Syntax: wasabi://<account name>:<account
key>@<endpoint>:<port>/<bucket>/<path>
Notes:
- The account name and account key are only required when when no File System is defined for the file system you are attempting to connect to.
Limitations
Note: The Wasabi API on which this EFS is based uses the Amazon S3 specification, and thus has many of the same limitations as Amazon S3, in addition to some other common EFS limitations. See Below for details.
- See Amazon S3 Limitations
- See Common EFS Limitations
- Resuming transfer is not supported on Wasabi
Notes
- Multi-client transfers - When executing multi-client transfers, the FileCatalyst client may try to initiate many requests in quick succession. If the External File System is unable to process the rapid influx of requests, this may result in some requests being rejected.
- See Amazon S3 Notes for other notes derived from the Amazon S3 specification.
Other Amazon S3 Compatible storage
Many storage vendors provide an Amazon S3 compatible interface which allows 3rd party tools like
FileCatalyst to connect to
their object storage. FileCatalyst has not formally been been tested with any S3 compatible storage other
than OpenStack Swift, however if
the implementation conforms to the Amazon S3 API spec, there is a good chance FileCatalyst can connect
with either its Amazons S3 or its OpenStack Swift3 drivers.
There are only minor subtleties between these 2 drivers, and it is recommended that you try both to see
which provides the best compatability.
DISCLAIMER: FileCatalyst in no way guarantees compatability with object storage claiming to be S3
compatible.
Version Support
The following table shows which versions of FileCatalyst officially support third party S3 compatible object storage. Note that FileCatalyst introduced support for EFS in v3.5 (for Amazon S3). Subsequent FileCatalyst versions have added support for other drivers. Newer drivers are designed to be backwards compatible in principle, but are not tested or officially supported in earlier product versions unless specified in the table below.
| Version | Compatible | Supported |
| 3.5+ | ✔ | X |
Prerequisites
- For best performance, run your FileCatalyst server on the same network as your S3 compatible object storage.
Getting Started
- Install FileCatalyst Server 3.5 or higher.
- On first run, install the provided license key from your sales rep
- On File Systems tab, click "New"
- Select "Amazon S3" or "OpenStack Swift3" from the Type drop-down menu.
- Enter your Account Name, Account Key, and Endpoint (Swift3 allows a port to be specified as part of the endpoint i.e. myswifthost:12345)
- Click the Test button to ensure that the credentials are entered correctly.
- Click the Save button.
- Make sure File System appears in the list
- Create a new user or Edit an existing user. Under the Home Directory section (located on Account Information panel for New user, or Account Settings when editing an existing user) the File System type drop down should have an option "Amazon S3" or "OpenStack Swift3" depending on which type you selected when creating the file system. Select it and click Browse.
- Select a home directory like you normally would. Note that the top level directories are the containers/buckets. User accounts will only have READ access at the top level, and will have access to all buckets if this is set as the home directory.
You have now successfully setup the FileCatalyst Server to connect to your Amazon S3 compatible storage.
URL Composition
When manually defining an S3 compatible EFS URL (i.e. not using the Browse button, or when no static File System has previously been defined) as part of a User home directory or Virtual File/Folder path, the following URL composition should be followed.
Scheme: swift3 or s3
Default Endpoint: blank
Full Syntax: <scheme ("s3" or "swift3")>://<account name>:<account
key>@<endpoint>:<port>/<container>/<path>
Note:
- The account name and account key are only required when when no File System is defined for the file system you are attempting to connect to.
- The port is only supported for Swift3 URLs and only needed when your implementation is running on a non-standard HTTP/S port, i.e. not 443 or 80
Limitations
See Amazon S3 Limitations.
See Common EFS Limitations.
Notes
See Amazon S3 Notes.
Dropbox (Labs)
This section assumes that the FileCatalyst server will be installed on a machine in close proximity (low RTT) to your Dropbox data center for the greatest performance. It is possible, though not recommended, to install the server on a machine that is not in close proximity (high RTT). In either case, the FileCatalyst server must have HTTP access to the Dropbox storage (via dropbox.com) to function properly.
Note: The Dropbox file system driver is still under development, and while generally functional, issues may be encountered during use. "Labs" features are made available for prototyping and public feedback. These features are not recommended for production use, and may be subject to changes in both content and function before general release.
Version Support
The following table shows which versions of FileCatalyst officially support the Dropbox EFS driver.
| Version | Compatible | Supported |
| 3.8+ | ✔ | ✔ |
Prerequisites
- You must have a valid Dropbox account to link with FileCatalyst Server. If you do not currently have a valid Dropbox account, you can sign up at dropbox.com
- Your FileCatalyst Server should be hosted in a data center that supports high bandwidth (10 Gbps recommended) on the US East coast. This puts your FileCatalyst Server in the same region as the Dropbox data center.
Getting Started
- Install FileCatalyst Server 3.8 or higher.
- On first run, install the provided license key from your sales rep
- On File Systems tab, click "New"
- Select "Dropbox (Labs)" from the Type drop-down menu.
- Click on the "Generate Access Token" button
- Click on the "Request Access Code" button. This should open a browser and take you to the FileCatalyst application authorization page.
- Click on the "Allow" button.
- Copy/Paste the code that is generated back into the FileCatalyst Server administration tool, then click the "OK" button.
- Click the Test button to ensure that the authorization works correctly.
- Click the Save button.
- Make sure the Dropbox File System appears in the list
- Create a new user or edit an existing user. Under the Account Information Panel when creating a user or Account Settings when editing a user, select "Dropbox (Labs)" from the File System type drop down menu.
- Click on Browse and select a directory to be used as this user's home directory.
You have now successfully setup the FileCatalyst Server to connect to your Dropbox storage.
URL Composition
When manually defining a Dropbox EFS URL (i.e. not using the Browse button, or when no static File System has previously been defined) as part of a User home directory or Virtual File/Folder path, the following URL composition should be followed.
Scheme: dropbox
Default Endpoint: dropbox.com
Full Syntax: dropbox://<OAuth Token>@dropbox.com/<path>
Note: The OAuth token is only required when no File System is defined
for the Dropbox storage you are attempting to connect to. In order to obtain an OAuth token, you must
first follow the steps in the Getting Started section, then edit the File System and copy the OAuth token
for use in your URLs.
Limitations
The following features are NOT supported in FileCatalyst client applications when connecting to a user account backed by Dropbox.
- Keep File Permissions (OSX/Linux Only)
- Keep file modification timestamp
- Transfer in priority sequence - works only by creation date not modified date
- Creation/Modification time for directories always show (in listings) as current date since the information is not provided by the Dropbox API
- Also see Common EFS Limitations
Notes
Your FileCatalyst Server sees Dropbox as a complete file system. However in the background, it is using the the Dropbox REST API, hence all communication is done with HTTP. This means reading and writing is not going to be as fast as local storage. There are several performance limitations when dealing with Dropbox. For example, it does not support the upload of concurrent file parts, they must be uploaded sequentially. Here is an idea of what you can expect:
- Large individual file uploads - Upload speed will be up to 200 Mbps for individual files. Files are uploaded in chunks (sequentially using HTTP uploads) in the background, and then need to be assembled by Dropbox at completion. This can cause a pause at the end of each transferred file. The larger the file the longer the pause, though it should not be more than a few seconds for files under 2 GB
- Large individual file downloads - Downloads will be fast, up to 400 Mbps read speed for individual files. No pause after download like there is with uploads.
- Upload large groups of smaller files - Large groups of small files will upload more slowly than individual files, but multi-client compensates for this just like on local file systems because several files are in transit at one time. See additional note for Multi-Client.
- Download large groups of smaller files - Large groups of small files will download more slowly than individual files, but multi-client compensates for this just like on local file systems because several files are in transit at one time. See additional note for Multi-Client.
- Multi-client transfers - When executing multi-client transfers, the FileCatalyst client may try to initiate many requests in quick succession. If the External File System is unable to process the rapid influx of requests, this may result in some requests being rejected.
- MD5 checksums - Calculating MD5 checksums requires all bytes of the file to be read by the FileCatalyst Server. Since the files are in the Dropbox data center, the entire file is transferred from Dropbox to the FileCatalyst machine to calculate the checksum. This means MD5 calculations will take longer than they would on a local file system.
- Resuming interrupted uploads - Resuming (i.e. appending to an existing file) is not supported with Dropbox storage.
- HTTP Uploads - This feature uploads a file in chunks, appending to the file each time. Because appends are not supported on Dropbox, HTTP uploads will first be stored on the local file system of FileCatalyst Server then moved to Dropbox when upload is completed.
- Upload with Incremental / Deltas -The current version of the Dropbox driver does not support transfers using the Incremental / Deltas feature. This will be supported in a future version.
- TCP downloads are slow - FileCatalyst uses HTTP GET with a "range" header in the background when it performs read operations on objects. Because the TCP transfer buffers are small (only 16KB) these read operations are not very efficient, and hence downloads are slow. This will be addressed in a future release.
- Access Code - The access code generated in the browser during the initial file system creation can be used one time. Do not confuse this code with an OAuth Token.
- OAuth Token - The OAuth Token that is generated after a Dropbox file system is created may be re-used for Dropbox URL definitions. See here.
- Multi-client transfers - When executing multi-client transfers, the FileCatalyst client may try to initiate many requests in quick succession; this may result in the External File System rejecting requests. If the External File System rejects new incoming connection requests, it is recommended that you reduce the number of clients or (in extreme cases) disable multi-client altogether.
SMB / CIFS
FileCatalyst provides an EFS driver to connect to Server Message Block (SMB) shares, sometimes referred to
as Common Internet File System (CIFS) shares. Typically on Windows
or Linux, a SMB / CIFS share would need to be mounted and authenticated in order for FileCatalyst to
access it. In the case of Windows when running FileCatalyst as a service, accessing SMB shares requires
the service account
to have permissions to access any shares you wish to assign to user accounts. This EFS driver provides a
convenient way to access one or more different shares, and removes the hassle of dealing
with permissions on the service account. On Linux or Mac, it removes the need to mount the share before
assigning it as a home directory for a user account.
Version Support
The following table shows which versions of FileCatalyst officially support the SMB / CIFS EFS driver. Note that FileCatalyst introduced support for EFS in v3.5 (for Amazon S3). Subsequent FileCatalyst versions have added support for other drivers. Newer drivers are designed to be backwards compatible in principle, but are not tested or officially supported in earlier product versions unless specified in the table below.
| Version | Compatible | Supported |
| 3.5 | ✔ | X |
| 3.6 | ✔ | X |
| 3.7+ | ✔ | ✔ |
Prerequisites
- For best performance, run your FileCatalyst server on the same network as your SMF / CIFS share.
Getting Started
- Install FileCatalyst Server 3.7 or higher.
- On first run, install the provided license key from your sales rep
- On File Systems tab, click "New"
- Select "SMF / CIFS" from the Type drop-down menu.
- Enter your Username, Password, and host/ip of the share
- Click the Test button to ensure that the credentials are entered correctly.
- Click the Save button.
- Make sure File System appears in the list
- Create a new user or Edit an existing user. Under the Home Directory section (located on Account Information panel for New user, or Account Settings when editing an existing user) the File System type drop down should have an option "SMF / CIFS". Select it and click Browse.
- Select a home directory like you normally would. Note that the top level directories are the shares. User accounts will only have READ access at the top level, and will have access to all shares if this is set as the home directory.
You have now successfully setup the FileCatalyst Server to connect to your SMF / CIFS share.
URL Composition
When manually defining an SMF / CIFS EFS URL (i.e. not using the Browse button, or when no static File System has previously been defined) as part of a User home directory or Virtual File/Folder path, the following URL composition should be followed.
Scheme:smb
Default Endpoint: blank
Full Syntax: smb://<username>:<password>@<host or
IP>/<share>/<path>
Limitations
- SMB / CIFS driver supports up to SMB v2 protocol - Speeds may not be comparable to natively mapped or mounted SMB/CIFS shares that use SMB v2 or higher.
-
Also See Common EFS Limitations.
Notes
The following is a list of notes that should be considered when using this file system.
- The FileCatalyst SMB / CIFS EFS implementation is based on JCIFS.
- LINK feature will not work if user is on the root path - FileCatalyst LINK requires the ability to create a directory FC_OUTBOX to store files uploaded to the server. If the user home directory is stored in the root path of the SMB / CIFS account (as opposed to inside a defined share), the server will not be able to create the required folder to temporarily hold files. It is recommended that the user home directory be defined inside an existing share.
Encrypted File System
Version Support
The following table shows which versions of FileCatalyst officially support the Encrypted File System driver.
| Version | Compatible | Supported |
| 3.8+ | ✔ | ✔ |
Prerequisites
- For best performance, create your encrypted file system on a fast local storage device or SAN. Although it may function against network storage (SMB/CIFS for example), performance may suffer as a result.
Getting Started
- Install FileCatalyst Server 3.8 or higher.
- On first run, install the provided license key from your sales rep
- On File Systems tab, click "New"
- Select "Encrypted" from the Type drop-down menu.
- Enter an Encryption Key to be used for the file system. This may be either a passphrase, or a 32 character AES key. Do not lose this passphrase/key. In the event your server settings are lost, your encrypted file system will not be recoverable.
- Enter a directory in which the encrypted file system should be created. For example "c:/encrypted/" for a directory on the local machine, or "//192.168.1.50/pub/encrypted" for a directory on an SMB network share. That directory should be empty, or have previously been configured using the same passphrase or AES key.
- Click the Test button to ensure that the credentials are entered correctly.
- Click the Save button.
- Make sure File System appears in the list
- Create a new user or Edit an existing user. Under the Home Directory section (located on Account Information panel for New user, or Account Settings when editing an existing user) the File System type drop down should have an option "Encrypted". Select it and click Browse.
- Select a home directory like you normally would.
You have now successfully setup the FileCatalyst Server to have an Encrypted file system.
URL Composition
When manually defining an Encrypted File System URL (i.e. not using the Browse button, or when no static File System has previously been defined) as part of a User home directory or Virtual File/Folder path, the following URL composition should be followed.
Scheme:encrypted
Default Endpoint: blank
Full Syntax: encrypted://<passphrase>@/<path>
Examples: encrypted://mypassword@/c:/encryptedpath/ or
encrypted://mypassword@/%2Fnetworkhost/path/encryptedpath/
Limitations
- Post processing on files by 3rd party tools will not function properly if they need to inspect file contents/meta-data. Files are encrypted fully, and can only be accessed through FileCatalyst.
-
Also See Common EFS Limitations.
Notes
The following is a list of notes that should be considered when using this file system.
- When defining an Encrypted File System as a static URL that points to a UNC path, i.e. "encrypted://passphrase@//host/path" you may need to URL encode the second / after the @ so it is not removed when translated into a URL. For example: "encrypted://passphrase@/%2Fhost/path"
- Size of files stored on the encrypted file system displayed in FileCatalyst clients will differ from the size shown by the OS. FileCatalyst will show the actual size of the file, while the OS (explorer, finder, ls, dir, etc...) will show the encrypted file size.
Common EFS Limitations
All EFS implementations in FileCatalyst have a common set of limitations that are not specific to their respective 3rd party storage. The following features are NOT supported in FileCatalyst client applications when connecting to a FileCatalyst Server user account backed by EFS. Features marked with an asterisk (*) will be implemented in a future release.
- Multi-client: Enable auto-archiving of small files (*)
- Enable compression: single-archive (*)
- Monitor File System events
- Expired temporary files (.fctmp.*, .fcsigs.*, *.fczip, etc...) will not be purged automatically for EFS backed user home directories (*)