Installation and Upgrades
Installation Instructions: The Quickstart Guide
The FileCatalyst Server QuickStart Guide is available on the main FileCatalyst web site for download (or here if you are viewing this user guide after installing the software). The Quick Start Guide provides overview instructions on how to quickly install the Server application (Windows).
The contents of the Quick Start Guide will not be duplicated here.
For command-line installs on headless Linux, please see the Administration via Command Line section of this document, and the Install as a Service section.
Software upgrades
Upgrading FileCatalyst Server requires a sequence of steps be taken based on the installation platform. Some steps are optional (to safeguard configuration data in case of a rollback), but should be followed to ensure the smoothest upgrade experience.
Windows
- Stop the FileCatalyst Server.
If you are running FileCatalyst Server stand-alone (from "Start" menu), please select the "Exit Administration" option in the file menu.
IF you are running the server as a service, please open up the Windows Services and stop the process from running (default name is "FileCatalyst Server"). - Backup configuration files.
If upgrading from v3.0.1 or less, you should copy the following configuration files into an "upgrade" folder.- fcconf.conf
- authentication.xml
- ipfilters.xml
- users.xml
- fcconf.conf
- ipfilters.xml
- .fcdb/
Note: Starting in v3.1, the authentication.xml and users.xml information is now stored in an internal database file in the directory ".fcdb/".
If upgrading from 3.0.1 or older to 3.1 or later, the Server will automatically import the users. If a user is missing correct authentication, the server will generate a new random password. Until the administrator sets the password to a known value, these users will not be able to log in. The server admin will display a list of reset users on the start up after the import. - Run the installer (install_fc_server.exe).
- Restart the FileCatalyst Server application (either as a service or standalone).
Linux/Unix
- Stop the FileCatalyst Server.
If you are running the FileCatalyst Server stand-alone (i.e. running fc_server.sh or fc_server_console.sh script), you need to shut FileCatalyst Server down before executing an upgrade. The following commands can be done to shut the service down and verify that processes are not running.- Execute the command "fc_server_shutdown.sh".
- Verify the service is down by running the command:
ps -ef | egrep -i "filecatalystserver"
- Linux:
service fcserver stop - Solaris:
svcadm -v disable fcserver
- If you have installed the service you must run the service_wrapper/uninstall.sh script to ensure that the application is completely uninstalled.
- Backup configuration files.
If upgrading from v3.0.1 or less, you should copy the following configuration files into an "upgrade" folder.
                            cd /opt/utechsoft/server/

mkdir ./upgrade

cp fcconf.conf ./upgrade

cp authentication.xml ./upgrade

cp ipfilters.xml ./upgrade

cp users.xml ./upgrade
If upgrading from v3.1, the following files & directories should be copied into an "upgrade" folder before running the new installer:
                            cd /opt/utechsoft/server/

mkdir ./upgrade

cp fcconf.conf ./upgrade

cp ipfilters.xml ./upgrade

cp -Rp .fcdb ./upgrade

cp ./service_wrapper/fc_env ./upgrade
Note: Starting in v3.1, the authentication.xml and users.xml information is now stored in an internal database file in the directory ".fcdb/".
If upgrading from 3.0.1 or older to 3.1 or later, the Server will automatically import the users. If a user is missing correct authentication, the server will generate a new random password. Until the administrator sets the password to a known value, these users will not be able to log in. The server admin will display a list of reset users on the start up after the import. - Unpack the software.
gunzip ./fc_server.tar.gz

tar -xvf ./fc_server.tar - Copy back the files settings overwritten by tar bundle
cp ./upgrade/fcconf.conf .Other files ("ipfilters.xml" and ".fcdb/" directories) should not be overwritten by tar bundle.
cp ./upgrade/fc_env ./service_wrapper/ - If you are running as a service you must rerun the service_wrapper/install.sh script to reinstall the service.
- Restart the FileCatalyst Server application (either as a service or standalone).
Silent install on Windows
- To generate the settings file,run the installer from the command with the SAVEINF flag
and the destination file for the settings.
install_fc_server.exe /SAVEINF="settings.inf" - Copy the installer and the generated file to the machine where you would like to perform the silent install.
- Run the installer from the command line with LOADIINF flag and specified settings file.
install_fc_server.exe /VERYSILENT /LOADINF="settings.inf"
Uninstalling FileCatalyst Server
Windows
- Shut down all the standalone applications
- Open ‘Services Manager’ by clicking on ‘Start’, search for services.msc, and then run that application
- Locate the FileCatalyst Server module and stop the service
- Open ‘Control Panel’ then navigate to ‘Programs and Features’.
- Click on the FileCatalyst Server and hit ‘uninstall’.
- Click the 'yes' option when prompted
Silent uninstall on Windows
- Open a command prompt and navigate to the install directory of the product you wish to uninstall.
- Run the uninstaller from the command line with the VERYSILENT flag.
unins000.exe /VERYSILENT" - Note that if you have installed multiple versions in this directory, the number at the end of the exe may have been incremented
MacOSX
- Quit the application and stop the FileCatalyst service by using ‘System Preferences’ located under the Apple menu
- Locate FileCatalyst Server and stop the service
- To uninstall the service, open ‘System Preferences’, find the FileCatalyst Server service module, right-click on it and click ‘remove from pane’
- From the ‘Finder’ window, click on ‘Applications’, find FileCatalystServer.app, right-click on it and delete it
- From the ‘Finder’ window, click on ‘Applications’, find FileCatalystServerAdmin.app, right-click on it and delete it
- Use ‘Finder’ to access the Library folder, open ‘Application Support’ and delete the FileCatalyst folder (path e.g. '/Library/Application Support/FileCatalyst' or '/Users/<username>/Library/Application Support/FileCatalyst')
Linux
Note: You may need admin access to perform some of these commands
- If you are running the FileCatalyst Server stand-alone (e.g. running fc_server.sh or fc_server_console.sh script), you need to shut down the FileCatalyst Server
- Open a new Terminal window
- Navigate to the folder where your server is installed (e.g. /opt/utechsoft/server/)
- Execute the command
"./fc_server_shutdown.sh" - Verify the service is down by running the command
ps -ef | egrep -i "filecatalystserver" - If you are running the FileCatalyst Server as a service, stop the service by using
the appropriate command needed for your version of Linux in the terminal window
(Ubuntu e.g.
"service fcserver stop")- Remove the service by navigating to service_wrapper folder located within
the server folder
(e.g.
/opt/utechsoft/server/service_wrapper) - Run
./uninstall.sh
- Remove the service by navigating to service_wrapper folder located within
the server folder
(e.g.
- You can now remove the folder structure by using rm -rf <path to the server
directory> (e.g.
rm -rf /opt/utechsoft/server)
Managing Users, Groups, and Virtual Files/Folders
Overview
Users Overview
FileCatalyst Users live at the application layer, and are managed by our internal database. Unlike standard UNIX FTP servers, you do not need to create a user at the OS level in order to utilize FTP access. If the user also exists on the operating system however, FileCatalyst Server can authenticate the user using external directory services such as Active Directory, LDAP or PAM.
FileCatalyst users by default are jailed to their home directories. This security feature ensures that a user cannot see data which does not belong to them (i.e. cannot see "C:\Windows") .
Example: Bob has a home directory of "D:/data/bob/". They can only see files within this directory structure when logged into the server. Files outside of the home directory are inaccessible (cannot modify files in C:/Program Files/ for example).
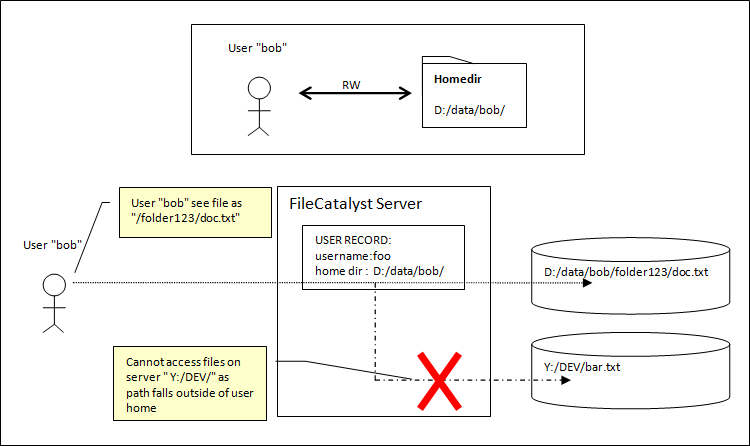
If you require more flexibility (i.e. user needs to access more than one mount point, or more than one user needs to collaborate on work together), you need to enable Virtual Files/Folders.
Virtual Files/Folders Overview
Virtual Folders allow an administrator to create multi-pathed home directories, and give flexibility to allow users access to directories they need access to. Virtual Files allow an administrator to give access to specific files outside of the users home directory.
Example: Bob requires access to project files stored in "Y:/DEV" in addition to files in his home directory.
On the server, we can create a Virtual Folder (i.e. "project1" with a path "Y:/DEV//"). Once this is done, the Virtual Folder can be assigned to the user, where it will appear as a mounted subdirectory inside his home directory. Note that these labels will be case insensitive on a Windows machine. (i.e. "project1" is the same as "PROJect1")
Multiple Virtual Files and Folders may be assigned to a user, each with assigned permissions.
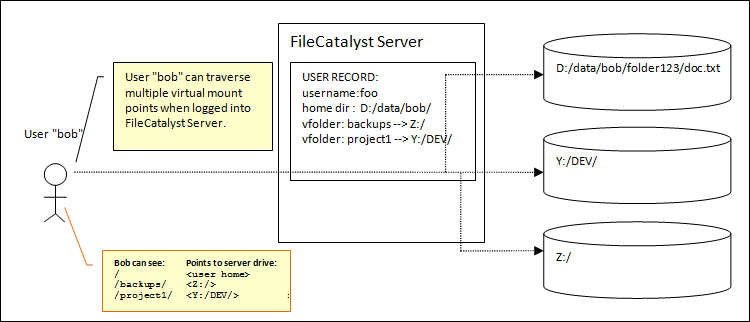
In this example, a new subdirectory "/project1/" would be visible from Bob's user home, which can access files stored under "Y:/DEV/".
User Groups Overview
For larger and more complex configurations, user groups are available. These allow administrators to easily map drive access to organizational roles (example: IT staff needs access to backups), and allow users to be assigned to one or more groups.
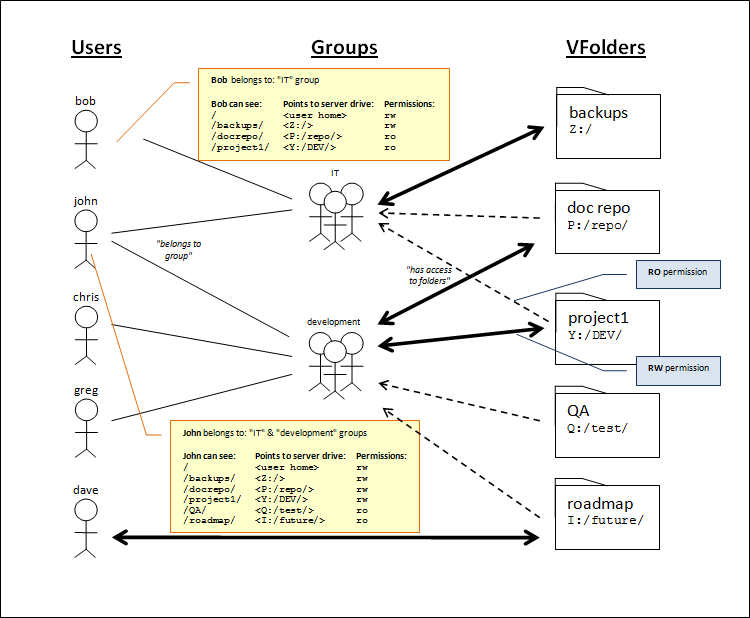
When assigning Virtual Files or Folders to either Users or Groups, permissions may also be granted. If multiple paths exist to a file or folder (example: John sees folder "project1" both through "IT" and "development" group), permissions are stacked for each access a user has to that file or folder.
Permission Overview
As the user (and groups and virtual files/folders) are contained in the application layer, permissions a user has to their files and directories are handled in the FileCatalyst Application as well.
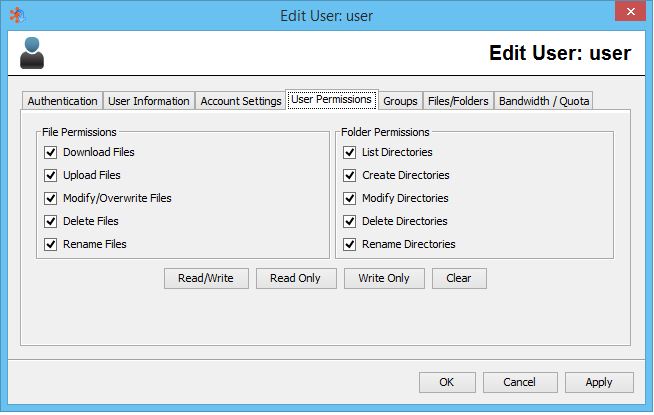
There are 10 permissions assigned either to the user (used when accessing content in their home directory) or to virtual files/folders (either directly assigned to the user or via group relationships). 5 apply to files, 5 apply to folders.
File Permissions
Download Files
If selected, the user has the ability to download files from the server.
Note: Upload with Incremental Delta's requires download permission as part of the RSYNC algorithm (signature files).
Upload Files
If selected, the user has the ability to upload files to the server. This does not indicate that they can modify or overwrite files if they already exist.
Note: Download with Incremental Delta's requires download permission as part of the RSYNC algorithm (signature files).
Modify/Overwrite Files
If selected, the user is given permission to upload files, as well as modify existing files by overwriting, or performing file operations (chmod, etc).
Note: Some features require modify/overwrite permissions:
- HTTP upload transfers need this enabled, as HTTP blocks are appended to a file and are considered "modified" rather than an original upload.
- Transfers using auto-resume as an option require modify to be enabled, as resuming a partially transferred file is considered modification of an existing file.
Delete Files
If selected, the user is able to delete files from the server.
Rename Files
If enabled, the user is able to rename existing files on the server.
Note: Upload transfers with temporary filenames requires rename permissions to be enabled.
Folder Permissions
List Directories
If enabled, the user is given permission to browse the file system, and get directory and file listings. This is required for FileCatalyst HotFolder's download option to work correctly.
Create Directories
If selected, the user will be able to create new directories on the server.
Modify Directories
If selected, the user is given permission to create new directories, and modify existing directories (chmod, etc)
Delete Directories
If selected, the user is permitted to delete existing directories from the server.
Rename Directories
If enabled, the user is able to rename existing directories.
User Manager
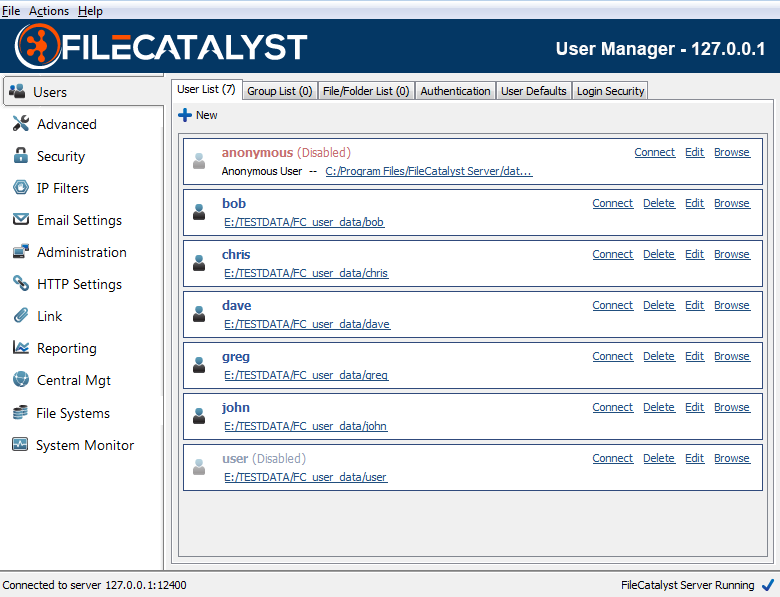
FileCatalyst Server uses a user-based permissions system which allows administrators to create and manage user accounts for all users of the system. The user menu allows administrators to add, edit, or delete existing user accounts. Each user also has a Connect link which provides access to the Quick Connect functionality.
Accounts that are faded indicate they are not active, either because they have been disabled or have expired. The red anonymous account is disabled by default. By enabling this account, it allows users to anonymously access the system, with no password required.
Creating a New User
To create a new user, click the "New" button and follow the steps in the wizard. You will be prompted to specify a username, password, permission settings, and account information before the user is added to the system.
Managing Existing Users
To edit, or delete existing users, right click and select the appropriate option, or click the “Delete” or “Edit” text inside the panel.
Search Existing Users
To bring up the find window in the user list, select the menu item "Actions -- Find User", or press "ctrl-f".
User Authentication
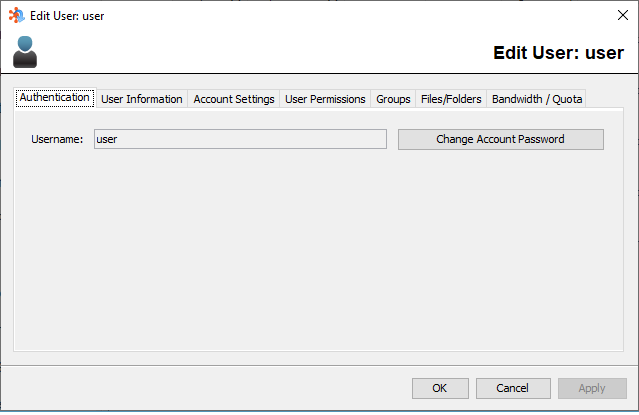
Username
The username of this account, used to authenticate with the server.
Change Account Password
To change the account password, click the change account password button and fill out the required fields.
Note: User passwords are stored on the FileCatalyst Server for users created by the administration tool. Changing a password for an existing user will modify the encrypted password entry in the database.
Users created by auto provisioning (LDAP and Database) have passwords stored in the remote authentication service. As FileCatalyst supports LDAP in read only mode, password changes on users will not modify the LDAP repository but place a password entry on the local file only.
User Information
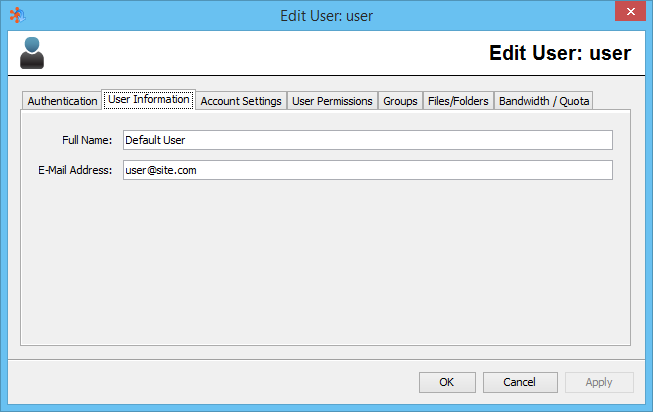
Full Name
The full name of the user to whom this account is assigned (optional)
Email Address
The email address of the user to whom this account is assigned (optional)
Account Settings
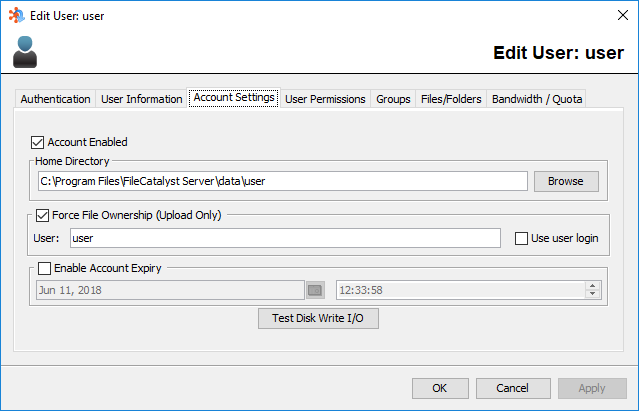
Disabling User Accounts
By deselecting the "Account Enabled" checkbox, the user will be unable to log on to the server or access any files or directories.
User Home Directory
The home directory of the user is the root directory to which they will have access. For example, if the user's home directory is specified as C:\Users\MyUsername\, they can access the MyUsername folder, and anything below it (i.e. C:\Users\MyUsername\MyNewDirectory)
Force File Ownership (Upload Only)
By selecting the "Force File Ownership" checkbox, all files transferred to the user will have their operating system user ownership set to the value specified. If the "Use user login" checkbox is selected, the FileCatalyst user's current username will be used instead of the specified value.
Note 1: On Linux, an additional field allows configuring group ownership.
Note 2: Force File Ownership is currently only supported with internal file systems. All external file system transfers will not have their file ownership changed to the configured value.
Note 3: If the Maintain UID/GID system property is enabled, the user and group data will be updated to accept user and group identifiers. Please note that this functionality is only on Linux operating systems.
Account Expiry
To specify an account expiry (a time and date at which the account will no longer be active), ensure the "Enable Account Expiry" checkbox is selected and enter the time and date in the applicable field.
Disk Write IO Test
Commands the server to perform a sequential write operation to the user's home directory. Using a small file size will likely demonstrate only system/hardware cache availability. Select a larger file size to test and show true disk write speeds.
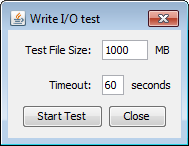
A maximum timeout value (seconds) can be set to ensure that the I/O test stops after a specified time. If the test was not able to complete when the timeout expires, the last speed before stopping will be returned, and all I/O resources will be released back to the server.
NOTE:The test creates a temporary file on the disk. Ensure that enough space is available for the test.
User Permissions
Permissions details can be found here.
Read/Write
Shortcut that selects all permission for the user for both files and folders.
Read Only
Shortcut that selects only File Download and Folder List permissions.
Write Only
Shortcut that selects permissions normally required for a user which only needs to upload files to the server.
Clear
Removes all permissions to the user.
Bandwidth / Quota
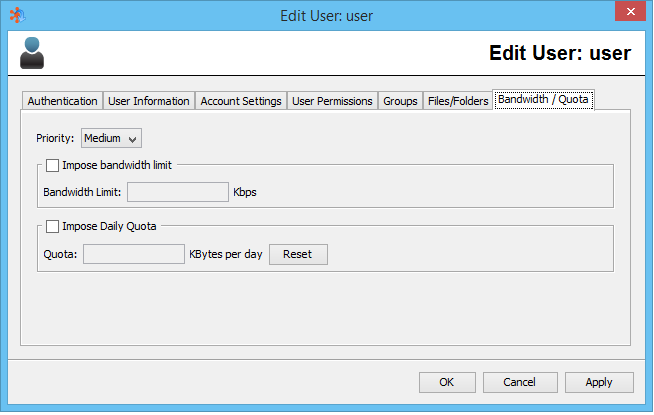
Priority
This setting determines how much bandwidth will be allocated to a connected user in proportion to other connected users. The possible settings are High, Medium, and Low. The weight of each priority is 10, 5, and 1 respectively. The combined weights of all connected users are added together, and divided into the total available bandwidth of the server. The result is then multiplied by the weight of the user to determine the actual allocated bandwidth. For instance, if there is a high priority user and a low priority user connected, and the server is licensed for 100 Mbps, then the total priority is 11. Divided into 100000, this gives 9090.09 Kbps. This means the low priority user will get 9.09 Mbps, and the high priority user will get 90.91 Mbps.
If only one user is connected, they will be allocated all available bandwidth.
Bandwidth
This setting determines the maximum bandwidth for a particular user, regardless of what is allocated to them via the priority settings. (Note that when there are multiple connections to the FileCatalyst Server from the same user account, bandwidth allocation is distributed evenly among all sessions using that account.)
This setting is useful if the available bandwidth of the end user is known to be a particular value. This ensures that all UDP transfers will never exceed that value. Although the end user also has the option to specify the maximum bandwidth on the client side, this might be easier.
If the calculated bandwidth based on priority is higher than the maximum value specified in this setting, the difference will be re-allocated to all other connected users.
This setting helps maintain fairness and still make optimal use of available
bandwidth.
Note on slower bandwidth settings (most noticeable below 100Kbps) it
may be necessary to lower the packet size of the udp transfers to get a tighter control
over the limit due to the granularity effect packet size has on bandwidth throttling.
Daily Quota (Upload Only)
This setting ensures that a user cannot upload more than the specified value in KB on
a given day. A day is determined by the date settings on the server machine. Note that
this is not a disk usage quota, but a fair usage quota. A user who has exceeded their
quota is not necessarily blocked from transferring; however priority is always
given to users with daily quota remaining.
For example, if all currently connected users have exceeded their daily usage quota, all
transfers may proceed with no restrictions. The instant a user (lets call them userX)
who has not exceeded their daily usage quota connects, all users who have previously
exceeded their quota will be prevented from transferring while priority is given to
userX. Once userX exceeds their daily usage quota, all users will again be able to
transfer without restrictions.
The administrator may reset Daily Usage by clicking the Reset button.
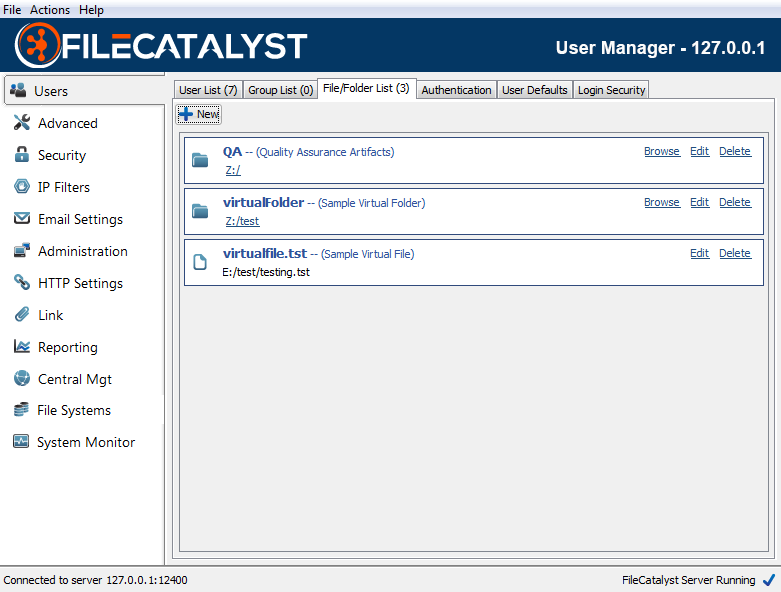
Virtual Files/Folders
Virtual Folders allow an administrator to select a secondary path to which a user may browse into and transfer files outside of their home directory. Virtual Files allow the administrator to give access to specific files outside the users home directory. To the end-user, these files and folders will appear as either a simple subdirectory structure they can CD into, or a file in their home directory root. Virtual Files/Folders can point to anywhere the server can access, including alternate local drives ("D:/") or an accessible UNC paths ("\\10.1.1.3\datadrive\").
Note: It is always recommended to utilize UNC paths rather than mapped drives on a Windows environment if the FileCatalyst Server is going to be run as a service.
New
Launch the Virtual File/Folder Wizard.
Browse
Open up the native browser to explore the virtual file/folder location (only available Remote Admin running on the server).
Edit
Modify the Virtual File/Folder, including assigning it to either Users or Groups.
Delete
Remove the Virtual file/Folder. Will remove all assigned references to Users and Groups.
Creating Virtual File/Folder
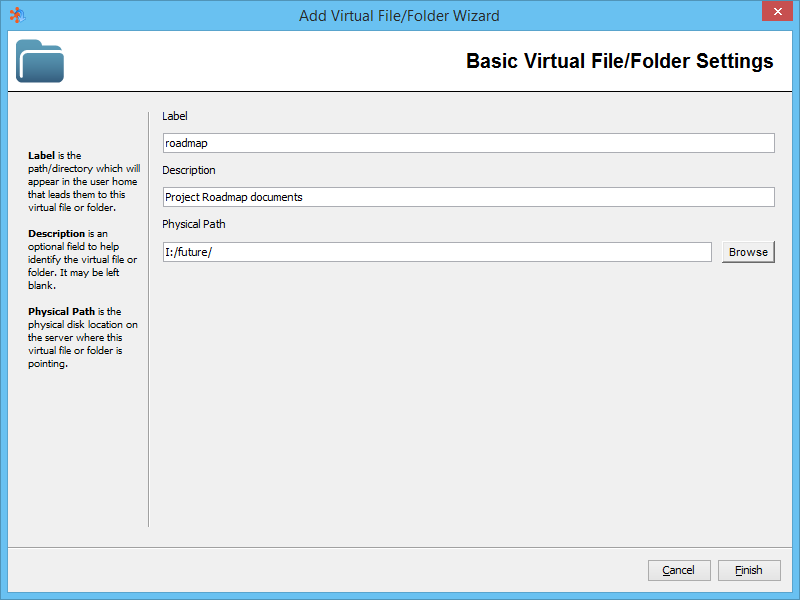
Label
This represents the sub-directory or file name a user will see in their home directory when logging into the system.
In the example above, if the user performs a "cd roadmap" upon logging into the system, they would be redirected to the contents of "I:/future/".
Description
Description of the file or folder. Useful for administrators to recognize the purpose of the virtual file or folder.
Physical Path
Physical disk location on the server where this virtual file or folder is pointing. This can be a local file or full UNC path (i.e. "\\10.1.1.1\dir\").
Assigning Virtual Files/Folders to Users and Groups
There are three different avenues you can take to assign Virtual Files/Folders:
- Edit the Virtual File/Folder directly by first navigating to the File/Folder List (shown below).
- Assign a Virtual File/Folder to a group by editing User Groups.
- Assign a Virtual File/Folder to a user by editing a User.
Each has advantages -- editing the Virtual File/Folder directly, you can assign it to all Users and Groups in one screen. On the other hand, assigning it by editing a User allows you to see if the Virtual File/Folder is already assigned to the user via a group assignment.
Editing a Virtual File/Folder from the Virtual File/Folder List
Once a Virtual File/Folder has been created, you can then edit it and start assigning it to either Users directly or to User Groups. Permissions the User and Group have to the Virtual File/Folder can be selected as it is assigned, or can be edited afterwards.
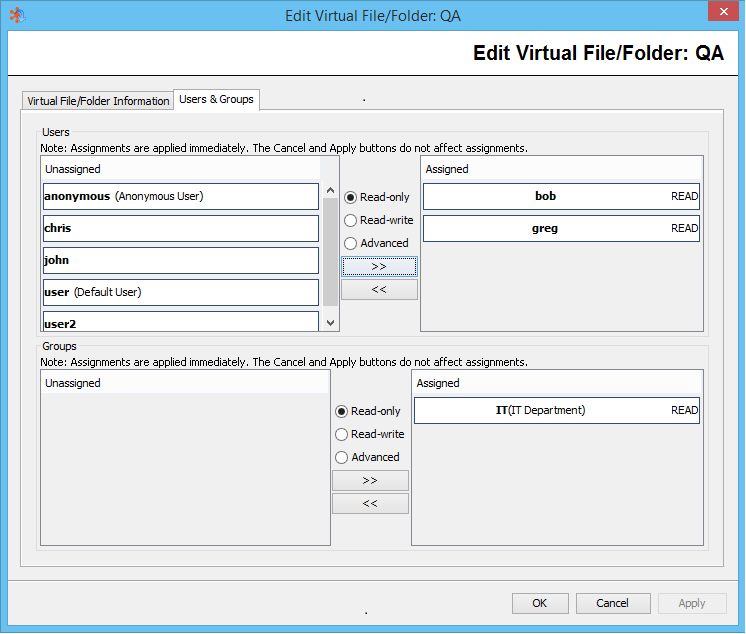
Note: Permissions stated as "ADV" fall outside of basic configuration of READ or ALL (read-write). Details can be viewed by selecting the permission link on the list.
Note: Changes to the User or Group list is modified immediately on the FileCatalyst Server database. The standard Apply and Cancel (where modifications wait for administrator confirmation) does not apply here.
Editing a User to assign Virtual Files/Folders
By editing a User and selecting the "Files/Folders" tab, you can also have a look at what Virtual Files/Folders a User can have access to. This also allows an administrator to quickly see not only what file and folders a user has access to, but what permissions are granted either directly or via groups which a user is assigned to.
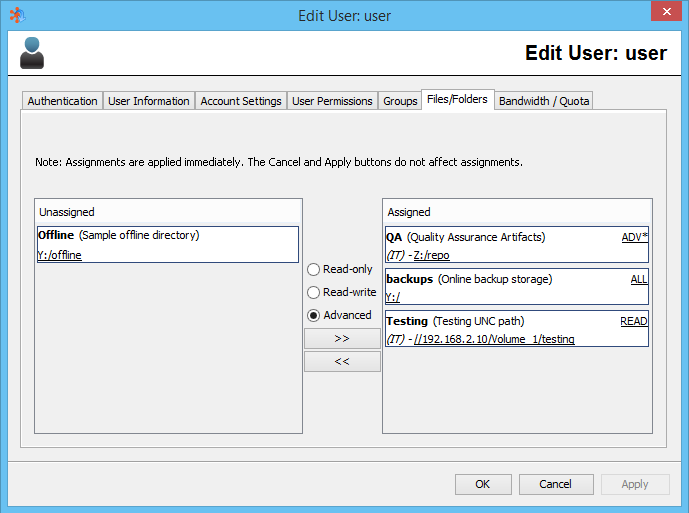
Note: A star '*' next to READ/ALL/ADV indicates that multiple permissions are granted to the user either by direct assignment of a folder or through various groups, and that these are the sum total of the permissions granted to the user.
It is possible to assign a Virtual File/Folder to a User even if they already have permission to access the folder via a User Group.
It is not possible from this panel to remove assignment of a Virtual File/Folder from a User if assignment is granted via a User Group. The administrator needs to modify either the group access to a Virtual Folder or this User's access to Groups.
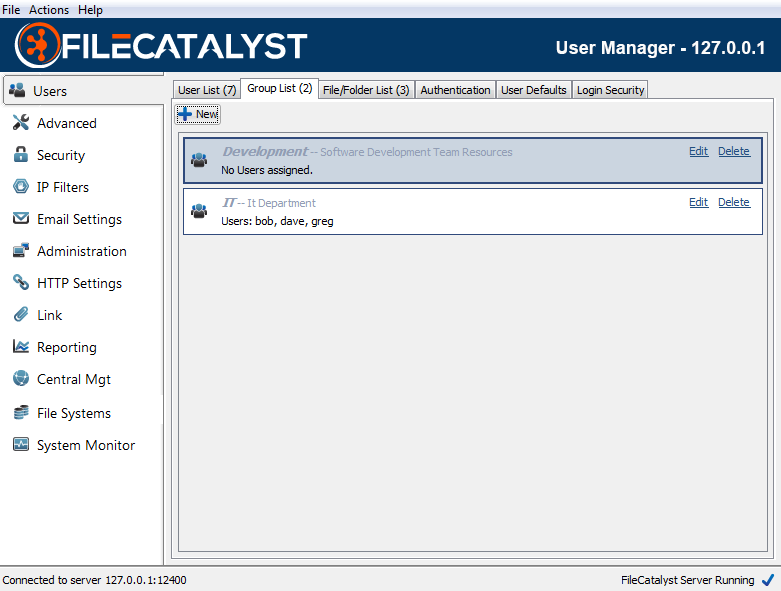
User Groups
User Groups allow easier management of Virtual Files/Folders by joining common access and permissions granted to multiple users on a team to be controlled in a single location.
New
Launch the User Group Wizard.
Edit
Modify the User Group, including assigning Users or Virtual Files/Folders to the Group.
Disable/Enable Group (right click option)
Disable the User Group. Allows an administrator to temporarily restrict access that a group provides without permanently removing the group's configuration.
Delete
Remove the User Group.
Creating User Groups
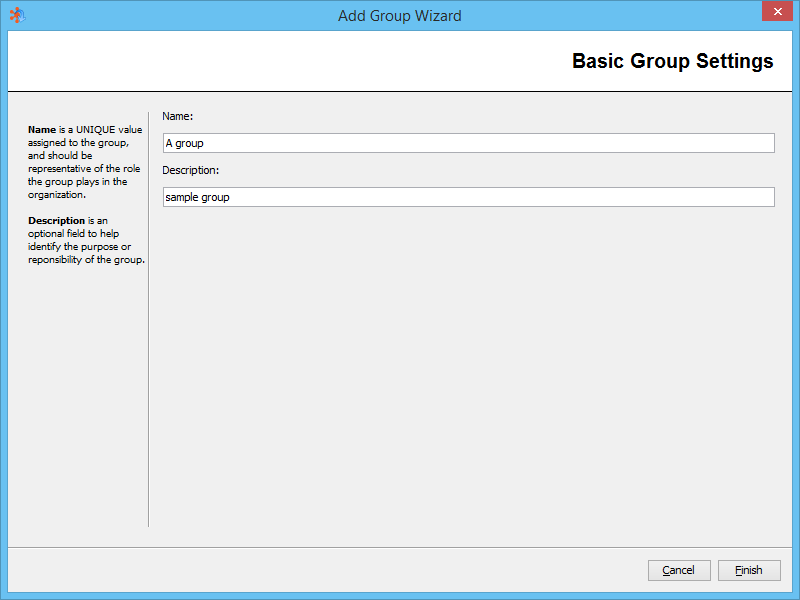
Group Name
Unique name on the FileCatalyst system to represent the Group. This is the name which will appear when provisioning a Virtual File/Folder to the Group or assigning a User to a Group.
Group Description
Description of the User Group. Useful for administrators to recognize the purpose of the group.
Editing Groups
Once a User Group has been created, you can start assigning Users to the Group, and configure Virtual Files/Folders to be accessible to the Group.
Assigning Users to a Group
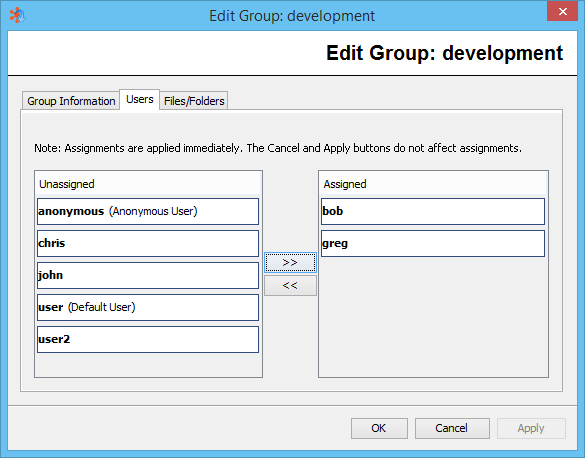
Assigning Virtual Folders/Files to Groups
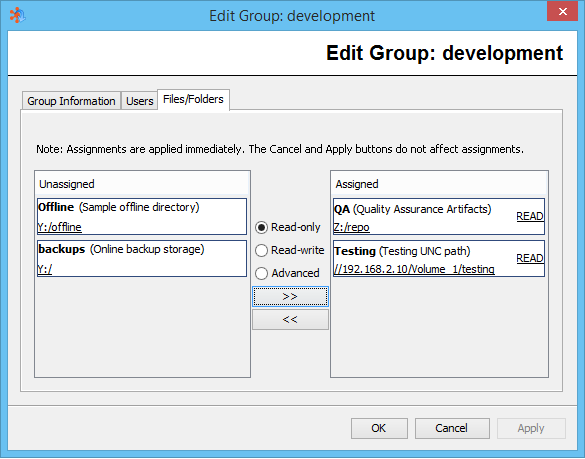
Note: Permissions stated as "ADV" fall outside of basic configuration of READ or ALL (read-write). Details can be viewed by selecting the permission link on the list.
Authentication Services (LDAP, RDBMS, PAM)
In addition to the internal user definitions, FileCatalyst Server allows the integration of LDAP servers for user management. This allows easy integration into existing corporate infrastructures, and allows users already defined in a corporate environment to be auto-provisioned.
Two different types of LDAP databases are supported by FileCatalyst server: OpenLDAP and Active Directory. Both can support multiple context strings, allowing easy integration on even complex corporate structures. LDAP queries over SSL (ldaps://, default port 636) are supported for secure encrypted communication between the FileCatalyst server and the remote authentication service.
Note: FileCatalyst does not support the ldapi:// protocol, which is also known as StartTLS, where an LDAP connection is established first (ex. on port 389) and then it becomes protected via TLS. Be sure your TLS LDAP server is configured for the ldaps:// protocol.
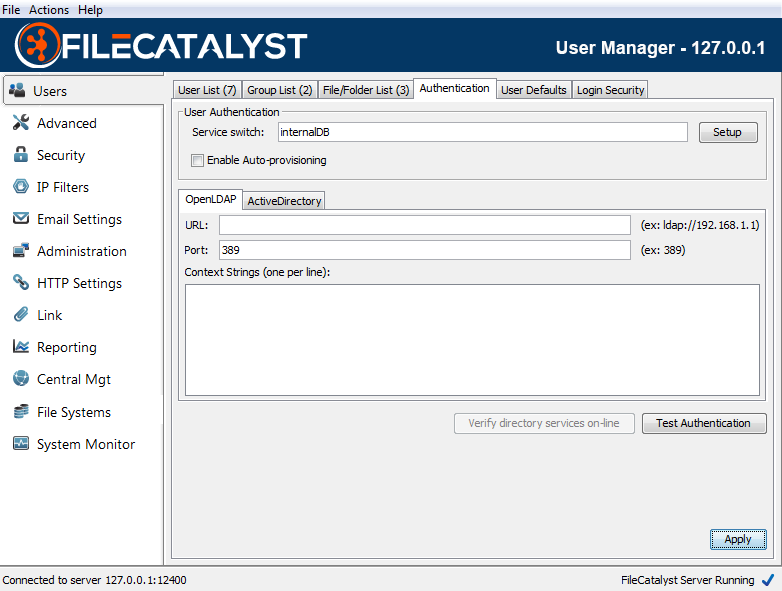
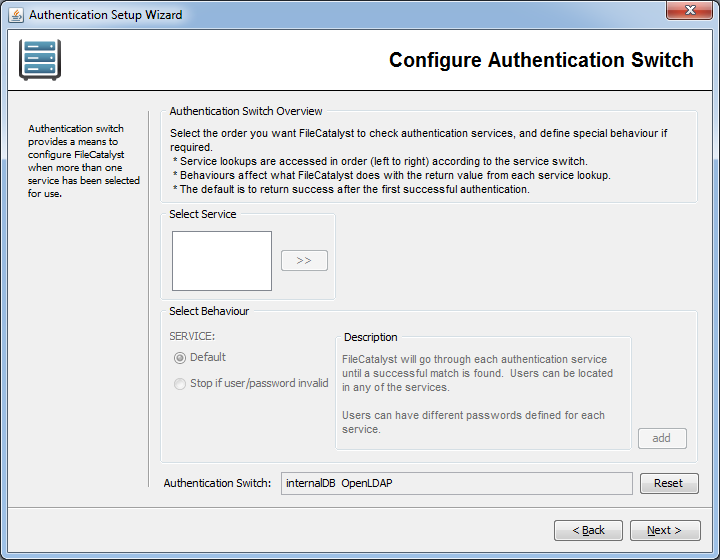
Service Switch
The service switch defines which order FileCatalyst Server will query authentication services to validate a user/password pair. The syntax is similar to the nslookup switch on Unix systems, and is configurable by the Authentication Wizard ("Setup" button).
Acceptable values are combinations of:
                        "internalDB"

                        "OpenLDAP"

                        "ActiveDirectory"

                        "db"

                        "PAM"
Enable Auto-provisioning
If OpenLDAP or Active Directory has been selected as an authentication service, the administrator can configure the server to automatically create users which already exist in the remote authentication service the first time they attempt to log in. If this is disabled, users must be explicitly be created by an administrator before being granted access to the server.
User accounts that are auto provisioned will be created using settings listed under the User Defaults tab.
If auto provisioned users should use a home directory found in the LDAP service, the administrator must edit the fcconf.conf file and specify the name of the appropriate parameter (e.g. homeDirectory) using the key FCServer.server.config.LDAP.homedir.attribute
OpenLDAP and Active Directory Configurations
Any changes to LDAP configuration must be sent to the server first ("Apply" button) before they can be tested or used by FileCatalyst server. For step by step LDAP configuration and examples, start the Authentication Setup Wizard ("Setup" button).
Verify Directory Services Online
Tests if remote directory services (OpenLDAP and/or Active Directory) are currently on-line and available to the FileCatalyst server. Used primarily to verify that the port/IP have been properly configured.
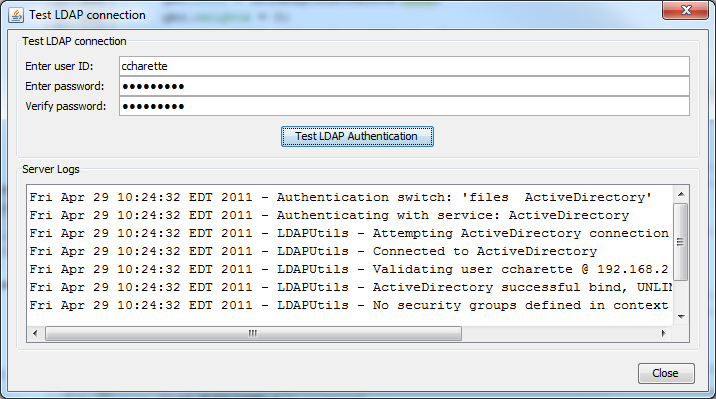
Test Authentication
Test complete authentication process on the FileCatalyst server. Administrator must provide a username/password pair. Server logs during the authentication process are output to capture trace and error logs.
Installing an SSL Certificate
To simplify the certificate installation process, steps 2-4 are best executed from within a Windows command line. In the examples, the certificate authority file used is "cacerts", which is part of the JVM/JRE directory as seen in step 2.
- Set up the LDAP server or Active Directory server with your certificate according to your organization's particulars.
- Copy the certificate authority file into the FileCatalyst Direct Server directory.
Using default installation paths, your command will look like this:
copy "c:\Program Files\FileCatalyst Server\jre\lib\security\cacerts" "c:\Program Files\FileCatalyst Server\" - Copy the certificate file(s) onto the FileCatalyst Direct server directory. This must
be an X.509 certificate format. Note: For Active directory
servers, the certificate is normally found on the root (c:\) directory. Example:
copy "c:\mycertificate.crt" "c:\Program Files\FileCatalyst Server\" - Import the LDAP server certificate key into authority file using Keytool, which is
distributed with JAVA. Note: Replace values represented by <>
brackets with appropriate values. The "alias" is arbitrary and can be any
easy-to-remember value. You will be prompted for a keystore password. By default,
cacerts
has a password of "changeit". Example import command:
"c:\Program Files\FileCatalyst Server\jre\bin\keytool.exe" -import -alias <myldapserver> -file <mycertificate.crt> -keystore "c:\Program Files\FileCatalyst Server\cacerts" - Insert the authority file keystore into fcconf.conf. Open fcconf.conf in an editor and
modify the appropriate line as follows:
FCServer.server.config.LDAP.ssl.selfsignkeystore=c:/Program Files/FileCatalyst Server/cacerts
Authentication Setup Wizard
Select Authentication Services
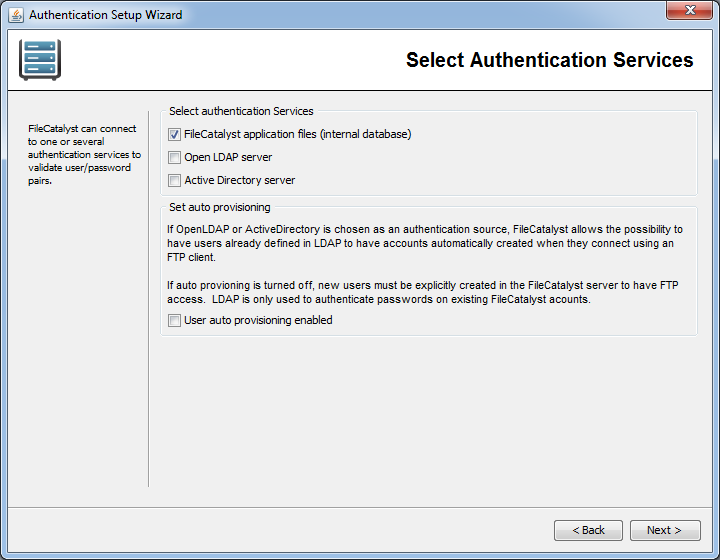
One or more authentication services may be selected for FileCatalyst Server. If an OpenLDAP or Active directory server is selected, you have the additional option of enabling users found on these remote authentication services to be auto provisioned.
OpenLDAP
OpenLDAP URL and Port
Enter the URL and Port Number of the server to connect to. The URL must start with "ldap://" or "ldaps://". By default, LDAP servers use port 389 for regular LDAP connections, and 636 for LDAP over SSL connections.
NOTE: Secure LDAP connections require a signed SSL certificate be installed on the LDAP server to function properly and securely. Though not recommended, the use of self-signed SSL certificates is possible. The SSL certificate file (.pem or .pkcs12) must first be transformed into a Java TrustStore file, and requires having the Java virtual machine on the FileCatalyst Server side accept the certificate as valid and trusted.
Once the certificate is a TrustStore, manually edit the FileCatalyst Server
fcconf.conf file and add the following line:
FCServer.server.config.LDAP.ssl.selfsignkeystore=TrustStore.filename
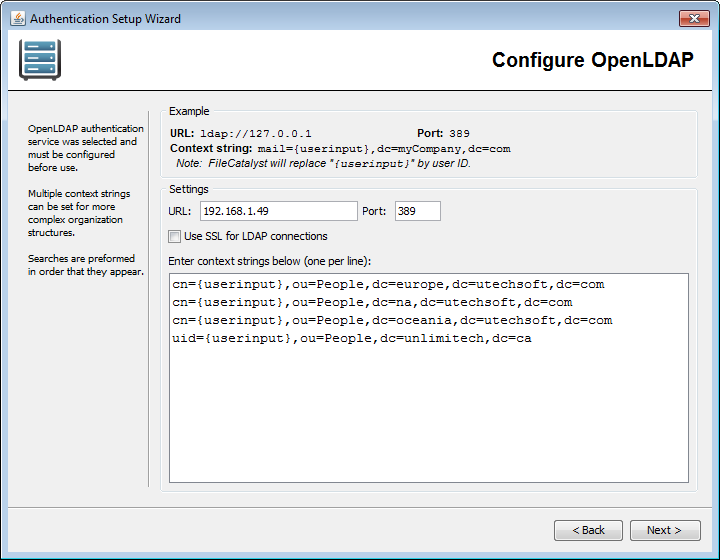
Context Strings
Context strings are required for LDAP queries to uniquely identify a user in the
repository. They are templates for the queries. The LDAP driver requires that curly
brackets
"{userinput}" exist in the
context string, as these will be removed and replaced with the username during the login
process. The FileCatalyst Server will try each context string, one at a time, until it
finds one that works for the user being queried.
Context strings are matched against configured LDAP dn values. Therefore, each
context
string must match the intended dn values exactly.
For example: If the LDAP
server is
configured with dn values formatted such as
dn: cn=victor,ou=People,dc=utechsoft,dc=com
where victor is a username, then the matching context string must be
cn={userinput},ou=People,dc=utechsoft,dc=com
Alternative dn formats may use a different RDN (relative distinguished name)
syntax for the username instead of
cn= (for example, uid=victor).
Configure your context string(s) appropriately.
Multiple context strings (one per line) can be entered for LDAP queries to satisfy more complex organizations. Configuring specific distinguished names also allows organizations to limit access to the application to only a subset of users where required. To optimize performance it is best to list multiple context strings in order of most preferred or most prevalent matching strings first.
Active Directory
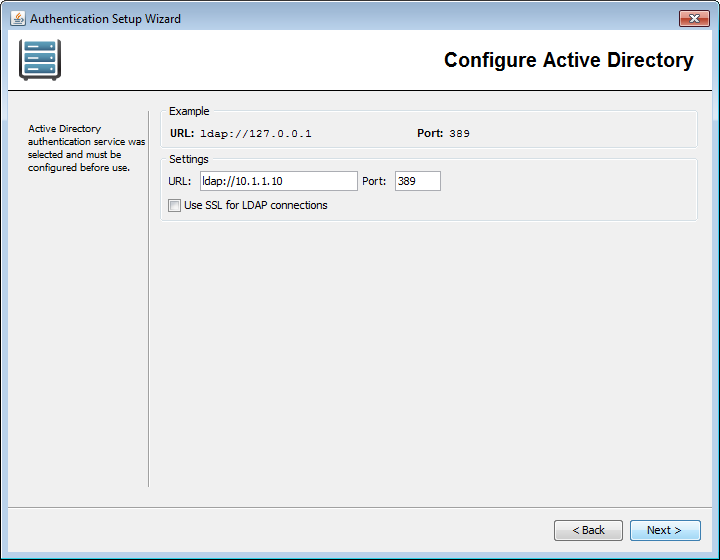
Active Directory URL and Port
Enter the URL and Port Number of the server to connect to. The URL must start with "ldap://" or "ldaps://". By default, LDAP servers use port 389 for regular LDAP connections, and 636 for LDAP over SSL connections.
Active Directory Context Strings
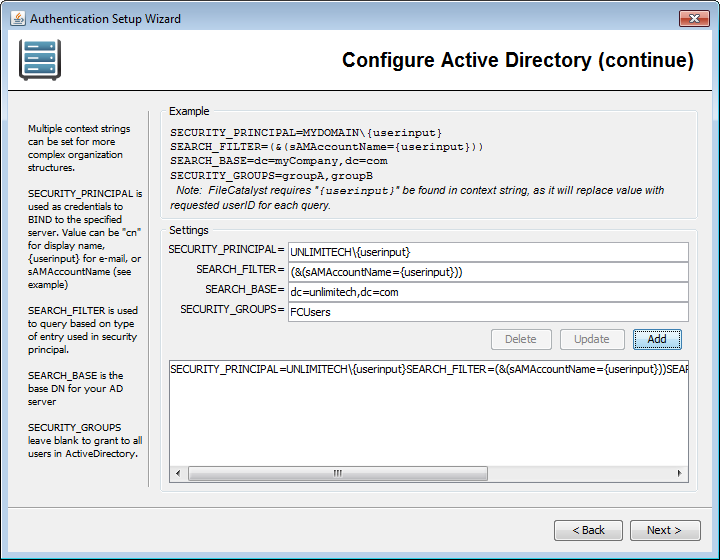
Context strings are required for Microsoft Active Directory to uniquely identify a user in the repository. The LDAP driver requires that curly brackets "{userinput}" exist in the context string to be replaced with the user name during the login process.
Values normally modified:
- enter the user domain
- enter the search base (identifies your organization)
- fill in the security group (to limit access to subset of users)
Multiple context strings (one per line) can be entered for LDAP queries to satisfy more complex organizations. Security groups in Active Directory can optionally be entered to restrict access to FileCatalyst to a subset of users.
Active Directory Authentication Service Switch
This switch determines the order in which the authentication services are called. By default, FileCatalyst Server requires a positive authentication from only one authentication service to accept an incoming user connection.
Active Directory Limitations
The names of security principal objects can contain all Unicode characters except the special LDAP characters defined in RFC 2253. This list of special characters includes: a leading space; a trailing space; and any of the following characters: # , + " \ < > ;
Test LDAP Authentication
The complete authentication process is validated on the FileCatalyst server. Administrator must provide a username/password pair. Server logs during the authentication process are output to the dialog box to capture any issues with the login procedure. This is the preferred method of validating authentication services.
Multiple Disjointed Directory Services
For organizations with multiple ActiveDirectory or OpenLDAP servers, it is normally best practice to configure the directory services to point to each other, allowing one AD or OpenLDAP server to authenticate any user within the organization.
If this is not possible, FileCatalyst does have the ability to support multiple ActiveDirectory or OpenLDAP servers. This must be done by editing fcconf.conf and manually setting LDAP settings for additional LDAP server.
## Example shows two active directory servers being utilized for user authentication.
## Default "ActiveDirectory" values can be edited via GUI
## "ActiveDirectory01" values must be edited in the configuration file

## authentication switch
FCServer.server.config.user.auth=ActiveDirectory ActiveDirectory01 internalDB

## Default AD server. These values may be edited (as before) in the GUI
FCServer.server.config.LDAP.AD.url=ldaps://192.168.1.99
FCServer.server.config.LDAP.AD.port=636
FCServer.server.config.LDAP.AD.context.00=SECURITY_PRINCIPAL=TEST\\{userinput}SEARCH_FILTER=
(&(sAMAccountName={userinput}))SEARCH_BASE=dc=unlimitechSECURITY_GROUPS=FCUsers

## ActiveDirectory01. Name in authentication switch MUST START WITH either
##"ActiveDirectory" or "OpenLDAP" to be valid, plus an additional label ("01" in this example)
FCServer.server.config.LDAP.AD.01.url=ldap://10.1.1.99
FCServer.server.config.LDAP.AD.01.port=389
FCServer.server.config.LDAP.AD.01.context.00=SECURITY_PRINCIPAL=DOMAIN2\\{userinput}SEARCH_FILTER=
(&(sAMAccountName={userinput}))SEARCH_BASE=dc=unlimitechSECURITY_GROUPS=
RDBMS as Authentication Service
Organizations where user/password information in stored in relational database (i.e. MySQL, Oracle), FileCatalyst can be configured to utilize JDBC drivers and query user tables to validate user/password pair.
This must be done by editing fcconf.conf and manually directory services. Multiple databases may be utilized for authentication.
## Example shows a MySQL and Oracle servers being utilized for user authentication.

## authentication switch
FCServer.server.config.user.auth=db db01 internalDB
#
# FCServer.server.config.auth.db.authenticationquery=SELECT username FROM users WHERE username=
'{username}' AND password='{password}'
# FCServer.server.config.auth.db.jdbcpath=C:/Program Files/FileCatalyst Server/lib/
mysql-connector-java-5.1.8-bin.jar
# FCServer.server.config.auth.db.jdbcdriver=com.mysql.jdbc.Driver
# FCServer.server.config.auth.db.jdbcconnectionstring=jdbc:mysql://10.1.1.50:3306/schemaname
# FCServer.server.config.auth.db.jdbcuser=mydbuser
# FCServer.server.config.auth.db.jdbcpasswd=mydbpassword
# FCServer.server.config.auth.db.jdbcvalidationquery=SELECT * FROM mysql.db
# FCServer.server.config.auth.db.password_encrypt=false
#
# FCServer.server.config.auth.db.01.authenticationquery=SELECT * FROM schemauser.usertable WHERE username=
'{username}' AND password='{password}'
# FCServer.server.config.auth.db.01.jdbcpath=C:/Oracle/XEClient/jdbc/lib/ojdbc14.jar
# FCServer.server.config.auth.db.01.jdbcdriver=oracle.jdbc.OracleDriver
# FCServer.server.config.auth.db.01.jdbcconnectionstring=jdbc:oracle:thin:schemauser/system@10.1.1.46:1521/XE
# FCServer.server.config.auth.db.01.jdbcuser=schemauser
# FCServer.server.config.auth.db.01.jdbcpasswd=system
# FCServer.server.config.auth.db.01.jdbcvalidationquery=SELECT * FROM DUAL
# FCServer.server.config.auth.db.01.password_encrypt=true
authenticationquery
Provides FileCatalyst Server with the SQL used to determine if the supplied credentials are valid. The authentication query MUST contain {username} and {password} to properly function. NOTE: If the function returns a record, authentication is considered successful.
jdbcpath
JAR for the JDBC driver. This is provided by the database vendor.
jdbcdriver
Class name for the JDBC driver. These are provided by the database vendor.
jdbcconnectionstring
Database connection parameters. This includes server IP, Port, driver type, and database identifier.
jdbcuser
Database credentials required to log into the database.
jdbcpasswd
Database credentials required to log into the database.
jdbcvalidationquery
Performed to ensure that the JDBC connection is still up. This should be a quick running query that can be periodically run by the JDBC pool (for Oracle, you can use "select * from dual").
password_encrypt
Used when the user passwords are encrypted as an MD5 hash on the database already. Setting this value to true will enable the MD5 hash value to be sent over the JDBC connection in the query instead of the plain text password (default false).
OpenLDAP with Security Filters
Organizations that use an implementation of LDAP such as OpenLDAP or SunONE directory services can specify a security filter against which users will be authenticated. The authentication involves two steps. The first step is to make sure the user can bind with the username and password provided. The second step is to check if the user meets the security filter defined in the context.
To define a security filter, append SECURITY_FILTER at the end of the context string.
This must be done by editing fcconf.conf or manually entering it through the user interface.
# To enable security filtering searches, append SECURITY_FILTER={filter string}
at the end of the context string.
# {filter string} is to be replaced by the string you wish to filter users. Context 3, 4, and 5 will
show examples of this.
# EXAMPLES:
# FCServer.server.config.LDAP.open.context.00=displayName={userinput},dc=myCompanyName,dc=com
# FCServer.server.config.LDAP.open.context.01=mail={userinput},dc=myCompanyName,dc=com
# FCServer.server.config.LDAP.open.context.02=sn={userinput},dc=myCompanyName,dc=com
# FCServer.server.config.LDAP.open.context.03=displayName={userinput},dc=myCompanyName,dc=comSECURITY_FILTER=
(&(mail={userinput})(uid=100))
# FCServer.server.config.LDAP.open.context.04=mail={userinput},dc=myCompanyName,dc=comSECURITY_FILTER=
(&(mail={userinput})(cn=admin))
# FCServer.server.config.LDAP.open.context.05=sn={userinput},dc=myCompanyName,dc=comSECURITY_FILTER=
(&(mail={userinput})(admin=true))
Unix PAM as Authentication Service
When installing the FileCatalyst Server on a UNIX machine, you can configure the application to authenticate against the operating system using native PAM interface. This allows you to configure users either on the OS (/etc/passwd + /etc/shadow files) or point to another authentication system (i.e. NIS server).
Authentication switch should have the PAM in it to direct calls.
FCServer.server.config.user.auth=PAM internalDB
# - This setup means that user lookup is done using PAM first.
# - If the user is not found or password does not match, an additional search is
# performed on an the Files.
Configuration of PAM on the system requires several steps to prepare the operating system to accept calls from the FileCatalyst Server. Please refer to the JPAM_README.txt and RELEASE_NOTES.txt under the Unix ./jpam/ folder for details.
User Defaults
User Defaults allows the administrator to pre-define what configuration values a new user shall have by default when created. These are a subset of the options presented when editing a user account.
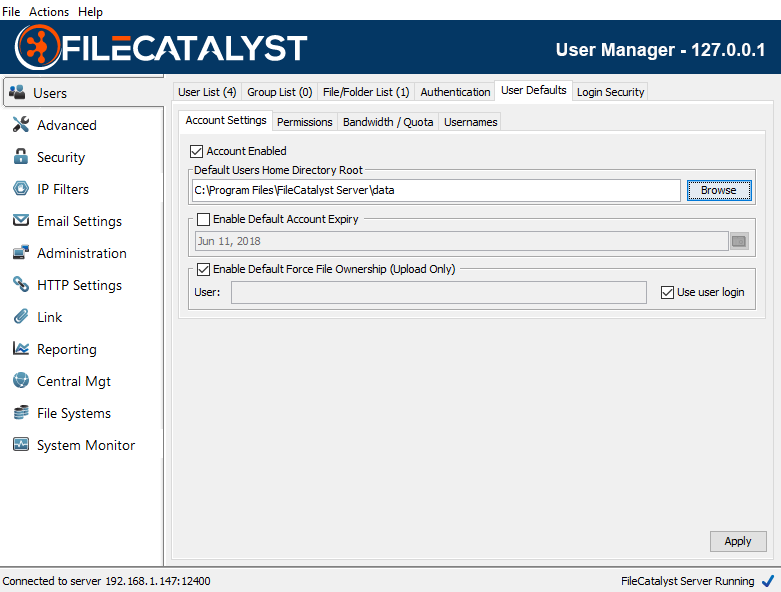
Account Settings
The Default User Home Directory Root specifies where user directories will be stored by default. Sub-directories using the username will be created from this location to separate user files. In the following example, a new user "joe" created would have his user files default to "C:/Program Files/FileCatalyst Server/data/joe/" directory.
Permissions
Select file and folder permissions that an account will have by default.
Bandwidth / Quota
The priority and volume of data (upload only) the user will be entitled to use by default.
Usernames
By default, the FileCatalyst Direct Server allows case sensitive usernames. A user identified as ‘bob’ is different than ‘BOB’ or ‘Bob’.
Microsoft Active Directory, on the other hand, is case insensitive; consequently, when AD authentication is coupled with auto-provisioning, duplicate entries are created. To solve this issue, you may configure FileCatalyst Server to force all user names to be case insensitive.
Note: When choosing to enable this feature, a user list purge is required on the server. This means:
- All users will have their usernames converted to lowercase.
- Duplicate users found on the system (‘Bob’, ‘BOB’, ‘bob’) will be removed from the system. When duplicate users are detected, the purge will try to keep the user with only lowercase characters if possible (‘bob’ in this case is preserved).
- All existing connections must be dropped for the user list to be purged. Clients can connect after the purge is complete.
Note: To roll back changes:
- Uncheck force username on GUI, and hit Apply
- Stop FileCatalyst Direct Server
- Replace the .fcdb\FCSERVER_DB folder with one from backup/database/<date of backup> where the date of backup is from before the conversion.
- Start FileCatalyst Direct Server
At this point, you will have returned the user list to the state it was before the purge.
Login Security
FileCatalyst Server can be configured to block user accounts and/or IP addresses which have been identified as having multiple consecutive failed login attempts. This includes consecutive failures which may have occurred before the relevant options are enabled by the administrator. When the limit is reached, login failures are recorded in the application log files. If the Monitoring Agent is configured, alarms are also sent out notifying that a User account or IP address has had multiple consecutive login failures.
FileCatalyst Server records the event and may enforce one of two actions:
- Temporarily block logins for the account/IP (to prevent brute force attacks on user passwords).
- Permanently block user accounts (or IP addresses using IP Filters).
Once user accounts have been blocked, they are “grayed out” in the Users section of the FileCatalyst Server interface. A link with the label “unblock” also appears, allowing the account to be re-enabled.
If the Monitoring Agent is configured, an additional alarm will be sent to alert the fact that accounts/IPs have been disabled.
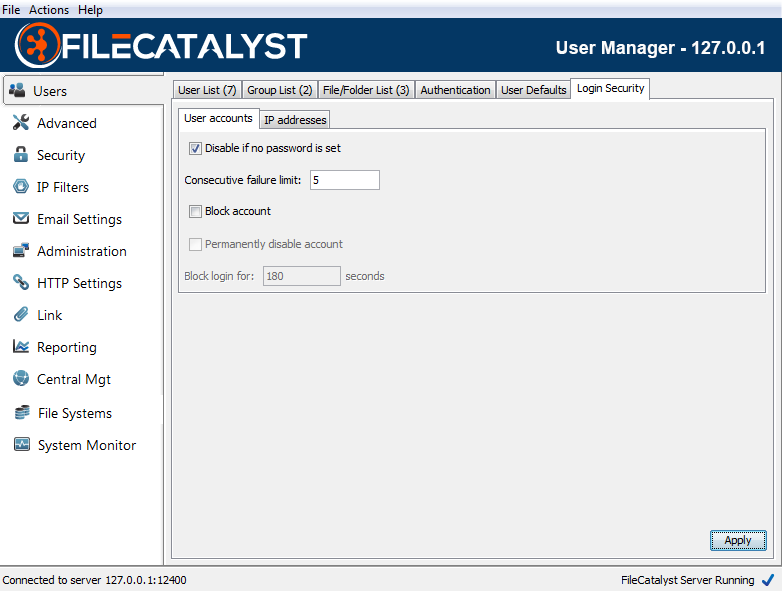
User accounts
Default failure limit is set to 5 consecutive login failures. Account blocking is enabled by default for a 3 minute interval (180 seconds).
IP Addresses
Default failure limit is set to 50 consecutive login failures. IP blocking is disabled by default. Recommended 600 seconds (10 minute) timeout if set.
Note: It is recommended that the IP address limits be above those for specific user accounts to prevent a single user who forgot their password from blocking an entire remote office.
Quick Connect
Once a user has been added to the File Catalyst Server, it is possible to use the connect option to transfer data between the file system and the user's directory.
Note: Quick connect from the Server uses 2 connections. One is for browsing and the other is used to transfer files.
To open the quick connect, click on the connect text inside the panel.
In the connect dialog, you may navigate to the files you wish to move and the location you wish to move them using the directory trees, listings and path text fields. In order to transfer files, select the files or folders you wish to move and drag them across to the other side.
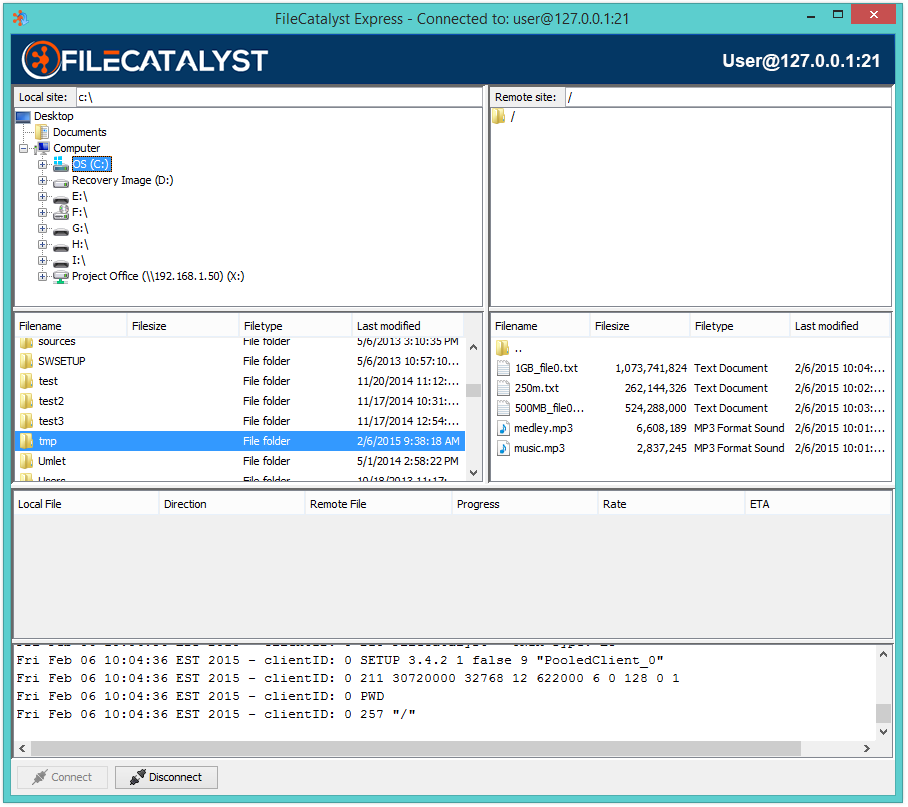
Once the transfer has begun, the progress and status of each file transfer is visible in the panel below the file listings.
Advanced Settings
Network
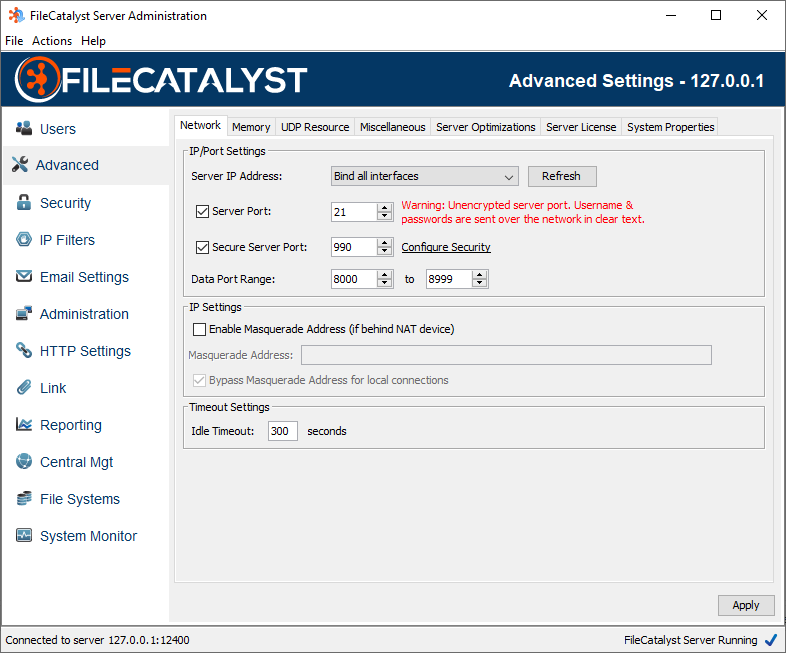
Bind to Server IP Address
FileCatalyst Server can bind server port to specific IP addresses hosted by the machine. By default, the server will try to bind (port 21) on all IP addressed assigned to the host.
In some situations the server will try and bind to an IP address that has not yet been initialized by the server. If you are experiencing this problem, you can add a bind timeout too allow for more time to establish a bind. To add this value, you must add the following new line to the fcconf.conf:
FCServer.server.config.bind.timeout=TIME
Replace "TIME" with the number of millisecond you wish to wait to establish a bind. The default is 30000.
Server Port
The port on which the server is listening for incoming connections. Clients connecting into this port should be aware that the data (including user/password) are non-encrypted, and can be intercepted on the network. This is maintained mostly for backwards compatibility with standard FTP. Default 21.
Secure Server Port
FTPS port, where connection data is encrypted using SSL. Default port 990. By default, a self-signed SSL certificate will be created at run-time by the application. Configuration of an alternate SSL certificate may be done by navigating to the Security panel.
Data Port Range
The port range which the server can use for data connections.
Masquerade Address
When FileCatalyst server is running on a private IP address, behind a NAT device, you must specify the public IP of the NAT device in order for FileCatalyst to allow connections from outside the NAT.
Bypass Masquerade Address for local connections
By default, the IP masquerade applies to all connections. However, it may be desirable
to bypass the masquerade address for local connections. A local connection is considered
one whose IP address is within the 192.168.*.*, 172.16-31.*.*, or 10.*.*.*
ranges.
Idle Timeout
The amount of time (in seconds) to remain idle before automatically disconnecting a client. This value defaults to 300 seconds or 5 minutes. Note that in some cases the client may be executing long running processes such as an MD5 or delta calculation on very large files and thus it may be necessary to increase this value.
Memory
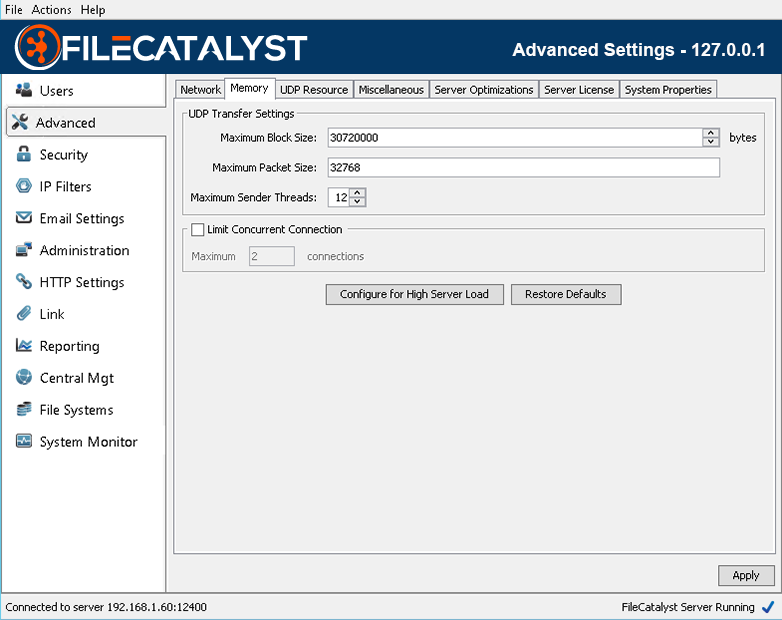
Maximum Block Size
The maximum block size dictates to all clients uploading files what the maximum block size will be. The block size determines how much data will be stored and sent at one time from the transmitter to the receiver. For example, if the block size is 10MB (10240000 bytes) then 10MB of data will be sent before proceeding to the next 10MB of data. Generally the larger the block size the better the throughput due to less acknowledgments. A server with a larger amount of memory may have a larger maximum block size. Consideration should be given to how many concurrent transfers may be occurring at one time as the memory usage of the server may rise to the product of the maximum block size * the maximum sender threads * the number of concurrent connections.
Maximum Packet Size
The maximum UDP packet size that client applications can send to the server. Generally this should be less than the MTU of your network, usually 1500.
Maximum Sender Threads
In order to improve performance, FileCatalyst transmit clients can begin to send another block of data before the previous block has been acknowledged. This setting defines how many blocks can be started before waiting for all previous blocks to be acknowledged. This improves performance as it removes the down time between when the transmitter has sent an entire block and when the receiver has acknowledged the receipt of that block. The memory consumption on the server and the client will necessarily consume more memory the higher this value is set. The amount of memory will be the product of the number of threads and the block size. Since the overlap time can be quite small, sometimes only 0.5 seconds or lower, the memory usage may appear to increase then drop once the previous block has been acknowledged
Concurrent Connection Limit / Configure for High Server Load
When enabled, the server can set a maximum concurrent user limit below the value granted in the license.
As a general rule, very high latency and high bandwidth network conditions often see performance improvements by having higher number of sender threads or allocating larger block size each thread. With limited memory on a system and a large volume of concurrent users connecting, you can encounter situations where the Java Virtual Machine runs out of memory, and cannot accept new connections.
If this scenario is encountered, the solution can either decrease memory allocation each user consumes server-side (the button ‘Configure for High Server Load’ does this), or limit the number of concurrent users while maintaining high throughput links within available memory.
UDP Resources
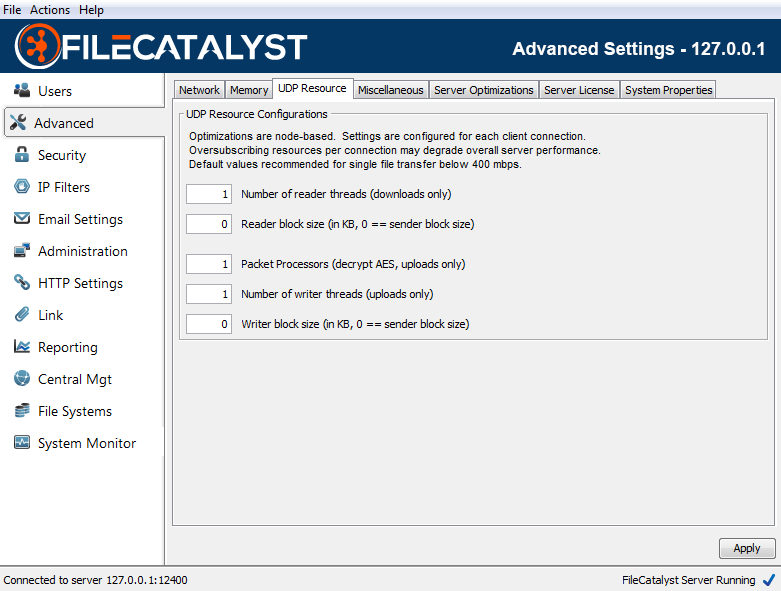
When configuring the FileCatalyst server to achieve high speed levels (500Mbps - 10Gbps for a single connection), several optimizations must be done in order to make sure the system is able to utilize multiple cores of a server. These include configuring the number of reader threads per connection, packet processors (used for decoding AES packets on the receiver side), and the number of block writers.
# Reader threads
Number of threads PER CONNECTION spawned to read blocks off the disk and place them into the sender queue ready for transport. On the server, setting this value will only affect downloads. Most systems perform optimally when you configure only 1 thread to perform reading. There are two scenarios where this value should be moved up: when IO tests have shown that adding threads increases throughput for your storage device, or when utilizing high CPU load (more sender threads than CPU cores, or utilizing high CPU options such as AES encryption or LMZA compression), a single thread doing the block reads may be pushed down in priority and be CPU starved, causing a slowdown in transfer speeds. Multiple threads may help both of these scenarios. If your system is configured to accept 50+ concurrent connections, it is recommended to leave this value at the default settings (1) to minimize system resources.
Reader block size
By default, the block size used for each read operation is the same size specified by the client in the network block size. This can be adjusted for improved performance. Please run the advanced IO testing tool to see what works best for your system.
Packet processors
Packet processors are responsible for taking packets off the network socket, decrypting them, and preparing them for the block writers. When using AES at speeds greater than 200Mbps, it may be required to increase the number of packet processors on the receiving end to ensure multiple CPU's are utilized to decrypt the incoming data.
On the server, setting this value will only affect uploads. If downloading data from the server, similar settings should be set on the client applications.
# of Writer threads
Number of threads PER CONNECTION spawned to write blocks off the disk. On the server, setting this value will only affect uploads. Writer threads in FileCatalyst perform the following tasks:
- Uncompress data block (if using on-the-fly compression)
- Perform MD5 checksum on block (if using on-the-fly Verification)
- Write block data to disk
For systems using LMZA compression or possibly high speed transfers (> 1Gbps), setting multiple block writers may allow higher performance for single high speed connections. If your system is configured to accept 50+ concurrent connections, it is recommended to leave this value at the default settings (1) to minimize system resources.
Writer block size
By default, the block size used for each write operation is the same size specified by the client in the network block size. This can be adjusted for improved performance. Please run the advanced IO testing tool to see what works best for your system.
These values should be modified only after running through some performance IO testing. See here for more details.
Miscellaneous
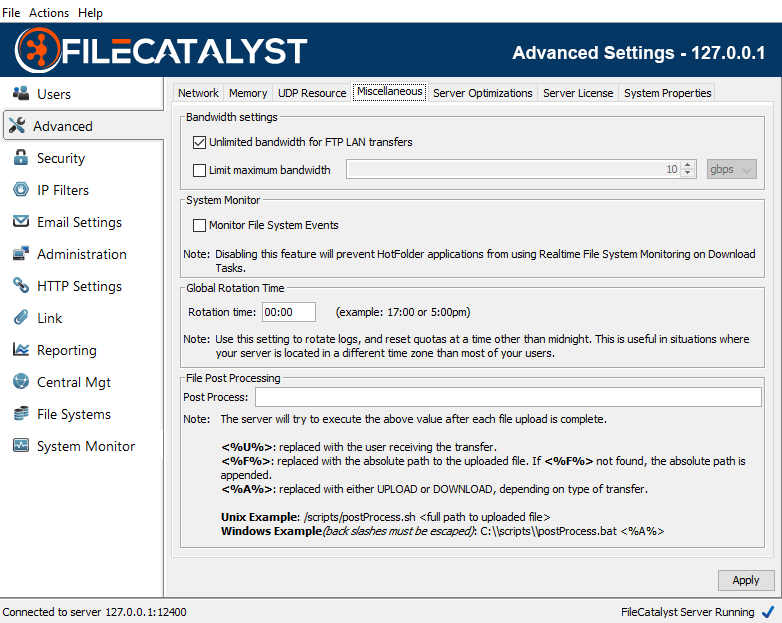
Bandwidth
Unlimited bandwidth for FTP LAN Transfers
By default, LAN FTP connections are granted unlimited bandwidth to the server. This behavior can be disabled, restricting even non-latent FTP traffic to abide by the server license restriction.
Enable Bandwidth Limit
In some cases, it may be beneficial to impose a bandwidth limit on the FileCatalyst Server. To enable a global bandwidth limit, select the Limit maximum bandwidth option, and then specify the limit that you wish to have. Do note, that this limit cannot be negative, and cannot exceed the bandwidth limit on the current FileCatalyst Server license.
System Monitor
Toggles the FileCatalyst Server to allow File System Event Monitoring, a feature provided with the HotFolder to trigger notifications when the file system detects a change event on a user directory. If errors are occurring because the file system is not compatible (some mounted network file systems), you can disable the feature to prevent error messages from appearing in the logs.
Rotation Time
This setting allows you to rotate logs and reset quotas at a time other than midnight. This is useful in situations where your server is located in a different time zone than most of your clients. i.e. you could have the quotas reset at midnight for your clients, rather than midnight on your server.
File Post Processing
The server will attempt to execute the given script after each file upload is complete passing in the following parameters into the said script. <%U%> will be replaced with the user receiving the transfer. <%F%> will be replaced with the absolute path to the uploaded file. If <%F%> is not found, the server will append the absolute path. <%A%> will be replaced with either UPLOAD or DOWNLOAD.
For example: /scripts/postProcess.sh <%F%>
Note: currently this feature is disabled for archiving since it defeats the purpose of batching large groups of small files together only to send a post command to the server for each individual file transferred, incurring the overhead that auto zipping (and Auto Archiving in multi manager) hoped to avoid.
Sample Scripts
Windows sample, to go into a .bat file. This script simply reads the parameters and saves the values to a post_process.log file
echo %1 %2 %3 >> C:\Program Files\FileCatalyst Server\post_process.log
Unix sample, to go into a .sh file. This script simply reads the parameters and saves the values to a post_process.log file
echo $1 $2 $3 >> /home/adminuser/post_process.log
Server Optimizations
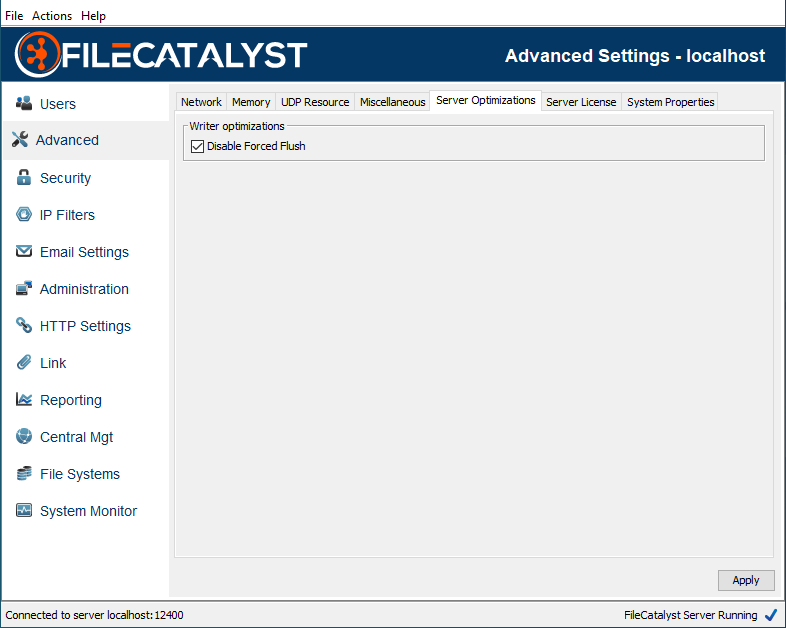
Disable Force Flush
By default, write operations automatically flush both data and meta data to file system for all IO calls. Disabling force flush allows Java to utilizes the OS file cache (RAM). This option is only visible in advanced mode.
Server License
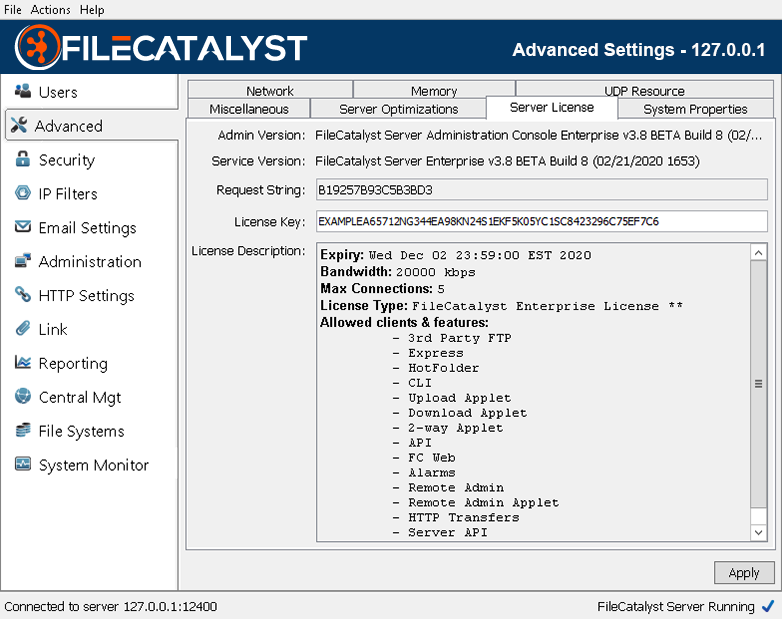
Server License
More details about the server license can be viewed and modified in this area. License changes can also be applied from a remote admin to the server.
Note: For FileCatalyst Server installs located on cloud-based environments (eg: Amazon EC2), you may encounter an issue where the request string changes between machine restarts. If you encounter this issue, you should be able to resolve it by performing the following operations:
- Shutdown the FileCatalyst Server instance
- Open the configuration file and locate the "FCServer.server.config.cloud" parameter
- Set the value to true and restart the application
-
Your application will start with a new request string that will persist through machine restarts.
- With this new request string, you must relicense your FileCatalyst Server with a new license. Please contact your license provider and have them generate a new license for your instance.
System Properties
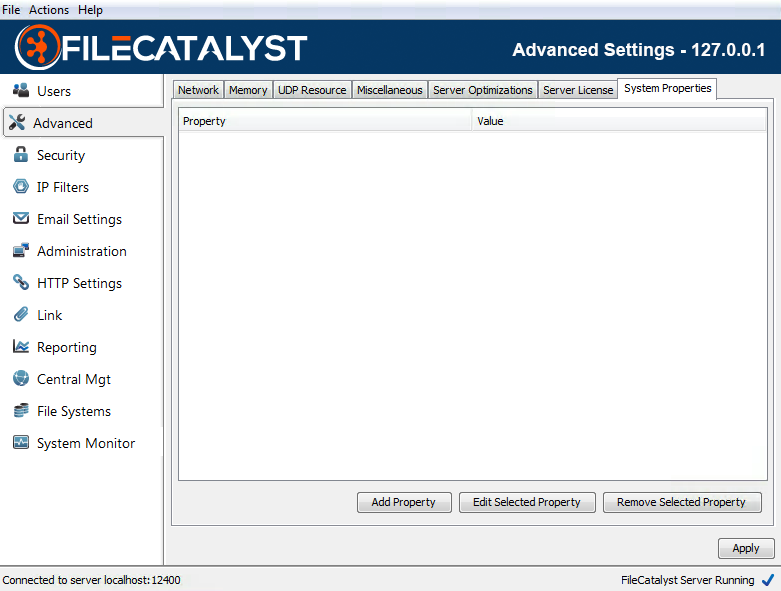
System Properties
This advanced feature is a tool for tech support to change Java VM System Settings on the fly, do not change any settings here without help from tech support. System properties are case sensitive. Please contact support before attempting to use these features.
Server may require a restart for these values to take effect.
| System Property | Product | Default value | Known values | Description |
| filecatalyst.embedded.webserver.enable.cache | All clients | true | true,false |
System property that determines whether or not browsers should be caching files
that are supplied by the internal web server.
In networks with high amounts of latency, enabling this property will reduce the amount of time that it takes for web browsers to load the web-based resources after they have been successfully loaded for the first time. |
| java.io.tmpdir | All | blank | File system path to a temp directory. | The java.io.tmpdir system property indicates the temporary directory used by the Java Virtual Machine (JVM) to create and store temporary files. The default value is typically "/tmp", or "/var/tmp" on Unix-like platforms. On Microsoft Windows systems the java.io.tmpdir property is typically "C:\WINNT\TEMP". When creating zip archives, the FileCatalyst Server creates the archives in the java.io.tmpdir. If this is not desirable, the java.io.tmpdir can be set to a more suitable location. |
| lmza_dict | HotFolder, Server | 16 | 0-28 |
2n value for dictionary size (16 represents 64K dictionary)
7-ZIP library specifies the following in their documentation: -d{N}: set dictionary - [0,28], default: 23 (8MB)Default value was lowered to allow faster throughput per core and keep RAM requirements reasonable. |
| lmza_fb | HotFolder, Server | 8 | Integer, 5-273 |
Change the value of LMZA fast bytes.
7-ZIP library specifies the following in their documentation: -fb{N}: set number of fast bytes - [5, 273], default: 128Default value was lowered to allow faster throughput per core and keep RAM requirements reasonable. |
| lmza_mf | HotFolder, Server | 1 | 0 (EMatchFinderTypeBT2), 1 (EMatchFinderTypeBT4) |
Set Match Finder. Default: bt4
7-ZIP library specifies the following in their documentation: -mf{MF_ID}: set Match Finder. Default: bt4.Default value was lowered to allow faster throughput per core and keep RAM requirements reasonable. |
| tc_masquerade_local_ssl.address | Server | false | true, false | Server switch to enable masquerade only if local, and only if SSL. |
| unlimited.core.filesystem.msab.readAheadBlocks | Server | 10 | positive integer value | When using the Azure Blob EFS provider, this value controls the maximum amount of data that will be pre-cached during sequential reads. |
| unlimited.core.filesystem.jclouds.readAheadBlocks | Server | 10 | positive integer value | When using the Dropbox, Google Cloud Storage, or Backblaze B2 EFS provider, this value controls maximum amount of data that will be pre-cached during sequential reads. |
| unlimited.core.filesystem.s3.maxReadAheadSize | Server | 20480000 | positive integer value (bytes) | When using the Amazon S3 EFS provider, this value controls the maximum amount of data that will be pre-cached during sequential reads. |
| unlimited.core.filesystem.s3.readAheadBlocks | Server | 10 | positive integer value | When using the Amazon S3 EFS provider, this value controls the number of blocks that will be pre-cached during sequential reads. |
| unlimited.core.filesystem.s3.usehttp | Server | false | true, false | When using the Amazon S3 EFS provider, setting this property to true will force the use of HTTP instead of the default HTTPS. |
| unlimited.core.filesystem.swift3.maxReadAheadSize | Server | 20480000 | positive integer value (bytes) | When using the Openstack Swift3 or Wasabi EFS providers, this value controls the maximum amount of data that will be pre-cached during sequential reads. |
| unlimited.core.filesystem.swift3.readAheadBlocks | Server | 10 | positive integer value | When using the Openstack Swift3 or Wasabi EFS providers, this value controls the number of blocks that will be pre-cached during sequential reads. |
| unlimited.core.filesystem.swift3.usehttp | Server | false | true, false | When using the OpenStack Swift3 EFS provider, setting this property to true will force the use of HTTP instead of the default HTTPS. |
| unlimited.core.io.ftptransfer.receive.bufsize | HotFolder, Server | 40960 | Any positive integer value | Use this value to control the size if the receive buffer (in bytes) for FTP transfers. This value also controls the size of storage write operations. Increasing this value may increase write performance, particularly when writing against object storage. This value should be kept in sync with the "unlimited.core.io.ftptransfer.transmit.bufsize" value on the transmit side of the FTP transfer. |
| unlimited.core.io.ftptransfer.transmit.bufsize | HotFolder, Server | 40960 | Any positive integer value | Use this value to control the size if the transmit buffer (in bytes) for FTP transfers. This value also controls the size of storage read operations. Increasing this value may increase read performance, particularly when reading object storage. This value should be kept in sync with the "unlimited.core.io.ftptransfer.receive.bufsize" value on the receive side of the FTP transfer. |
| unlimited.core.util.MD5.MAX_BUFFER_SIZE | Server | 4096000 | Any positive integer value | Use this value to control the size if the MD5 read buffer. A larger buffer may increase the speed of MD5 calculations, in particular when the file is located on a cloud storage backed EFS. |
| unlimited.fc.allowRestrictedCharacters | All clients | false | true,false |
System property that allows filenames/paths to use characters restricted on windows.
Due to the fact you can never really know what OS is managing mounted network storage, we skip (and log the skip) file paths that would fail in windows. |
| unlimited.fc.blockBufferMultiplier | Server | 2 | Any positive integer value | Used in combination with unlimited.fc.blocksWrittenOutOfOrder. It controls the amount of block buffering. The amount of blocks buffered will be number of sender threads X this multiplier. |
| unlimited.fc.blocksWrittenOutOfOrder | Server | true | true, false |
Use this value to control how blocks are written to disk. If set to False, blocks will only be written in sequential order. Warning: blocksWrittenOutOfOrder is considered a Labs feature as changing this value may have unexpected impact on other features. For example, setting this value to False will break congestion control. |
| unlimited.fc.database.maxActiveConnections | Server, Central | 8 | Any non-zero integer value (negative or positive) | Numerical value used to set the max number of active connections the internal SQL database can have. If no value is supplied then the default active connection amount of eight connections will be used. If a negative value is provided, the database will have no limit for active connections. |
| unlimited.fc.database.maxConnectionWaitTimeMillis | Server, Central | -1 | Any non-zero long value (negative or positive) | Numerical value used to set the amount of time that an idle database connection will wait for until it is exhausted. If no value is supplied then the default timeout value of -1 will be used. If a negative value is provided, then the database will never timeout an idle connection. |
| unlimited.fc.database.maxIdleConnections | Server, Central | 8 | Any non-zero integer value (negative or positive) | Numerical value used to set the max number of idle connections the internal SQL database can have. If no value is supplied then the default idle connection amount of eight connections will be used. If a negative value is provided, the database will have no limit for active connections. |
| unlimited.fc.delete_filesonly_after_transfer | HotFolder | false | true, false | When the HotFolder task uses the feature delete source files after transfer, it also normally removes the directory structure as well. This flag tells the HotFolder to maintain the source directory tree. |
| unlimited.fc.deployment.security.enforcement.strict | All clients | false | true, false | Strict SSL. This feature blocks SSL connections to the FileCatalyst server from being established if the server certificate is not trusted by your client. This feature is only applicable when SSL is enabled. When this is set to true on your client, the SSL certificate configured on the server must be trusted by your client. Your client must be stopped and restarted for this property to take effect. |
| unlimited.fc.deployment.security.enforcement.truststore | All clients | <not set> | Path to truststore file | Strict SSL - additional option. This setting is optional and only applicable when strict SSL is enabled. If you choose to provide a custom truststore file to assert the trust of the certificate you have configured in the server, you can specify the path to your truststore file with this property. If not set, the default truststore file provided by the your Java Runtime Environment is used. Your client must be stopped and restarted for this property to take effect. |
| unlimited.fc.diagnostics.captureHeapOnShutdown | All | false | true, false | This is an optional value that will generate a diagnostic when the application is shut down.. |
| unlimited.fc.diagnostics.logSystemStats | Server | false | true, false | This will turn on system stats logging, logging cpu and memory useage on a one minute schedule, useful for troubleshooting. |
| unlimited.fc.diagnostics.maxOptionalFileSize | All clients | 200 | Max size of logs pulled into diagnostics file in MB | This is an optional value that can change the default maximum size of files pulled into the diagnostics zip file. |
| unlimited.fc.diagnostics.maxOptionalFileAge | All clients | 86400000 | Max age of the last modified stamp on the file | This is an optional value that can change the default maximum age of files pulled into the diagnostics zip file. |
| unlimited.fc.direct.disk_backed | HotFolder, Server | false | true, false | When performing transfers of very large file sets, the data must be loaded into memory. A 4GB heap can handle roughly 3 million files. In cases where increasing memory is not an option, setting this option to true will move the data structures to disk to save memory. In this case even a small heap is able to handled very large numbers of files. This will incur a performance hit because values must be retrieved from disk instead of memory. |
| unlimited.fc.direct.forceClientSideFilter | HotFolder | false | true, false | Isolated case where server-side filtering (downloads) was not working for customer. This switch brings back older behaviour of Server returning entire remote file list and forces client to then filter through the files it needs. |
| unlimited.fc.direct.httpUsePortsOutsideRange | Server | false | true, false | FileCatalyst HTTP transfers may use up TCP ports in the server port range quickly, leaving the server starved for ports, and preventing new transfers from taking place until the ports are released by the OS (up to 240 seconds on Windows). By setting this property to true, when connections to the server are via the HTTP servlet running inside the server, it will use ports outside the port range. |
| unlimited.fc.direct.udp_receive_timeout | HotFolder, Server | 60 | integer value 60 or larger in seconds | By default, the application will wait 60 seconds waiting for packets to be received before declaring that packets are being blocked by a firewall or network has dropped. This values allows someone to increase it beyond 60 seconds. Values below the default 60 seconds are discarded. |
| unlimited.fc.direct.useCreateTimeForFilter | HotFolder, Server | false | true, false |
This feature works with the "Transfer files older/newer than" feature on the
HotFolder task "File Set" tab. When this feature is enabled, the filter will use
the creation time rather than the modified time when comparing and deciding if a
file should be transferred. If you are doing downloads, this property needs to be added to the Server (since filtering happens server side when it is getting the list of files to download). For uploads it needs to be added to the HotFolder. |
| unlimited.fc.direct_mem.disabled | All | false | true, false |
Forces application to create regular byte buffers instead of direct memory byte
buffers. Performance may
degrade when this is used, but is helpful when constrained by platform or memory
limitations.
Java8 API description: A byte buffer is either direct or non-direct. Given a direct byte buffer, the Java virtual machine will make a best effort to perform native I/O operations directly upon it. That is, it will attempt to avoid copying the buffer's content to (or from) an intermediate buffer before (or after) each invocation of one of the underlying operating system's native I/O operations. |
| unlimited.fc.direct_tcp_keepalive | HotFolder | Varies on JVM | true, false |
Triggers the Java Socket SO_KEEPALIVE value for the client control channel.
Java8 API description: When the keepalive option is set for a TCP socket and no data has been exchanged across the socket in either direction for 2 hours (NOTE: the actual value is implementation dependent), TCP automatically sends a keepalive probe to the peer. This probe is a TCP segment to which the peer must respond. One of three responses is expected: 1. The peer responds with the expected ACK. The application is not notified (since everything is OK). TCP will send another probe following another 2 hours of inactivity. 2. The peer responds with an RST, which tells the local TCP that the peer host has crashed and rebooted. The socket is closed. 3. There is no response from the peer. The socket is closed. The purpose of this option is to detect if the peer host crashes. Valid only for TCP socket: SocketImpl |
| unlimited.fc.disableGlobalByteBufferPool | Server, HotFolder | false | true, false | Disables use of a global byte buffer pool in the application. |
| unlimited.fc.disableMD5OnTheFly | HotFolder, Server | false | true, false | By default, during UDP transfers, FileCatalyst will verify each block using MD5. Value needs to be set in the product doing the transmitting (ie: Server for downloads, HotFolder for uploads). To disable this option set this property to true and restart the product. |
| unlimited.fc.doFullMD5WhenReconnected | HotFolder | false | true, false | If set to true, when doing a progressive transfer, if the connection is lost, upon reconnection the entire destination file will be verified using MD5 before attempting to append. |
| unlimited.fc.doMD5onProgressiveAppend | HotFolder | false | true, false | If set to true, when doing a progressive transfer, for each append the previous block will be verified using MD5 to ensure integrity. If set to false, this check is only performed if the connection was lost. |
| unlimited.fc.enable_delete_temp_file_thread | Server | true | true, false |
FileCatalyst Server will periodically scan user home directories for temporary
files and clean up any that are no longer needed. Setting this property to false
will disable this feature. This includes files with the following extensions: .fctmp,
.fczip, .fcsigs, and .fcdeltas.
Note: User home directories that are backed by EFS storage are not scanned for performance reasons. |
| unlimited.fc.fastio.disable_attribute_cache | HotFolder, Server | false | true, false |
FileCatalyst caches recently accessed file attributes (size, modification time,
etc) to speed up
file system performance. Disabling this value may slow down directory listings
on larger structures, but
will ensure that we hit the native file system directly rather then rely on
cached metadata.
This setting may be toggled if the HotFolder is not picking up file changes fast enough for frequently executed tasks (less than 30 minutes). |
| unlimited.fc.fastio.max_cache_age | HotFolder, Server | 120000 | integer, age of cache in ms |
FileCatalyst caches recently accessed file attributes (size, modification time,
etc) to speed up
file system performance. This value determines the length of time the cached
value is stored before
expiring it.
The default value of 2 minutes (120000 ms). |
| unlimited.fc.follow_symlinks | Server | false | true, false | If this value is set to true, the server will follow symbolic links instead of ignoring them. This does not prevent access to files outside of the users home directory and files may end up being pulled from outside of the user's sandbox. This was previously called unlimited.fc.allow_symlink_download and this label is backwards compatible. |
| unlimited.fc.force.ownership_throw_on_error | Server, HotFolder, TransferAgent, Command Line | true | true, false | If this value is set to true, the force file ownership feature will cause all failed force file ownership operations to mark the transfer as a failure. If the value is set to false, then failed force file ownership operations will be logged, but the file will continue to transfer as normal. When the transfer completes, the destination file will have the same user ownership of the FileCatalyst application. |
| unlimited.fc.globalMD5RateLimit | `0 | Integer value for rate in Kbps, i.e. 10000 | When set, all MD5 checks will be limited in speed to the specified rate. Default is 0 (no limit). | |
| unlimited.fc.hideWelcomeMessageVersionString | Server | false | true, false | If set to true, FileCatalyst Server will not return a version string in its welcome message. Instead the version string is returned as part of the reply to the SYST command. Note that if this option is enabled, only FileCatalyst clients v3.6 and higher will be able to connect. |
| unlimited.fc.idleBandwidthShareRatio | HotFolder | 4 | 1-99 | Value indicates 1/n bandwidth that idle clients will be given compared to active clients. Setting to a lower value (i.e. 1/20) may slow down transfers which toggle between states (moving from idle to active will not receive any new bandwidth until the next bandwidth reallocation broadcast every second). Should only be used to fine tune for optimal performance. |
| unlimited.fc.iptos_tcp | HotFolder, Server | 0 | An integer value between 0 and 255 inclusive | Sets the DSCP traffic class or type-of-service octet in the IP header for packets sent using TCP sockets in FileCatalyst. As the underlying network implementation may ignore this value, it should only be considered a hint to the OS. |
| unlimited.fc.iptos_udp | HotFolder, Server | 0 | An integer value between 0 and 255 inclusive | Sets the DSCP traffic class or type-of-service octet in the IP header for packets sent using UDP sockets in FileCatalyst. As the underlying network implementation may ignore this value, it should only be considered a hint to the OS. |
| unlimited.fc.log_file_listing_growth | All | 20000 | Integer value | Used by application for logging progress of large sorts of data items. By default, the application will output logs every 20000 items during filtering or sorting of larger directory structure. This value may be tuned up or down as needed. |
| unlimited.fc.maintain_uid_gid | Server, HotFolder, CommandLine and Transfer Agent | false | true, false | When set, use UID/GID rather than user name/group name. This will require the property to be set on the client side for uploads, and the server side for downloads. It is recommended to set the property on both sides to make it work for both upload and download. |
| unlimited.fc.no_so_linger | HotFolder, Server | false | true, false |
Force to not use SO_LINGER property on the socket. Setting to true will remove
the SO_LINGER.
Java8 API description |
| unlimited.fc.output_timestamp | All clients | false | true, false | Run-time flag for logging statistic measurements in CLI. Timestamp will reflect transfer time and remove setup time, and will spit out to System.out string value containing transfer time in seconds. |
| unlimited.fc.packetlossThreshold | HotFolder, Server | 2 | Integer, 2-10000 | Advanced setting for congestion control. Indicates how many packets may be skipped (gotten out of sequence) before the congestion control considers it a packet loss event. |
| unlimited.fc.postURL.encodeAllPathsParameter | HotFolder, TransferAgent, Server | false | true, false | A system property that allows the FileCatalyst application to URL encode the "allFiles" parameter that is sent to web applications when performing HTTP based Post URL operations. If the value is set to false, the "allFiles" parameter will be non-encoded and will contain the raw text of all files that were transferred. If the value is set to true, each file in the "allFiles" parameter will be URL encoded in the same manner as the remote paths and local paths parameters. |
| unlimited.fc.preallocation | HotFolder, Server | false | true, false | FileCatalyst does not pre-allocate files to their full size when transferring. It relies on the underlying file system to optimize file write operations. If you wish to pre-allocation the entire file, set this value to true. |
| unlimited.fc.progressiveDelayBeforeAppending | HotFolder | 0 | Delay value, in seconds | When performing a progressive transfer, if this value is set, after each progressive append the transfer will delay X seconds to allow more growth before continuing with another append. |
| unlimited.fc.showHiddenFiles | HotFolder, Server, Transfer Agent,Express | false | true, false | FileCatalyst has the ability to toggle hidden files as a system property so that customers can modify behaviour based on their needs. By default, value is set to false (we hide hidden files). |
| unlimited.fc.udpbuffersize | HotFolder, Server | 32768000 (default 8388608 if AIX detected) | Integer value, in bytes |
Sets the UDP socket buffer for sender/receiver, in bytes.
Java8 API description ReceiveBufferSize Java8 API description SendBufferSize Value is normally overridden by operating system settings to be smaller. IBM JVM on AIX only allows buffer sizes of 1MB, 4MB, and 8MB. It is important to match these up with values on the OS level. See support knowledge base article for details. |
| unlimited.fc.use.fast.md5 | Server, HotFolder, Central, TransferAgent | true | true,false | When attempting to verify the integrity of a given transfer, an MD5 checksum is calculated for both the source and destination files. If this property is enabled when the MD5 is generated, the application will use an MD5 implementation that is usually much faster than standard Java-based implementations. If this property is disabled when the MD5 is created, then a slower MD5 generation algorithm will be used to generate the MD5 checksums. |
| unlimited.fc.verifySizeAfterTransfer | HotFolder | false | true, false | If set to true, upon completion of a transfer, the size of the source and destination file will be compared. The transfer will fail if the size does not match. |
| unlimited.fc.waitForSourceFileToBeStatic | HotFolder | 0 | Integer, time value in seconds | This value if set, will not transfer a file unless it has been static for up to X seconds. Must also set "unlimited.fc.waitForSourceFileToBeStaticFilter" for this feature to work. |
| unlimited.fc.waitForSourceFileToBeStaticFilter | HotFolder | blank | String value of file filter, i.e. *.mxf | When set, will apply the "unlimited.fc.waitForSourceFileToBeStatic" only to files that match the specified include filter. This is GLOBAL, meaning it affects all tasks. Default is blank. If the Hotfolders "Wait for file growth to cease" feature is being used in a task, using the same file filters in this feature would cause the matched files to wait the sum of both configured delays. |
Security Settings
Enable Implicit SSL
By default, FileCatalyst server establishes a clear text channel to communicate commands with connected client programs. If you are using a password for authentication, or if policy dictates that this type of communication must be secure, you must enable SSL on the Control Connection. When enabled, FileCatalyst will use the specified certificate (see SSL Certificate Settings) to encrypt all commands and replies that are sent through the Control Connection.
Enabling Security will also ensure all admin sessions are created using SSL.
To enable a secure channel, go to the "Advanced" tab and check "Secure Server Port". If security has not previously been set up on the system, click the "Configure Security" text and step through enabling security for the application.
In order to connect from a 3rd party FTP client, you must set the connection mode to FTPS/Implicit.
Enable AES
If procedure dictates that all data be encrypted, you must enable the AES option for the Data connection. When enabled, FileCatalyst will use AES encryption to ensure that, in the unlikely event that data was intercepted, it is useless to everyone except the intended recipient.
The strength of the encryption can be adjusted in the config file (fcconf.conf) to 128, 192, or 256 bit. The higher the encryption strength, the higher the overhead, and subsequently the lower the attainable transfer speed will be. It is recommended that unless policy dictates a higher strength, that users keep the default value of 128 to achieve the best balance of security and performance.
SSL Certificate Settings
When "Enable SSL" is selected, you must specify a certificate to be used to encrypt the control connection:
Certificate File
This is the path to the SSL certificate stored in PEM format (*.pem).
Private Key File
This is the path to the private key file for the selected certificate stored in PVK format (*.pvk).
Password
This is the password for the selected private key.
New Certificate
FileCatalyst provides a convenient SSL Certificate Generation wizard that, in the event you do not already have a certificate issued from a 3rd party such as Verisign or Thawte, allows you to create your own "self-signed" certificate. Please see help section for "SSL Certificate Generation Wizard" for more details.
Online instructions for converting .crt files into PEM files are available: http://conshell.net/wiki/index.php/Keytool_to_OpenSSL_Conversion_tips.
Mode details on installing SSL certificates are available: https://support.filecatalyst.com/index.php?/Knowledgebase/Article/View/293/0/how-to-install-a-ssl-certificate-into-a-filecatalyst-server.
View Certificate
This option allows you to view the details of the currently selected SSL certificate.
SSL Cipher Restrictions
FileCatalyst Server allows the selection of specific SSL ciphers which are considered appropriate for encrypted communication. By default, the entire Java SSL/TLS set is utilized. To modify the default values (example: enforce a minimum 128-bit encryption cipher), manual configurations may applied to fcconf.conf.
The following steps illustrate how to configure so that only strong ciphers are utilized:
- Enable SSL on the FileCatalyst Server: Follow the example provided in section 4.0. The option "Enable Implicit SSL" must be selected, and SSL must be properly functioning before restricting enabled ciphers.
- Shutdown FileCatalyst Server: As this is a manual fcconf.conf file modification, the server must be shutdown before changes can be made to the server.
- Restrict the Cipher List: The following lines should be added onto
the fcconf.conf file to restrict ciphers:
## SSL Cipher restriction
# By default, accepted SSL ciphers are specified as part of the standard Java JRE.
# These can be modified to exclude less secure ciphers.
FCServer.server.config.ssl.restrict.ciphers=true
- Restart the Server & Verify Logs for Supported Ciphers: Because
there is no specific cipher list defined yet in fcconf.conf, the
server will recognize the lack of allowed encryption
algorithm and immediately shut down. By examining the server logs, the complete list of
supported ciphers for the platform is listed.
The following is an example captured using Amazon Corretto OpenJDK version 1.8.0_242 on Windows Server 2019 Standard.
Thu Mar 26 14:34:03 EDT 2020 - System: Windows Server 2019 10.0 amd64 - Java(tm) OpenJDK 64-Bit Server VM 1.8.0_242
Thu Mar 26 14:34:04 EDT 2020 - Waiting for SSL Context to initialize...
Thu Mar 26 14:34:04 EDT 2020 - SSL Context initialized.
Thu Mar 26 14:34:04 EDT 2020 - No ciphers listed are currently supported by the JVM.  Please revise the allowable ciphers in the configuration.
Thu Mar 26 14:34:04 EDT 2020 - Available SSL cipher supported by JVM: (0) TLS_ECDHE_ECDSA_WITH_AES_256_CBC_SHA384
Thu Mar 26 14:34:04 EDT 2020 - Available SSL cipher supported by JVM: (1) TLS_ECDHE_RSA_WITH_AES_256_CBC_SHA384
Thu Mar 26 14:34:04 EDT 2020 - Available SSL cipher supported by JVM: (2) TLS_RSA_WITH_AES_256_CBC_SHA256
Thu Mar 26 14:34:04 EDT 2020 - Available SSL cipher supported by JVM: (3) TLS_ECDH_ECDSA_WITH_AES_256_CBC_SHA384
Thu Mar 26 14:34:04 EDT 2020 - Available SSL cipher supported by JVM: (4) TLS_ECDH_RSA_WITH_AES_256_CBC_SHA384
Thu Mar 26 14:34:04 EDT 2020 - Available SSL cipher supported by JVM: (5) TLS_DHE_RSA_WITH_AES_256_CBC_SHA256
Thu Mar 26 14:34:04 EDT 2020 - Available SSL cipher supported by JVM: (6) TLS_DHE_DSS_WITH_AES_256_CBC_SHA256
Thu Mar 26 14:34:04 EDT 2020 - Available SSL cipher supported by JVM: (7) TLS_ECDHE_ECDSA_WITH_AES_256_CBC_SHA
Thu Mar 26 14:34:04 EDT 2020 - Available SSL cipher supported by JVM: (8) TLS_ECDHE_RSA_WITH_AES_256_CBC_SHA
Thu Mar 26 14:34:04 EDT 2020 - Available SSL cipher supported by JVM: (9) TLS_RSA_WITH_AES_256_CBC_SHA
Thu Mar 26 14:34:04 EDT 2020 - Available SSL cipher supported by JVM: (10) TLS_ECDH_ECDSA_WITH_AES_256_CBC_SHA
Thu Mar 26 14:34:04 EDT 2020 - Available SSL cipher supported by JVM: (11) TLS_ECDH_RSA_WITH_AES_256_CBC_SHA
Thu Mar 26 14:34:04 EDT 2020 - Available SSL cipher supported by JVM: (12) TLS_DHE_RSA_WITH_AES_256_CBC_SHA
Thu Mar 26 14:34:04 EDT 2020 - Available SSL cipher supported by JVM: (13) TLS_DHE_DSS_WITH_AES_256_CBC_SHA
Thu Mar 26 14:34:04 EDT 2020 - Available SSL cipher supported by JVM: (14) TLS_ECDHE_ECDSA_WITH_AES_128_CBC_SHA256
Thu Mar 26 14:34:04 EDT 2020 - Available SSL cipher supported by JVM: (15) TLS_ECDHE_RSA_WITH_AES_128_CBC_SHA256
Thu Mar 26 14:34:04 EDT 2020 - Available SSL cipher supported by JVM: (16) TLS_RSA_WITH_AES_128_CBC_SHA256
Thu Mar 26 14:34:04 EDT 2020 - Available SSL cipher supported by JVM: (17) TLS_ECDH_ECDSA_WITH_AES_128_CBC_SHA256
Thu Mar 26 14:34:04 EDT 2020 - Available SSL cipher supported by JVM: (18) TLS_ECDH_RSA_WITH_AES_128_CBC_SHA256
Thu Mar 26 14:34:04 EDT 2020 - Available SSL cipher supported by JVM: (19) TLS_DHE_RSA_WITH_AES_128_CBC_SHA256
Thu Mar 26 14:34:04 EDT 2020 - Available SSL cipher supported by JVM: (20) TLS_DHE_DSS_WITH_AES_128_CBC_SHA256
Thu Mar 26 14:34:04 EDT 2020 - Available SSL cipher supported by JVM: (21) TLS_ECDHE_ECDSA_WITH_AES_128_CBC_SHA
Thu Mar 26 14:34:04 EDT 2020 - Available SSL cipher supported by JVM: (22) TLS_ECDHE_RSA_WITH_AES_128_CBC_SHA
Thu Mar 26 14:34:04 EDT 2020 - Available SSL cipher supported by JVM: (23) TLS_RSA_WITH_AES_128_CBC_SHA
Thu Mar 26 14:34:04 EDT 2020 - Available SSL cipher supported by JVM: (24) TLS_ECDH_ECDSA_WITH_AES_128_CBC_SHA
Thu Mar 26 14:34:04 EDT 2020 - Available SSL cipher supported by JVM: (25) TLS_ECDH_RSA_WITH_AES_128_CBC_SHA
Thu Mar 26 14:34:04 EDT 2020 - Available SSL cipher supported by JVM: (26) TLS_DHE_RSA_WITH_AES_128_CBC_SHA
Thu Mar 26 14:34:04 EDT 2020 - Available SSL cipher supported by JVM: (27) TLS_DHE_DSS_WITH_AES_128_CBC_SHA
Thu Mar 26 14:34:04 EDT 2020 - Available SSL cipher supported by JVM: (28) TLS_ECDHE_ECDSA_WITH_AES_256_GCM_SHA384
Thu Mar 26 14:34:04 EDT 2020 - Available SSL cipher supported by JVM: (29) TLS_ECDHE_ECDSA_WITH_AES_128_GCM_SHA256
Thu Mar 26 14:34:04 EDT 2020 - Available SSL cipher supported by JVM: (30) TLS_ECDHE_RSA_WITH_AES_256_GCM_SHA384
Thu Mar 26 14:34:04 EDT 2020 - Available SSL cipher supported by JVM: (31) TLS_RSA_WITH_AES_256_GCM_SHA384
Thu Mar 26 14:34:04 EDT 2020 - Available SSL cipher supported by JVM: (32) TLS_ECDH_ECDSA_WITH_AES_256_GCM_SHA384
Thu Mar 26 14:34:04 EDT 2020 - Available SSL cipher supported by JVM: (33) TLS_ECDH_RSA_WITH_AES_256_GCM_SHA384
Thu Mar 26 14:34:04 EDT 2020 - Available SSL cipher supported by JVM: (34) TLS_DHE_RSA_WITH_AES_256_GCM_SHA384
Thu Mar 26 14:34:04 EDT 2020 - Available SSL cipher supported by JVM: (35) TLS_DHE_DSS_WITH_AES_256_GCM_SHA384
Thu Mar 26 14:34:04 EDT 2020 - Available SSL cipher supported by JVM: (36) TLS_ECDHE_RSA_WITH_AES_128_GCM_SHA256
Thu Mar 26 14:34:04 EDT 2020 - Available SSL cipher supported by JVM: (37) TLS_RSA_WITH_AES_128_GCM_SHA256
Thu Mar 26 14:34:04 EDT 2020 - Available SSL cipher supported by JVM: (38) TLS_ECDH_ECDSA_WITH_AES_128_GCM_SHA256
Thu Mar 26 14:34:04 EDT 2020 - Available SSL cipher supported by JVM: (39) TLS_ECDH_RSA_WITH_AES_128_GCM_SHA256
Thu Mar 26 14:34:04 EDT 2020 - Available SSL cipher supported by JVM: (40) TLS_DHE_RSA_WITH_AES_128_GCM_SHA256
Thu Mar 26 14:34:04 EDT 2020 - Available SSL cipher supported by JVM: (41) TLS_DHE_DSS_WITH_AES_128_GCM_SHA256
Thu Mar 26 14:34:04 EDT 2020 - Available SSL cipher supported by JVM: (42) TLS_ECDHE_ECDSA_WITH_3DES_EDE_CBC_SHA
Thu Mar 26 14:34:04 EDT 2020 - Available SSL cipher supported by JVM: (43) TLS_ECDHE_RSA_WITH_3DES_EDE_CBC_SHA
Thu Mar 26 14:34:04 EDT 2020 - Available SSL cipher supported by JVM: (44) SSL_RSA_WITH_3DES_EDE_CBC_SHA
Thu Mar 26 14:34:04 EDT 2020 - Available SSL cipher supported by JVM: (45) TLS_ECDH_ECDSA_WITH_3DES_EDE_CBC_SHA
Thu Mar 26 14:34:04 EDT 2020 - Available SSL cipher supported by JVM: (46) TLS_ECDH_RSA_WITH_3DES_EDE_CBC_SHA
Thu Mar 26 14:34:04 EDT 2020 - Available SSL cipher supported by JVM: (47) SSL_DHE_RSA_WITH_3DES_EDE_CBC_SHA
Thu Mar 26 14:34:04 EDT 2020 - Available SSL cipher supported by JVM: (48) SSL_DHE_DSS_WITH_3DES_EDE_CBC_SHA
Thu Mar 26 14:34:04 EDT 2020 - Available SSL cipher supported by JVM: (49) TLS_EMPTY_RENEGOTIATION_INFO_SCSV
Thu Mar 26 14:34:04 EDT 2020 - Available SSL cipher supported by JVM: (50) TLS_KRB5_WITH_3DES_EDE_CBC_SHA
Thu Mar 26 14:34:04 EDT 2020 - Available SSL cipher supported by JVM: (51) TLS_KRB5_WITH_3DES_EDE_CBC_MD5
Thu Mar 26 14:34:04 EDT 2020 - null
Thu Mar 26 14:34:04 EDT 2020 - Server can not start Admin server on port 12400 cannot create SSL server socket. Shutting down.
Thu Mar 26 14:34:04 EDT 2020 - Server shutting down
- Enable Cipher List on the Server: There are multiple on-line forums
describing the exact makeup of each cipher. In the
case where
only strong ciphers are required (encryption levels >= 128 bit), the following lines
are entered into fcconf.conf. Only these specific ciphers will be used by the
application
server socket. If clients connecting does not have a match, the connection will be
logged
and dropped.
# If the restrict.cipher == true, you must supply a list of acceptable ciphers
# the application can utilize when opening up SSL server sockets.
# Each cipher listed should have a unique number assigned (start with ".00"), with the preferred
# cipher set to the lowest numerical value.
FCServer.server.config.ssl.allowed.ciphers.00=SSL_RSA_WITH_RC4_128_MD5
FCServer.server.config.ssl.allowed.ciphers.01=SSL_RSA_WITH_RC4_128_SHA
FCServer.server.config.ssl.allowed.ciphers.02=TLS_RSA_WITH_AES_128_CBC_SHA
FCServer.server.config.ssl.allowed.ciphers.03=TLS_DHE_RSA_WITH_AES_128_CBC_SHA
FCServer.server.config.ssl.allowed.ciphers.04=TLS_DHE_DSS_WITH_AES_128_CBC_SHA
FCServer.server.config.ssl.allowed.ciphers.05=SSL_RSA_WITH_3DES_EDE_CBC_SHA
FCServer.server.config.ssl.allowed.ciphers.06=SSL_DHE_RSA_WITH_3DES_EDE_CBC_SHA
FCServer.server.config.ssl.allowed.ciphers.07=SSL_DHE_DSS_WITH_3DES_EDE_CBC_SHA
- Restart the Server and Verify Server Logs If SSL ciphers are
restricted, server logs provide a list of ciphers enabled.
Mon Sep 21 15:23:44 EDT 2009 - Initializing SSL Administrative Socket on port 12400
Mon Sep 21 15:23:45 EDT 2009 - SSL ciphers restricted by configuration.
Mon Sep 21 15:23:45 EDT 2009 - SSL cipher enabled: (0) SSL_RSA_WITH_RC4_128_MD5
Mon Sep 21 15:23:45 EDT 2009 - SSL cipher enabled: (1) SSL_RSA_WITH_RC4_128_SHA
Mon Sep 21 15:23:45 EDT 2009 - SSL cipher enabled: (2) TLS_RSA_WITH_AES_128_CBC_SHA
Mon Sep 21 15:23:45 EDT 2009 - SSL cipher enabled: (3) TLS_DHE_RSA_WITH_AES_128_CBC_SHA
Mon Sep 21 15:23:45 EDT 2009 - SSL cipher enabled: (4) TLS_DHE_DSS_WITH_AES_128_CBC_SHA
Mon Sep 21 15:23:45 EDT 2009 - SSL cipher enabled: (5) SSL_RSA_WITH_3DES_EDE_CBC_SHA
Mon Sep 21 15:23:45 EDT 2009 - SSL cipher enabled: (6) SSL_DHE_RSA_WITH_3DES_EDE_CBC_SHA
Mon Sep 21 15:23:45 EDT 2009 - SSL cipher enabled: (7) SSL_DHE_DSS_WITH_3DES_EDE_CBC_SHA
Setting Encryption Method
In order to help keep sensitive configuration information secure, the application encodes data in the settings files. The default setting may be overridden to use either a salted AES or a salted DES encryption. To set the value, you must edit your fcconf.conf file. Find the line:
FCServer.server.config.encoding.format=DEFAULT
Changing the value of this setting to AES, DES, or DEFAULT will cause all encoded values to be re-encoded and saved with the new algorithm. If you are upgrading from a version where encoding did not take place, these values will be encoded and saved.
The default settings are:
							FCServer.server.config.deployment.security.defaultTransport=TLSv1.3

							FCServer.server.config.deployment.security.SSLv2Hello=false

							FCServer.server.config.deployment.security.SSLv3=false

							FCServer.server.config.deployment.security.TLSv1=false

							FCServer.server.config.deployment.security.TLSv1.1=false

							FCServer.server.config.deployment.security.TLSv1.2=true

							FCServer.server.config.deployment.security.TLSv1.3=true
Supported protocols include:
- SSLv2Hello
- SSLv3
- TLSv1
- TLSv1.1
- TLSv1.2
- TLSv1.3
Remote Access via Encrypted Protocols
If you are accessing the server using a remote admin, that application must have access to an FCConf.conf file that contains the protocol information. On Windows and Linux, this is the install directory and if you are running the admin that was installed with the server no file creation is necessary. If you are running the server as a service on OS X, you will need to copy the fcconf.conf file from
/Library/Application Support/FileCatalyst/Server
to
/Users/User/Library/Application Support/FileCatalyst/Server
Note that these settings must also be provided for other clients, such as the HotFolder, so that they can access the server.
FileCatalyst Reverse Proxy
FileCatalyst Reverse Proxy allows a FileCatalyst Server to be completely isolated behind a firewall, with no incoming ports open and still be accessible to FileCatalyst Client applications. Documentation for the FileCatalyst Reverse Proxy is available for download.
Note that the link to the FileCatalyst Reverse Proxy documentation will require login credentials. Please log into the Support Portal (http://support.filecatalyst.com/) and click the Get Download Password Button. If you do not see the Get Download Password Button please submit a ticket to the Support Team.
SSL Certificate Generation Wizard
Certificate Information
This step allows you to enter information about your organization and will be stored in the generated certificate.
Note: The Common name is generally the domain name on which FileCatalyst server will be running. For example, if the server is located at filecatalyst.mycompany.com then set common name to ‘filecatalyst.mycompany.com’.
Key Length
The key length allows you to specify the encryption strength that will be used to generate the SSL certificate. The higher the strength the more secure your data will be. However keep in mind that higher strength encryption will also lower performance.
Certificate Name and Save Location
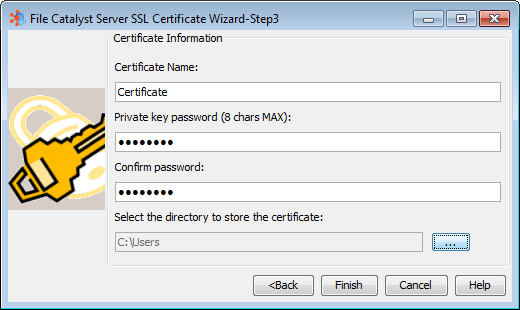
The certificate name specifies the filename under which the certificate will be stored. For example if you specify ‘mycert’ as the certificate name, the files will be stored as ‘mycert.pem’ (certificate file) and ‘mycert.key’ (the private key file).
When specifying a password for your certificate, please record the password and store it in a safe place. Without the password your certificate is useless and must be re-created. Passwords may not be the same as the certificate name.
You must select a location to store your certificate files. Please make note of this location as you will need it to select the newly created certificate on the Security Settings panel of FileCatalyst.
IP Filters
IP Filters provide a method of protecting your server from attacks or malicious users. Servers can be pre configured to allow or deny all IPs by default, and then provide exceptions to the default rules. If Allow is enabled, any IP's on the allow list will take precedence over the Denied list. If Deny is enabled, items in the deny list take precedence over the allow list.
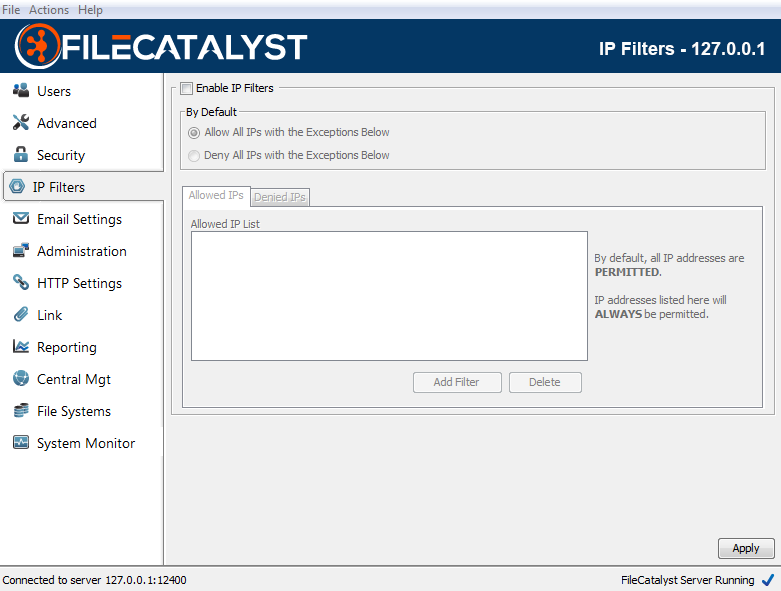
Enable IP Filters
To enable IP filters, this box must be checked. If left unchecked, any filters applied (including the default apply/deny rule) will be ignored and all requests will be allowed.
Allowed IP List
The allowed IP list indicates the IP's that should always be allowed access to the server, regardless of the default mode. In the case that an IP is found in both the Allowed AND Deny Lists, the rules of precedence described above will take place.
Denied IP List
The denied IP list indicates the IP's that should always be denied access to the server, regardless of the default mode. In the case that an IP is found in both the Allowed AND Deny Lists, the rules of precedence described above will take place.
IP Ranges and Wildcards
IP rules support both wildcards and ranges. For example:
- 192.168.1.1 (only this specific IP should be affected by the rule)
- 192.168.1-100.1 (all IPs starting with 192.168, followed by any value within the range of 1-100, followed by a 1 should be affected by this rule)
- 192.168.*.* (any IP starting with 192.168 should be affected by this rule)
IP Filters XML Schema
The IP Filters XML file (ipfilters.xml) describes the status (enabled/disabled) of the IP Filters mechanism, as well as the default rule (allow/deny) and any other rules defined.
<?xml version="1.0" encoding="UTF-8"?>

<!-- Root Element in the XML Representing The Access Restrictions
and their current status (enabled=true/false) -->
<AccessRestrictions Enabled="true">

<!-- Denotes the value of the default rule (Allow/Deny) -->
<DefaultRule AllowDeny="Allow"/>

<!-- Denotes the start of the rules for this server -->
<Rules>

<!-- Rules describing specific IPs or ranges that are always permitted to access the server -->
<Allow IP="127.0.0.1" />
<Allow IP="192.168.*.*" />

<!-- Rules describing specific IPs or ranges that are always denied from access the server -->
<Deny IP="147.1-100.*.*" />

</Rules>

</AccessRestrictions>
Email Settings
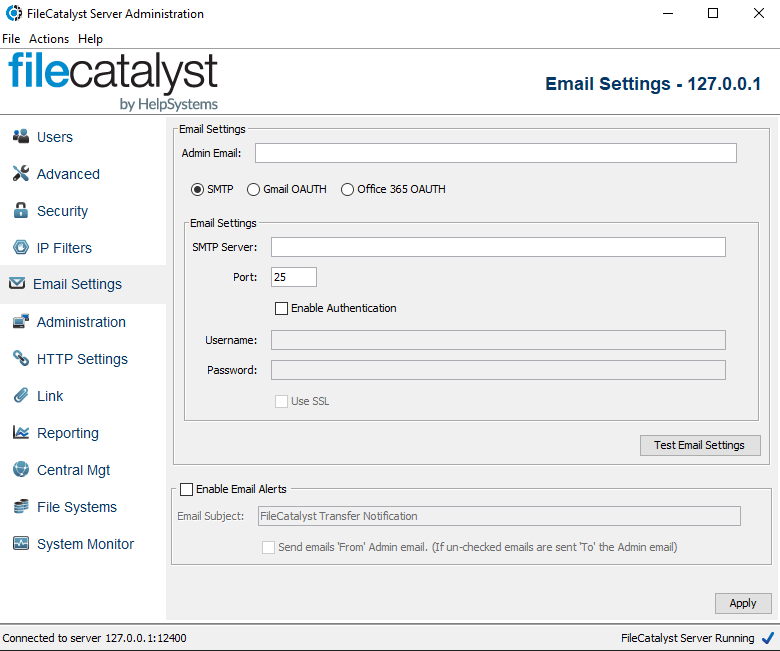
SMTP Settings
Administrator Email
Enter the administrator's email address, or the email address in which you wish to send transfer notifications to.
Server Type Selection
FileCatalyst Direct now supports the ability to configure OAUTH2-based authentication for customers who use email servers that do not support basic SMTP connections has been added. To support authentication that does not require user interaction (also known as 2-leg authentication), we use a client credential flow within our applications.
You can select standard SMTP, Google's Gmail or Microsoft's Azure/Office 365.
Prerequisite: FileCatalyst Direct version 3.8.7 or later
SMTP Server
The hostname of your outgoing mail (SMTP) server.
Port
The port which the SMTP server is running on. Typically port 25.
Enable Authentication
If your SMTP server requires authentication, check this box and complete the username and password fields.
Username
If your server requires authentication to send mail, then enter the username provided by your system administrator.
Password
If your server requires authentication to send mail, then enter the password provided by your system administrator.
Use SSL
If your server requires SSL to send mail, then check this box
- Note: If you enable this option and are not properly connecting to an SSL port on the SMTP Server then you will an encounter error stating "Unknown SSL message, plaintext connection?". If you see this message, de-select the use SSL option and then retest your SMTP settings.
GMAIL OAUTH Settings
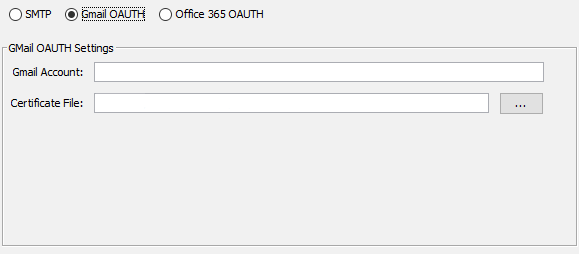
Gmail Account
The Gmail address associated with the account that will be responsible for sending the emails.
Certificate File
This file was generated by Google and is used to help google identify that this user has permission to send email.
To configure for Gmail and generate this file, you will need to enable access to Google's APIs for Service Accounts. You can find instructions for setting this up here:
https://developers.google.com/identity/protocols/oauth2/service-account
As noted in this instructions document, you will create and download a certificate file which will contain your service account key. This is the Certificate File that is referenced in the Gmail settings. This information cannot be recovered and must be regenerated if lost.
Microsoft OAUTH Settings

Office 365 Account
This is the account for the user that will be sending the emails.
Client ID
This is the Client ID for the application on the Microsoft Exchange Service that has permission to send emails.
Client Secret
This is the Client Secret that was created to identify this application to the client.
Tenant ID
This is the tennant where the Microsoft Exchange Service is hosted.
To configure for the Microsoft Exchange Service, the administrator of the service must create a Service/Daemon app.
Instructions for registering an app suitable for a ClientCredentials flow can be found here:
https://learn.microsoft.com/en-us/graph/auth-register-app-v2
This will allow you to retrieve the values needed. You will also need to make sure that you generate a client secret. This value must be saved when generated as it cannot be retrieved later, and new value would need to be generated.
Once the application has been registered, then it needs to have Microsoft Graph Mail.Send API Permission added. It is important to add this permission as the Application Type.
Enable Email Alerts
If this is enabled and the user specifies on their side (i.e. from the client application) to send alerts, then email will be sent to the address provided. Note that some SMTP servers have rules in place that may limit the recipient email address to a certain domain name. If you encounter issues configuring these settings please contact the administrator of your SMTP server.
Alert E-mail Subject
Enter the subject that you would like all email alerts to have. The default subject for alert emails is "FileCatalyst Transfer Notification"
Send emails 'From' Admin email
This option determines who will receive email alerts once a transfer has finished. If this option is unchecked, all email alerts will sent to the email address specified within the Admin email text area. If the option is checked, all email alerts will be sent from the specifed admin email to the client's email address
Additionally, email notifications will be sent daily if the license is going to expire or if more than 5% of incoming connections are being rejected due to exceeding the licensed limit.
Administration Settings
Configuration
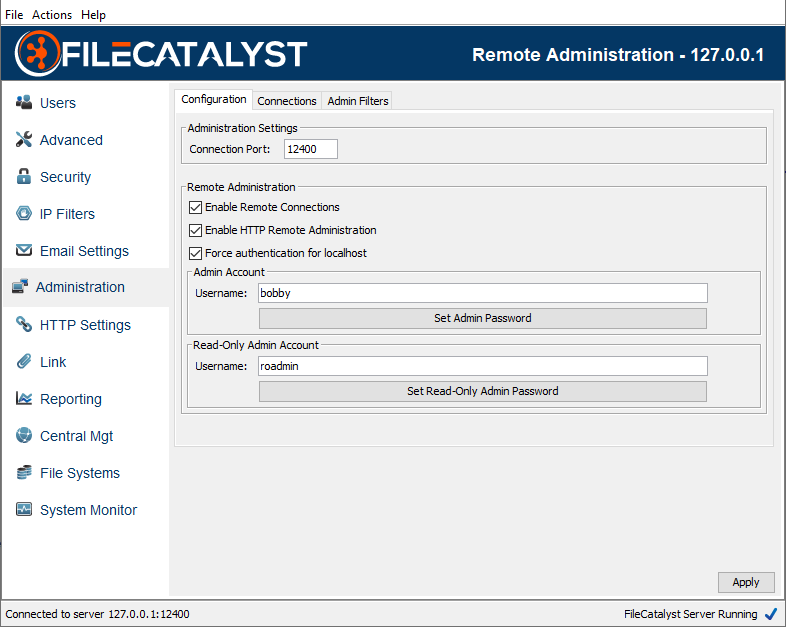
Connection Port
Specifies the port which the remote administration tool will use to connect to the FileCatalyst Server (default: 12400).
Enable Remote Connections
Specifies whether or not to allow computers other than “localhost” to connect to the FileCatalyst Server. This value cannot be set until a username has been specified and password has been set for the Remote Admin. Enabling Remote Connections will set the passwords their default values: "system" for the Admin and "rsystem" for the Read Only Admin. Disabling Remote Connections will clear any set passwords.
Enable HTTP Remote Administration
Specifies whether or not to allow computers other than “localhost” to connect to the FileCatalyst Server through HTTP connections. If disabled, all non-local HTTP connections and REST services to the FileCatalyst Server will be rejected.
Force authentication for localhost
Specifies whether or not to force localhost administration connections to authenticate (adminuser/password), or to allow connections through as they already have physical access to the machine.
Expected behavior on a Windows machine is to set this value to false. It implies that when you start the server, the administration console will come up as expected and you can immediately configure and monitor the FileCatalyst Server.
On a Linux/UNIX environment however, client-side remote access is often granted onto a server via SSH or VNC. In order to lock down configuration from regular users, it is desirable to select this feature and limit access.
Read-Only Administrator Account
Provides an optional administrator account that is used only to monitor the server but not apply any settings. When this user connects, all configuration options are hidden, while all activity and monitoring tools are available.
Using FileCatalyst Server Admin
FileCatalyst Server is managed through a remote protocol and server interface. This allows the flexibility of being able to manage your server, from anywhere, at anytime. You will use the FileCatalyst Server Admin tool (included in the FileCatalyst Server installer for Windows, and available as a separate download) for either of these scenarios:
- Accessing FileCatalyst Server from a remote computer; for example, over the Internet or over a LAN.
- From the local machine, while FileCatalyst Server is running as a service or is otherwise 'headless' (no GUI)
Once connected, the administrator is presented with the standard server administration GUI.
Logging In
With no sites defined, the tool is used to log into an instance of FileCatalyst Server running on “localhost” (ex. FileCatalyst Server running as a service on the same physical machine). However, to create a remote connection you must first define a site with the Connection Manager (see below). Once defined, select the server from the drop down, enter a username and password, and click “Login”
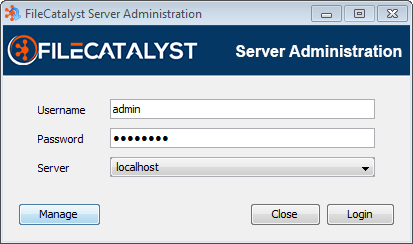
Using Active Directory
The remote administrator may authenticate using an Active Directory; however, this option must be enabled and configured through the fcconf.conf configuration file, located in the FileCatalyst Server install path. To enable, first locate the configuration parameter FCServer.server.config.admin.auth= and add the value "ActiveDirectory".
Next, the configuration values must be set by uncommenting the selection of FCServer.server.config.LDAP.AD parameters (found next in the conf file) and setting appropriate values. Once both steps are done, a resulting configuration section might look like the following example:
                    FCServer.server.config.admin.auth=ActiveDirectory files

                    FCServer.server.config.LDAP.AD.url=ldaps://127.0.0.1

                    FCServer.server.config.LDAP.AD.port=636

                    FCServer.server.config.LDAP.AD.context.00=SECURITY_PRINCIPAL=MYDOMAIN\\{userinput}SEARCH_FILTER=(&(sAMAccountName={userinput}))SEARCH_BASE=dc=myCompanyName,dc=comSECURITY_GROUPS=FCUSERS
Connection Manager
After clicking ‘Manage’, the connection manager allows you to define connection information for various FileCatalyst servers. The “localhost” account is created by default, and is for connecting to a server running on the same machine. To define a new site, simply click add new site, then fill out the required information (site name, host, and port (default 12400)).
Click “Close” to save the site.

Connections
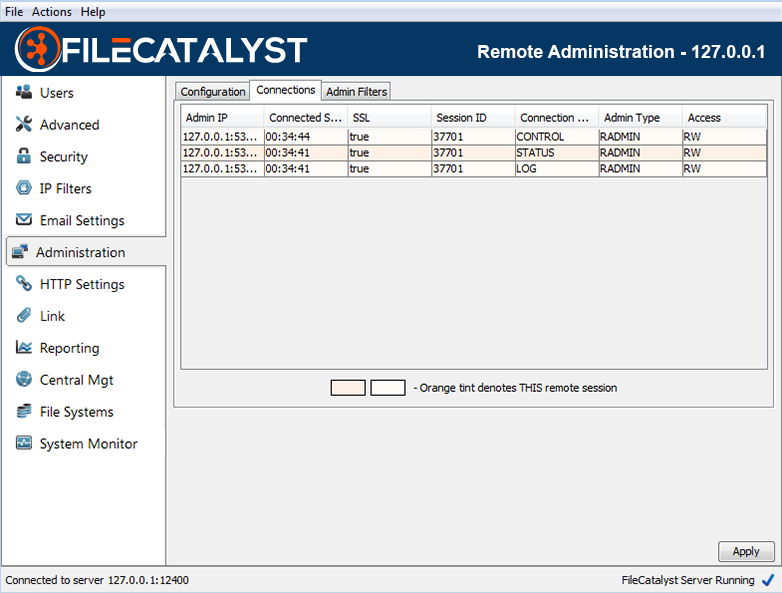
The “Connections” tab allows you to see the connections into the FileCatalyst Server from remote administration tools such as the Remote Server Admin, Remote Server Applet, or Server API.
The ‘Connection Type’ column shows that each connection is one of:
- ‘CONTROL’ connections sent commands to the server
- ‘STATUS’ connections retrieve user and admin status updates from the server
- ‘LOG’ connections retrieve administrative log output from the server
Right-clicking the table permits closing remote admin connections. Remote admin connections (such as the Server GUI) may reconnect.
Administration Filters
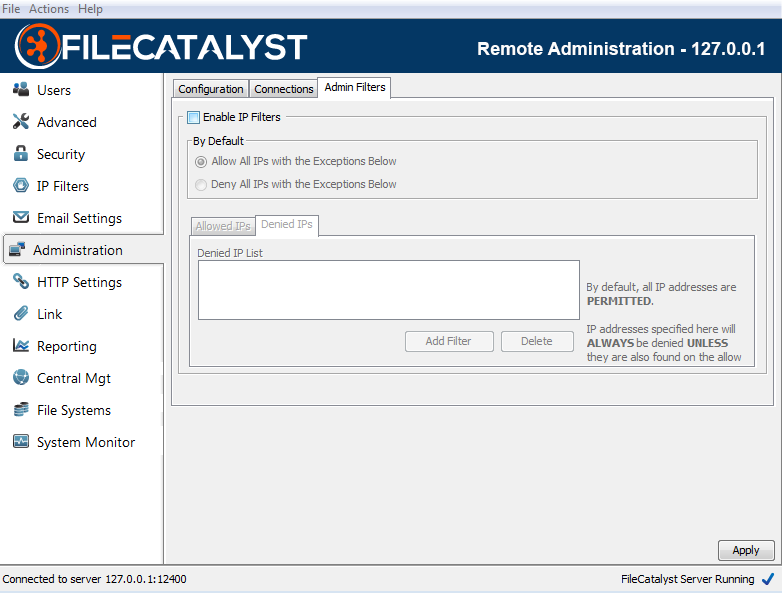
FileCatalyst Server has the ability filter IPs for remote administration connections. This works similar to the User IP Filters, which allow you to designate a default behavior (i.e. DENY all connections) and then apply a filter to allow specific IP addresses or ranges that are allowed access.
Administrators trying to connect from a blocked IP address will be notified they have been blocked by IP Filters.
HTTP Settings
HTTP Access
FileCatalyst Server allows the application to administered through Internet access. To fully enable this access, visit the Administration panel and check “Enable Remote Connections”. The specified Connection Port and Web Port must be opened on the firewall if one is in place.
Enable HTTP Transfers
Allows FileCatalyst Clients to transfer data to the server via the embedded HTTP Servlet.
Enable Link
Allows FileCatalyst Clients access to the Link functionality if this option is selected
Use SSL
Enabling SSL will force all browser requests to the configured web port to go through an SSL socket.
HTTP Config
- The IP format can be chosen from the drop-down depending on whether the administration
URL will
be used
internally or externally.
-
Note: If the bind all interface option is selected, FileCatalyst Server will listen to all IP formats that are present within the drop-down window. If the option is disabled, the FileCatalyst Server will only listen to requests to the currently selected IP format.
-
- Web Port may be changed to any valid and available port.
Access Links
-
Webroot: This URL serves as the entry point for web applications hosted by the server.
The 'Manage Application' button leads to FileCatalyst Server's Web Administration tool. A detailed explanation on how to use the Web Administration tool can be found here
The 'Transfer Files' button opens additional options for browser- and TransferAgent-based transfers to and from the FileCatalyst Server
-
Servlet: This URL is used by FileCatalyst client software in order to establish HTTP-based transfers. Directly accessing it will show a status page.
-
Link: This URL is the entry point to the FileCatalyst Link application described in this section: Link Settings.
-
Note: When IP Masquerade is enabled, all access links will be updated to use the masquerade address. There will be also be a new notification that informs you of the changes that have been made the access links. Here is an example of what the access links may look like when IP Masquerade is enabled.
Enabling AJP Connector
To enable the AJP Connector, check the appropriate box.
On their own, IIS or Apache cannot serve Java based applications. AJP (Apache JServ Protocol) allows the FileCatalyst Embedded Web server to be integrated with a 3rd party web server like IIS or Apache. The 3rd party web server may then proxy requests to the FileCatalyst server without the need to open additional ports on the firewall. It also allows the HTTP server in FileCatalyst to take advantage of any pre-existing SSL encryption that might exist on the web server.
The following documents explain how to integrate IIS and Apache with the Tomcat web server; the process is identical to integration with FileCatalyst.
- To integrate with Apache refer to http://tomcat.apache.org/connectors-doc/webserver_howto/apache.html
- To integrate with IIS refer to http://tomcat.apache.org/connectors-doc/webserver_howto/iis.html
Note that enabling AJP access will block direct access to HTTP on the server. All access must go through the AJP provider. This includes but is not limited to the HTML UI, the applets, the servlet, REST services, Link, the Server Upload Form and the help documentation. Links in the UI will not work.
HTTP Uploads with HTTP Servlet
In order to use HTTP Servlet to upload files, HTTP transfers should be enabled first (see section Enabling HTTP Access).
The user can find the HTTP Upload tool via the splash page found at the web root (see image below). The user must click "Transfer Files", followed by "Upload (HTTP)".
Button.PNG)
Clicking on the "Upload (HTTP)" button will take the user to a login page where user must provide valid credentials associated with a user that exists on FileCatalyst Server. Once the user is authenticated, they can either browse files from local file system or drop files into the upload area and upload files into their home directory:

If the transfer is successful, has errors, or is cancelled, the user will be redirected to new page. Pictured below is the redirect from a successful file transfer:
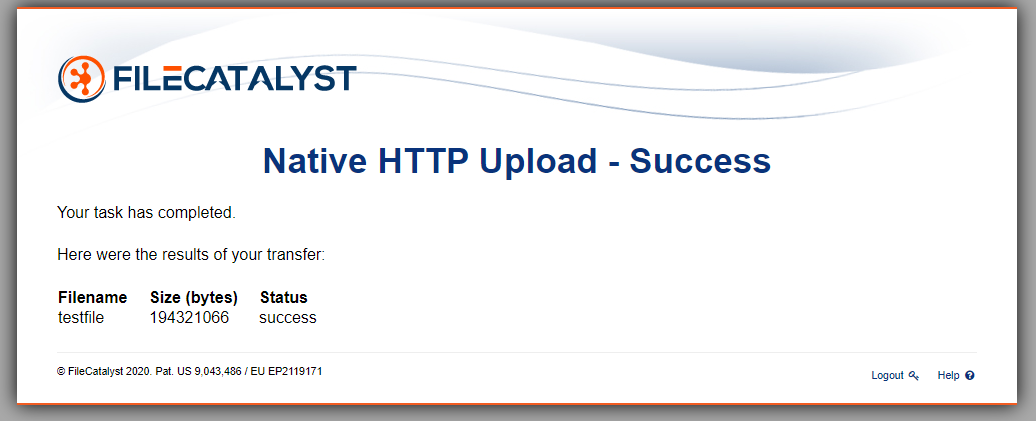
The redirect pages are configurable. The file config.js can be edited to provide redirect URLs for transfer error, success, and cancelation events using "errorurl", "succesurl", and "cancelurl" respectively. To customize, simply replace the defaults with your own valid paths to custom files.
The config.js file provides several other configuration options. A detailed explanation of each field is provided here.
Enabling Cross-Origin Resource Sharing (CORS) for HTTP Servlet
By default, the HTTP Servlet is not set up to respond to requests that come from web pages served from a origin different from its own. The HTTP upload tool does not need the HTTP Servlet to respond to Cross-Origin requests because the HTTP Servlet and the HTTP upload tool are both hosted on the same WebServer (ie. they share the same origin). However, If the HTTP upload tool is being integrated into another web application as described here, the HTTP Servlet would need to be able to respond to Cross-Origin requests.
The configuration file trustedorigins.xml is used to define the origins that are trusted by HTTP Servlet and allowed to make requests to the HTTP Servlet to transfer files. More specifically, the URL entered for an origin tag (<origin>) is a trusted origin. Add as many trusted origins as required, where each origin contains one unique entry. Alternatively, to allow the HTTP Servlet to trust any origin, enter an origin tag with the value set to '*'.
Restart the server after modifying the trustedorigins.xml file for the changes to take effect.
For instance, if the HTTP upload tool is deployed on a web application at http://filecatalyst.com/httpupload/ then http://filecatalyst.com must be added to the trusted origin list.
A Note About Licensing And The HTTP Servlet
Un-Licensed, The following restrictions apply:- Personal, or developmental use only. All others must buy a license.
- Maximum 20 KB/s upload transfer rate
- Maximum 20 KB/s download transfer rate
- Maximum 2048 KB file size
- Maximum 1 concurrent service request
To confirm if you are licensed for the HTTP Servlet, click on the Servlet link in the HTTP Settings tab as shown above.
Link Settings
Overview
In an attempt to allow FileCatalyst clients a simple and easy method to send files to others,
FileCatalyst provides
clients with the ability create an email "link" that is sent out to a recipient list
specified
when the link is created. Upon receiving the link, the recipient will be able to open the
email and
activate the link by clicking on the URL
specified within the email's content. Once a link is activated, a temporary user with no
assigned
home directory will be created on the server,
and the recipient of the weblink will use this temporary user to access the files that are
contained
within the link. Temporary users created this way will automatically
delete after the period of inactivity set by you in link
settings
Note: If IP Masquerade is enabled, all Links that are sent out by FileCatalyst Server will have their access IP replaced with the current masquerade address. If both the IP Masquerade and Use Host Name For Links options are enabled, the hostname will be used over the IP Masquerade address
Additional documentation can be found at the following locations:
- Link User Guide contains basic overview on how to use the software to create and download a link.
Link Management
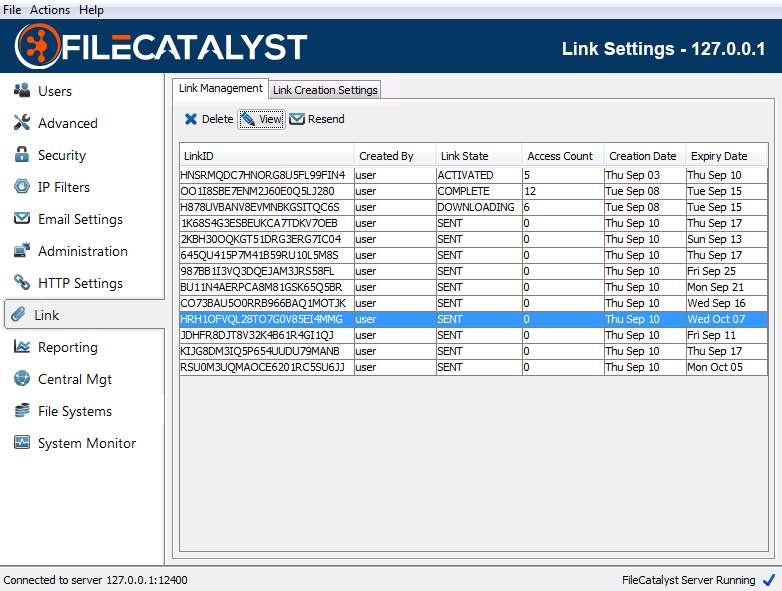
The link management tab allows you see all of the links that are currently stored within the server application. In addition, the table provided will allow you to view important information such as the link ID, which user created the link, how many times the link has been accessed by a client, the creation date of the link and the date the link expires on.
Note: When using FileCatalyst TransferAgent to download a Link, the "Link State" will be set to "COMPLETED" upon both full and partial downloads of the Link. When using HTTP Download, the state will only be set to "COMPLETED" when all files have been downloaded.
In addition to the details for each link, the table that is presented supports a collection of options that you might find useful. Right clicking on an entry within the table will present a pop up window where you will be able to chose if you would like to delete, resend, or view the link that you have selected. The link table also supports the ability to search for links matching a particular link ID or user name specified within a search window. To bring up this search window, simply select the menu item "Actions -- Find", or press "ctrl-f".
Link Creation Settings
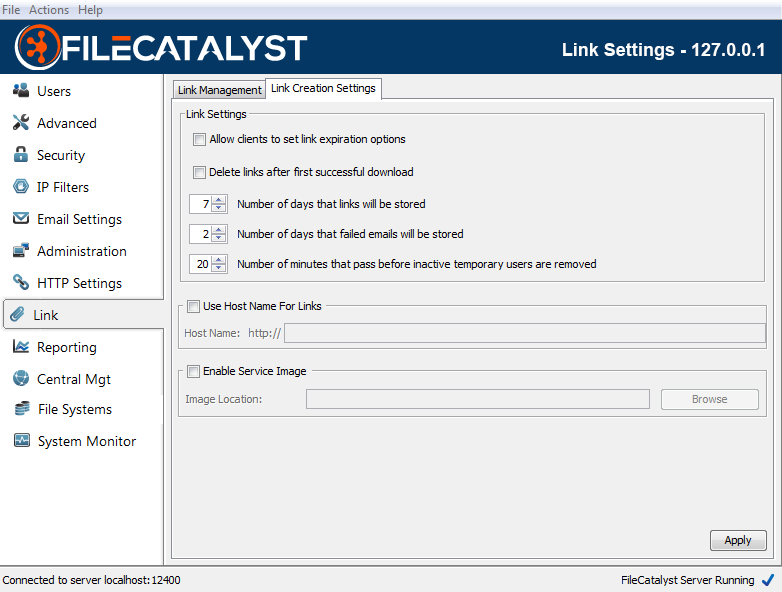
Allow Clients To Set Link Expiration Options
Enable this option to give client applications the ability to set an expiration time on links. When a client specifies an expiry, the time must be smaller than the value found within the "Number of days that links will be stored" configuration option.
Delete Links After First Successful Download
Enable this option to cause the Server to delete Links after they are successfully downloaded.
Note 1: This setting applies to all current Links for as long this option is enabled
Note 2: A Link is considered to be downloaded when all files in the Link have been downloaded. If one or more of the files in a Link aren't downloaded, and the "Delete Links After First Successful Download" option is selected, the Link will delete/expire as normal.
Note 3: This setting takes precedence over "Allow Clients To Set Link Expiration Options". If both settings are enabled, a client application may only create single-use Links, but is still allowed to set a custom expiry date as per the description for "Allow Clients To Set Link Expiration Options" above.
Number Of Days That Links Will Be Stored
The number of days that a created link will stored. By default the amount of days that links are stored within the server is 7. However you may change this value to any value that is between 1 day and 31 days.
Number Of Days For Failed Emails Will Be Stored
The number of days a failed email will be stored for retry. The default failed email retention value is 2 days; however, you may change this value to any value between 1 and 5 days.
Number Of Minutes That Pass Before Inactive Temporary Users Are Removed
The number of minutes an inactive temporary user will be stored within the server. The default value is 20 minutes; however, you may change this value to any value between 1 and 60 minutes.
Use Host Name For Links
Hostname may be used instead of IP to give links a friendlier appearance, as well as to allow both internal and external users to access the application. If you wish to use a hostname instead of IP, check this box and specify a hostname in the provided field (ie. somemachine.yourdomain.com instead of default IP value).
Note: To function properly, the hostname must be able to be resolved by the recipients of the links. This is typically done through appropriate DNS entries, but may also be accomplished by the user editing their system (ie. a "hosts" file).
Enable Service Image
Enable this option and provide a valid image file (JPG, PNG, or GIF) in order to show the image in Link emails, as well as on the Link Creation and Link Download pages. In Link emails, the image is shown at the top of the email content; on the Link pages it appears at the top-left corner of the page.
Note: Updating these settings will not affect emails that have already been sent.
Note 2: On the Link Creation and Link Download pages the logo is vertically limited by the height of the navigation bar and horizontally by 125px.
Reporting
Overview
FileCatalyst provides defined reports that contain important information that is gathered during transfers. These reports are stored within a database located within the report location directory, and inside of that database, there are two kinds of reports.
The first of these reports are the file transfer data reports that contain a record for every individual file transfer that takes place. The reports are written at the end of each file transfer and contain important information such as file size, transfer time, mode, status, average rates, and destination addresses.
The second type of reports are the bandwidth reports which contain records that include the transmit and receive rate of a session at a given time. These reports also contain the username of the user transferring as well as a timestamp of when the report was created. The frequency of these records is determined by adjusting the report snapshot interval. If there are no active transfers at the time of the snapshot, there will be no record written. If there is data in the snapshot, a record will be written for each user that is currently transferring, as well as a record that is the sum of all transmit and receive rates for all users.
It is also important to note that both report types can be exported into a CSV file that may be consumed by third-party applications. To download these reports as a CSV, navigate to the HTML administration web application, and click on the reporting tab. Within the reporting panel, you will see a section called "Run Report" which contains options that can be used to filter out reports from the CSV export . Once all the information for your export has been set, click on the "Export CSV" button and then the CSV file will automatically download to your system.
Settings
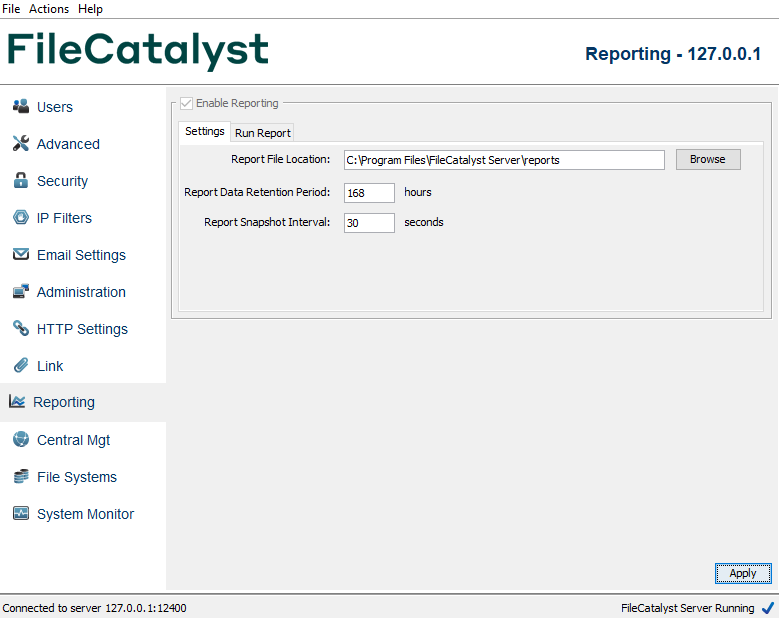
Click the checkbox to enable reporting and press Apply. Define the location for reports in the first field, followed by the Retention Period and the Snapshot interval. The Retention Period is used to define how long logs are kept for before they are purged. Report Snapshot Interval refers to the granularity of the bandwidth data information being captured. Shorter intervals provide the most information, but at the cost of system performance and report file size.
Run Report
FileCatalyst Server provides 2 basic graphical reports; one for the amount of data a user has transferred over a time period, and another that displays snapshots of the transmit and receive rates at defined intervals for individual users or the server as a whole.
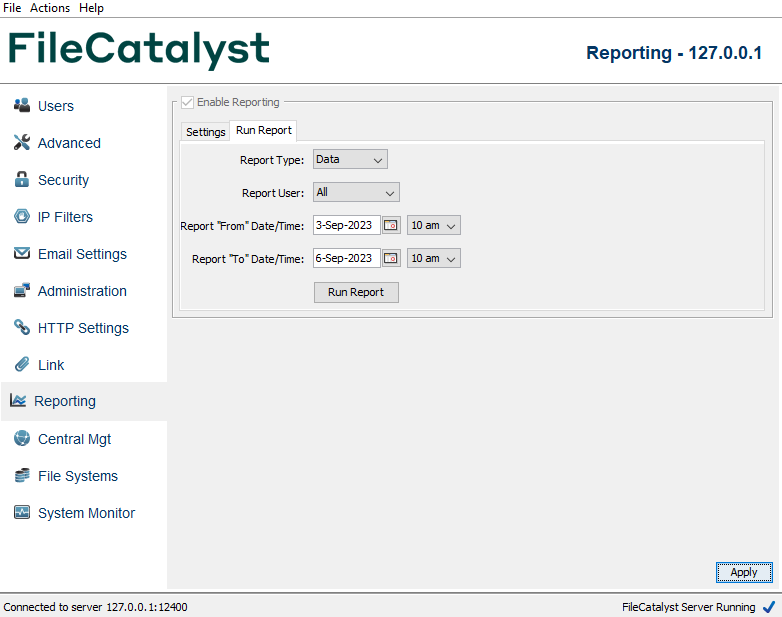
Select a type of report, a range of users, and a range of time. Click "Run Report" to generate a graph of the statistics requested. Here are a few sample reports:
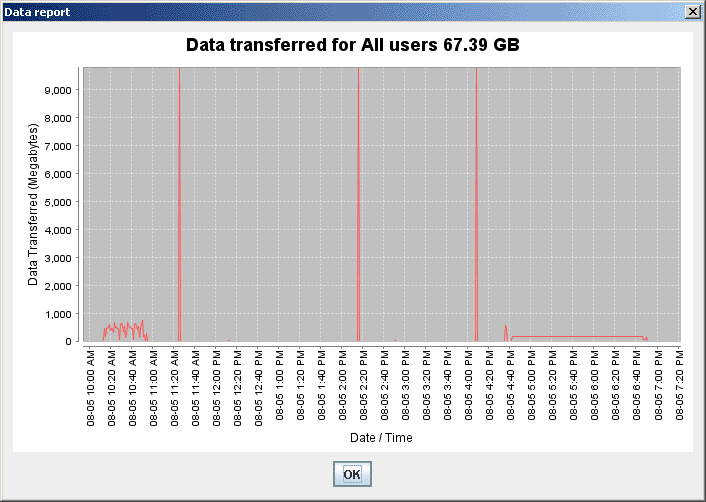
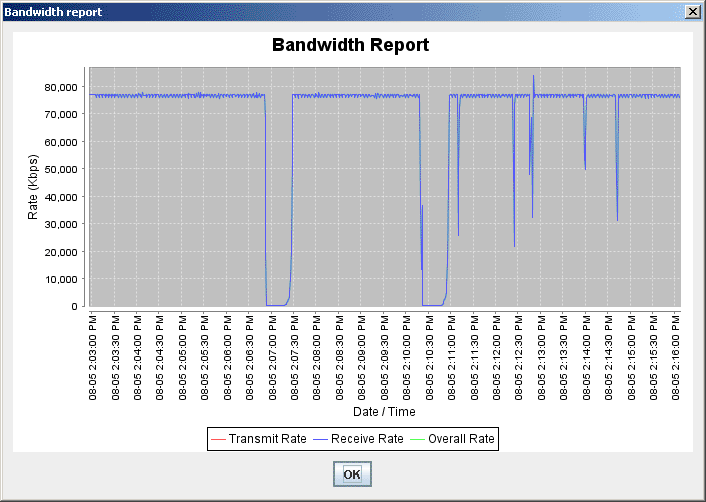
Zooming
FileCatalyst allows you to zoom in on the reports as well. If for example you run a report such as the one below, you can click in the top left of the area on which you want to zoom and drag the mouse cursor to the bottom right of the area on which you want to zoom. Here is an example of the full report, and the section to be zoomed on has been highlighted.
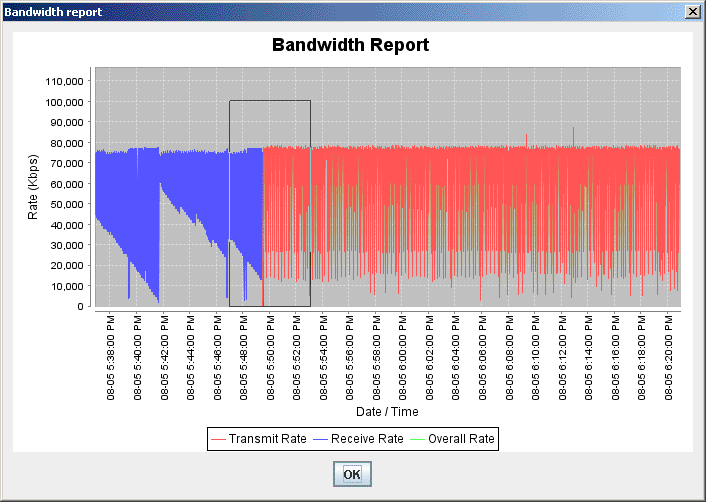
And once you release the mouse button, the highlighted section will fill the entire graph area as illustrated below:
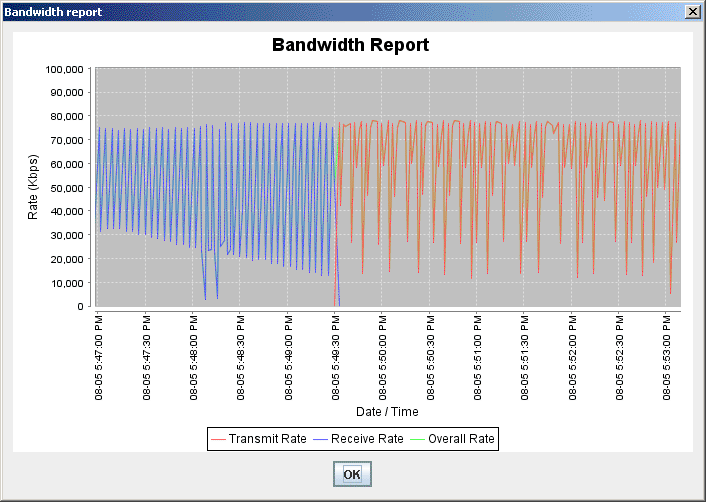
In order to zoom out, hold the mouse cursor anywhere on the graph, click and drag it to the left, and the release.
Report File Format
Exported FileCatalyst report files are currently written using a CSV (Comma-separated values) file format. The first line of the file will always contain the headers for each field. The format for both the Data report and the Bandwidth report are as follows.
Data Report Information
| Fields | Values |
|---|---|
| Report Create Time | A positive 64-bit integer value representing milliseconds since 1970 |
| Username | The username for account that initiated the transfer |
| Transfer Type | ‘UDP’, ‘FTP’ representing the protocol used for the transfer |
| Direction | ‘UPLOAD’, ‘UPLOAD_RESUME’, ‘DOWNLOAD’, ‘DOWNLOAD_RESUME’ representing direction of transfer |
| ID | 32-bit integer, can be negative but will always be unique across all records. |
| Status | ‘SUCCESS’, ‘CANCEL’, ‘ERROR’ representing the state of the transfer upon completion |
| File Size | A positive 64-bit integer value representing the total size of the source file to be transferred |
| Data Transferred | A positive 64-bit integer value representing the amount of data actually transferred (less than total if cancelled or error) |
| Transfer Start time | Date/Time of transfer start in format yyyy/MM/dd HH:mm:ss.SSS (i.e. 2008/07/30 16:09:10.037) |
| Transfer stop time | Date/Time of transfer stop in format yyyy/MM/dd HH:mm:ss.SSS (i.e. 2008/07/30 16:09:10.037) |
| Average Rate | A positive 32-bit floating point value representing the average data transmit/receive rate (Kbps)for the duration of the transfer |
| Peak Rate | A positive 32-bit floating point value representing the peak data transmit/receive rate (Kbps) over the duration of the transfer |
| Effective Rate | A positive 32-bit floating point value representing the effective data transmit/receive rate (Kbps) over the duration of the transfer |
| Packet Loss % | A positive 32-bit floating point value representing the packet loss percentage over the duration of the transfer |
| Remote Host | The IP address of the remote client which initiated this transfer |
| File Path | The local path which the file was transmitted or received |
| Session ID | A value created in a transfer with a FileCatalyst HotFolder which identifies which transfer task a particular file transfer is associated with |
| Agent ID | The identification value assigned to the server by File Catalyst Central |
| Location | The FileCatalyst Server's IP Address |
| Remote Location | The IP Address of the remote client |
| Report Archive Time | A positive 64-bit integer value representing milliseconds since 1970 |
Sample CSV file contents:
"1217536998271","user","UDP","DOWNLOAD","1162920586","SUCCESS","221184000","217088000","2008/07/31
                        16:43:18.271","2008/07/31
                        16:43:55.990","47532.0","49916.0","46584.0","0.0","127.0.0.1","C:\data\user\bigfiles\sub\500MB",
                        ,"1331613959626-11-NULL","1323899227284","192.168.1.107","192.168.1.147","1506630436501"
Bandwidth Report Information
| Fields | Values |
|---|---|
| TimeStamp | A positive 64-bit integer value representing milliseconds since 1970 |
| Username | The username for account that initiated the transfer. The global sum user is ‘_SUM_’ |
| Remote Host | The IP address of the remote client which initiated this transfer. Value will be blank for the global sum user. |
| Report Time | Date/Time of this bandwidth snap shop in format yyyy/MM/dd HH:mm:ss.SSS (i.e. 2008/07/30 16:09:10.037) |
| Transmit Rate | A positive 32-bit floating point value representing the transmit rate (Kbps) at time of snapshot |
| Receive Rate | A positive 32-bit floating point value representing the receive rate (Kbps) at time of snapshot |
Sample CSV file contents:
"1217350587500","user","127.0.0.1","2008/07/29
                        12:56:27.500","0","85000"
FileCatalyst Central—Enterprise Monitoring and Management
Connecting to FileCatalyst Central
Allows a FileCatalyst Server to connect to FileCatalyst Central (formerly known as MonitoringAgent or MonitoringConsole).
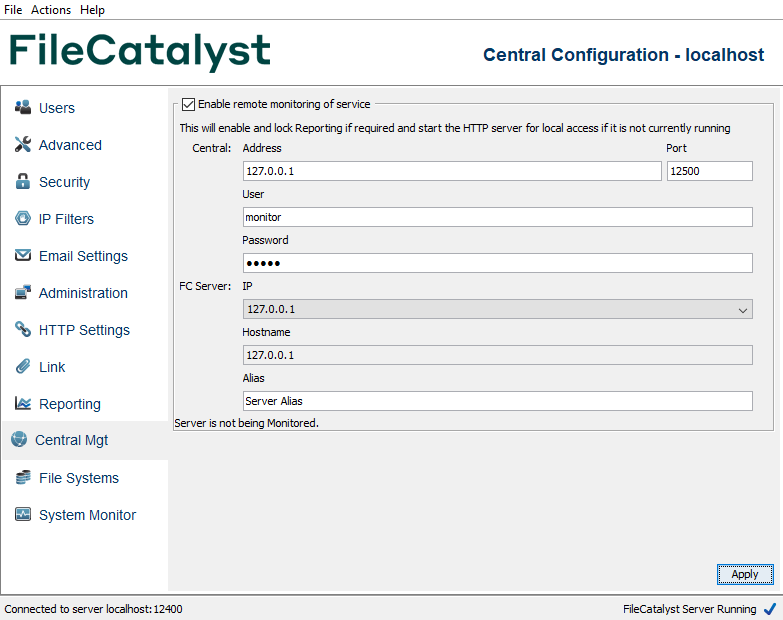
Connections to FileCatalyst Central must be initiated by the service (HotFolder or Server). Fill in the information to connect to Central (address/port/monitor username/password), as well as indicate what IP this server is known as and an alias that can be used to recognize this specific service.
Enabling connection to FileCatalyst Central will also initiate report generation, so that Central can download transfer activities to it's database.
External File Systems
FileCatalyst Server has the ability to leverage external file systems (such as cloud storage instances) for file storage. Supported file systems include:
- Amazon S3
- Azure Blob
- OpenStack Swift
- Google Cloud Storage
- Backblaze B2
- Wasabi
- Dropbox (Labs)
- SMB / CIFS
- Encrypted
Note: File Systems marked with the "Labs" tag are still under development, and while generally functional, issues may be encountered in their use. Labs features and products are made available for prototyping and public feedback, but are not recommended for production use, and may be subject to changes in both content and function before general release.
This feature is described in a separate document: FileCatalyst Server: External File Systems.
System Monitor
System Activity Monitor
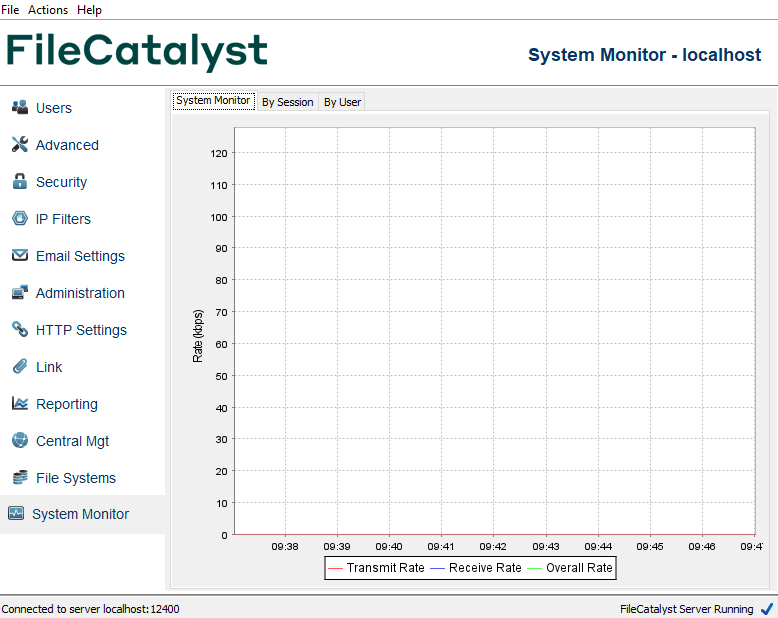
This graph indicates the transfer rates of your server, including both FileCatalyst and FTP traffic. The blue line indicates the total receive rate of the server (that is files being uploaded to the server). The red line indicates the total transmit rate (that is files being downloaded from the server). The green line is the total rate (that is combination of the transmit and receive).
Monitor By Session
The system monitor allows you to view and manage current sessions on the server. It lists all active sessions, their IP address, username, status, and connection time. You can kill an individual session by right clicking on an item in the list and selecting “Kill Session”. You may also block the IP or disable the User account logged in for the session, which will also terminate it and prevent it from reconnecting.
Monitor By User
This monitor allows you to view and manage current sessions, grouped by logged on users, on the server. It lists all active users, and how many active sessions they have. You can kill all sessions from a user by right clicking on an item in the list and clicking the Kill Session(s) button. You can also block all of the IP's used by that user, or disable the user account from this menu.
Guaranteed Delivery
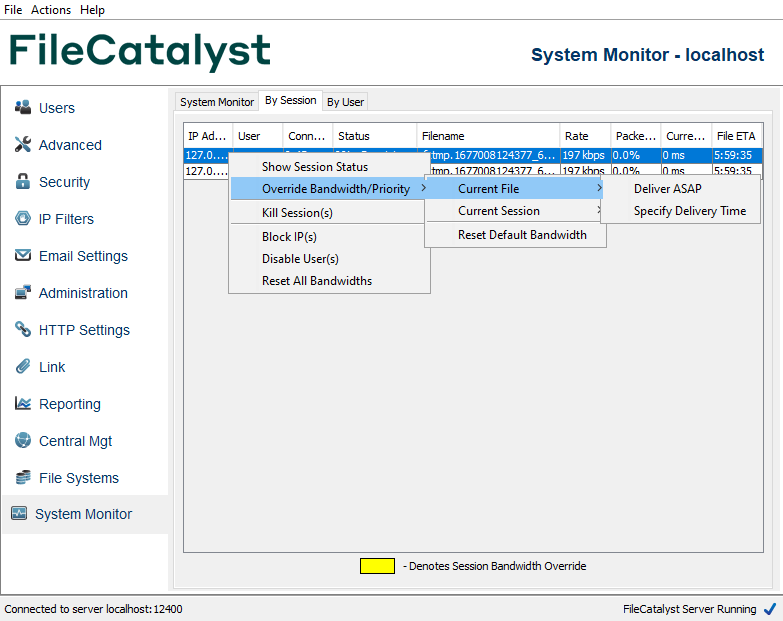
FileCatalyst Server provides the capability to perform on-the-fly modification to bandwidth allocation, priority, and file delivery time. This allows administrators to temporarily override the bandwidth values assigned to user sessions. There are a variety of ways to re-allocate bandwidth depending on the needs of the administrator.
In order to access these functions, navigate to the ‘System Monitor’ section on the left of the GUI, and select the ‘By Session’ tab. Assuming there are active sessions, right-click the session to be modified and select ‘Override Bandwidth /Priority’ followed by the desired option. Modified sessions are highlighted in yellow until defaults are restored automatically or manually.
The available options can be set by ‘Current File‘ or by ‘Current Session’. Modifications classed as ‘Current File’ will only take place for the duration of the one file already in progress. Modifications classed as ‘Current Session’ will span multiple files, and will end once the session in-progress has finished.
Current File Options
Deliver ASAP
This will allocate 99% of the available server bandwidth to the transfer of the current file, in the selected session. A note will appear to present the ETA (Estimated Time of Arrival) of the file. All other sessions will be reduced to very low bandwidth values until the selected file is completely transferred.
Specify Delivery Time
This will allow the administrator to choose an exact delivery time for the current file, in the selected session. The administrator will be warned if the selected time is not possible due to license or bandwidth constraints. If the selected time is possible, the exact bandwidth required to meet that delivery time is calculated and applied to the session. Upon completion of the file delivery, the bandwidth is returned to the default values for that user.
Note: this feature has known limitations. The bandwidth calculated to complete the transfer at the specified time is not re-adjusted as the transfer progresses. Over time, external factors such as congestion and/or other users connecting/disconnecting, may render the initial bandwidth calculation inadequate to complete the transfer by the specified time. For this reason, this feature may only be relied upon if the congestion is minimal, and there are a minimal number of connects/disconnects during the transfer. These limitations will be addressed in a future version.
Current Session Options
Override Priority
This will decrease or increase the priority of the selected session based on the value (1 - 10) selected by the administrator, permitting the selected session to use less or more of the available bandwidth relative to the other active sessions. The amount of bandwidth permitted as a result depends on how many sessions are active. User accounts, by default, have a priority of medium, so the impact of setting a session priority may be less if several users are connected. Please see the note below for more information.
Specify Exact Rate
This allows the administrator to specify the exact bandwidth for a session. For example, setting the bandwidth for a session to 500 Kbps guarantees that session will transfer at exactly that rate for the duration of the session. If the value is higher than the default bandwidth that user was assigned, additional bandwidth will be taken from other sessions to accommodate. If the specified value is lower than the default bandwidth the session was assigned, the difference will be divided among the remaining sessions. If the specified value is not possible due to other bandwidth already being allocated, a warning message will be presented to the administrator notifying them of the maximum available bandwidth they can assign.
The bandwidth override functions may be reset at any time by right clicking the
desired session, selecting ‘Override Bandwidth /Priority’ followed by
‘Reset
Default
Bandwidth’. In addition, the bandwidth for all sessions may be reset by right clicking
any session and selecting ‘Reset All Bandwidths’.
NOTE: These override settings cannot allocate
more
bandwidth to the user than they have
assigned in their client application. For example, if a client application is set to use 10
Mbps,
and the
server attempts to allocate 50 Mbps, the rate of the client will not increase. The
assumption is
that the
client application is set for their individual link speed, and as such an attempt by the
server to
override this value may accidentally oversaturate the client's network.
If all active sessions have the same priority, then the server permits each session to
use an
equal percentage of the licensed maximum bandwidth. The permitted bandwidth for each session
depends
on how
many sessions are active, such that the sum of the maximum bandwidths permitted by all
sessions
equals the
absolute maximum bandwidth allowed by the server licence.
Sessions with different priorities are permitted to use different percentages of the
licensed
maximum
bandwidth based on differences between the assigned priorities. If the network does not
support as
much
bandwidth as the server licence permits, priority differences can have little to no effect
on the
balance of the realized session bandwidths.
Running at Startup
Windows Service
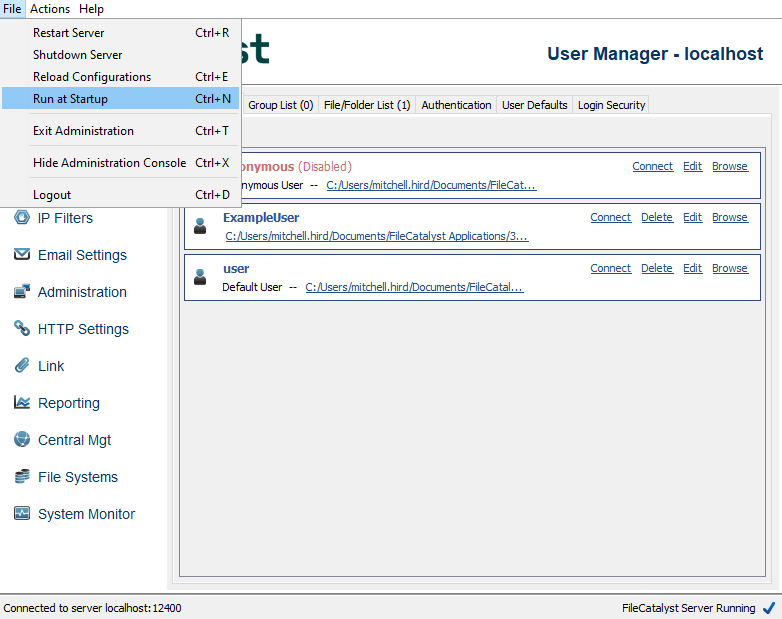
FileCatalyst Server can be configured to run as a service. Clicking the File menu option Run at Startup will install the FileCatalyst Server as a service. On next startup, FileCatalyst Server will start automatically. When run as a service, the administration will not be available through a Graphical User Interface (GUI). In order to use a GUI, the administrator must connect using the FileCatalyst Server Admin application or via an HTTP connection to the applet URL.
Linux, Solaris, AIX Service
Installation on Unix-derived operating systems follow the same commands. For more information, read the files included in the tar bundle: ./README and ./service_wrapper/SERVICE_WRAPPER_README
NOTE:Ubuntu servers require additional packages installed. Please refer to the packaged SERVICE_WRAPPER_README files for details.
- FIRST STEPS: Install application, install license, enable remote administration
- Create application folder: /opt/utechsoft/server/
- Download FileCatalyst Server(Unix GZip/TAR bundle)
- Unzip/Untar bundle
cd /opt/utechsoft/server

                                    gunzip ./fc_server.tar.gz

tar -xvf ./fc_server.tar - Run server to extract License request string
./jre/bin/java -jar FileCatalystServer.jar

                                    Your license key is not valid. Contact Unlimi-Tech Software for a valid license
                                    key

Request String: R2D2C3P0W3333333 - Contact FileCatalyst for your license string.
- Edit fcconf.conf, enter in licensing information, enable remote administration.
- Set the administrative password on the server.
./jre/bin/java -jar FileCatalystServer.jar -passwdadmin
- CONFIGURE application to run as a run-time daemon
- Run the following commands as the root user to install the service:
sudo su -

                                    cd /opt/utechsoft/server/service_wrapper

chmod +x *.sh - Edit the fc_env file if necessary (installation directory, java path, etc)
- Install the service
./install.sh
- Run the following commands as the root user to install the service:
- At this point, you should be able to start the service. You can now login using the FileCatalyst Server Admin to configure the application.
- Logs can be examined in /opt/utechsoft/server/wrapper.log
Uninstall by running the /opt/utechsoft/server/service_wrapper/uninstall.sh script as the root user.
HTTP Servlet
Connection Illustration
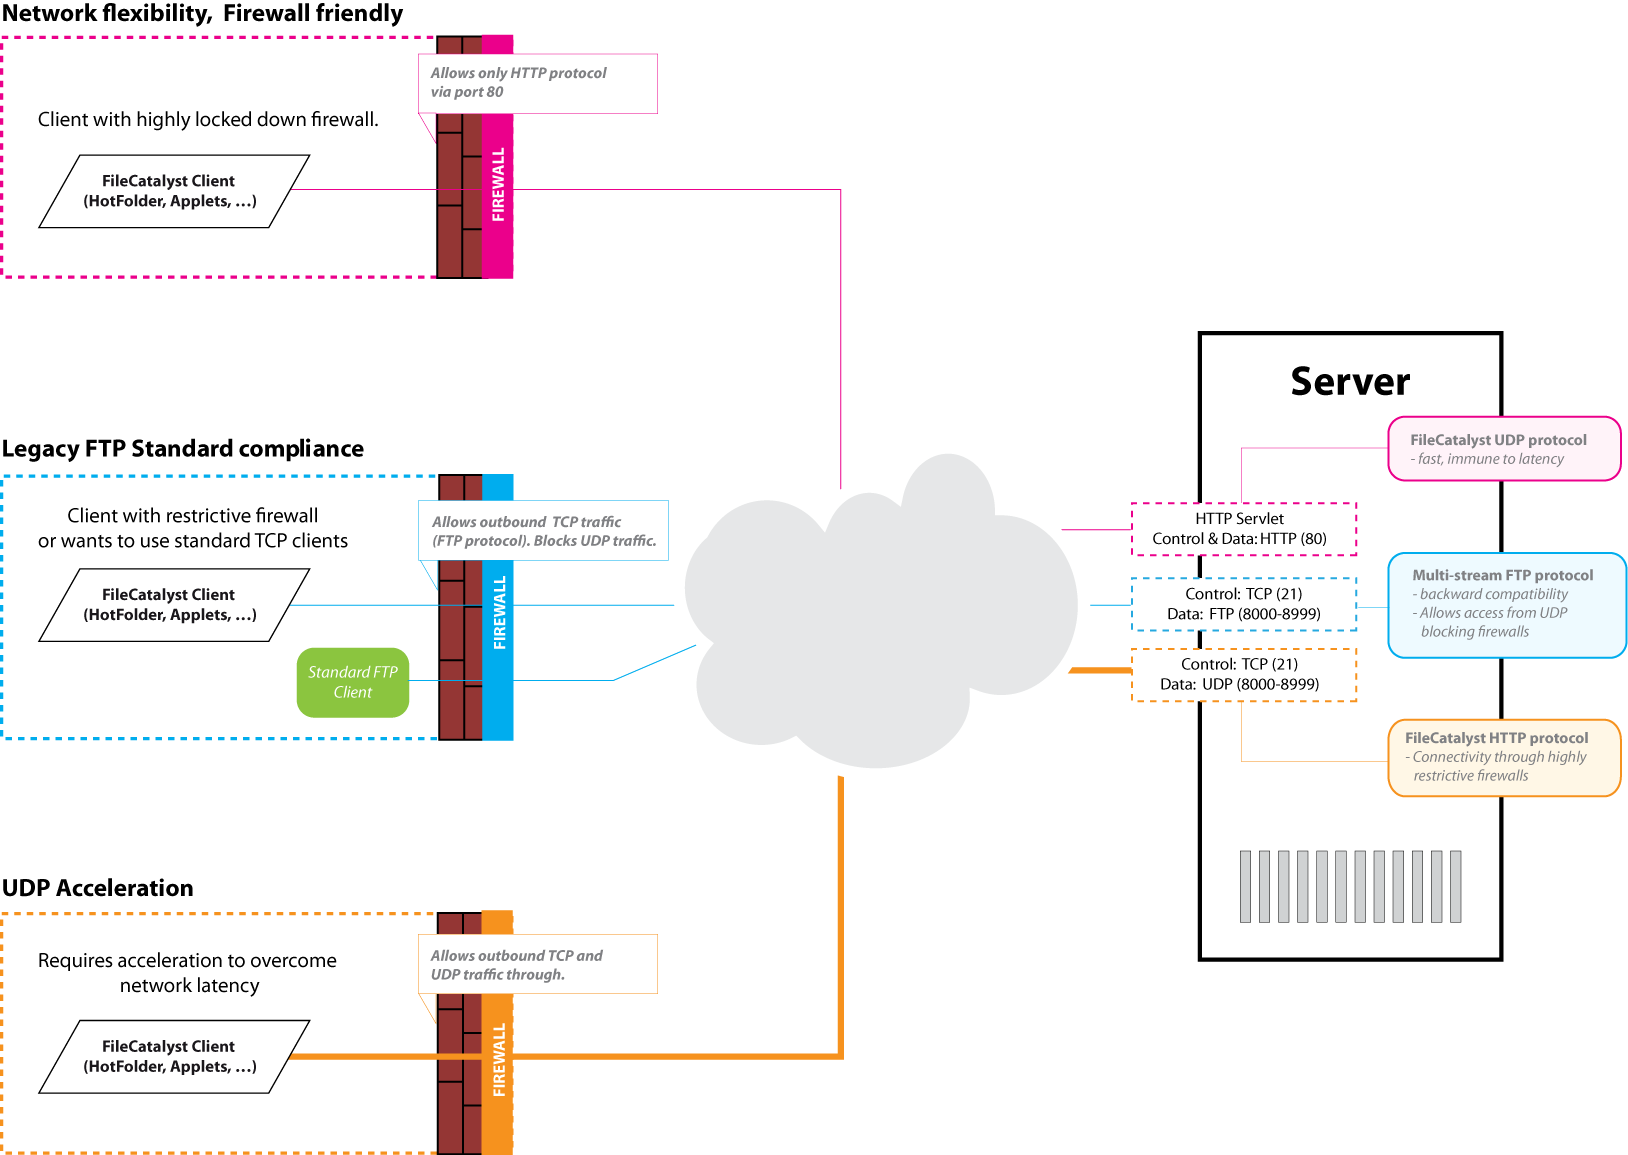
HTTP Tunneling
The HTTP Servlet allows FileCatalyst Direct Clients to fall back to HTTP-based transfer when ‘auto’ mode is used, or to always use HTTP in certain client scenarios.
Typically, FileCatalyst Direct Clients will fall back from Accelerated UDP to multi-stream TCP to single-stream TCP; the servlet adds one more layer: fallback to HTTP.
The benefit of HTTP-based transfer is that it is almost never blocked by corporate firewalls. As long as a user's computer is able to connect to the Internet, they should be able to transfer files over HTTP. Although HTTP-based transfers cannot be accelerated with the FileCatalyst Protocol, two key benefits remain:
- virtually guaranteed connectivity between client and server ends. End users will not need to have special configuration performed by their IT department in order to make a transfer
- The reliability and scheduling benefits of the FileCatalyst product are still intact
The servlet will also translate HTTP requests to FTP for non-FileCatalyst FTP servers. If you have a legacy FTP server still in production, you may use the Servlet in conjunction with our client software (with a special Client Connect Key) in order to allow them to communicate with the legacy FTP server through the HTTP tunnel.
The Servlet needs to be licensed in order to operate within the Server architecture.
Performance Tuning
The FileCatalyst Performance Tuning documentation can be found here
Administration Via Command Line
Installing the Software
Download the desired version of FileCatalyst Server and save it to a location such as our recommended directory: /opt/utechsoft/server
Extract the files:
gzip -d fc_server.tar.gz

tar xvf fc_server.tar
Run the following command to make the shell scripts executable
chmod a+x *.sh
Licensing the Server
Run the server for the first time:
./fc_server_console.sh
You will be prompted with a License Request String. If you have not already been sent a license key, send this request string to Unlimi-Tech and someone will reply with a license key.
Once you obtain a license key, edit the file ‘fcconf.conf’, and enter your license as follows:
## License key

FCServer.server.config.license=3D9456711670A38C040ABC66CA13297B23
Changing Default Ports
Edit the file ‘fcconf.conf’, and look for the lines similar to this:
## FC server port number.

## Default FC port is 21.


FCServer.server.config.port=21


## FC data port numbers

## Default data port is 0 (means any available ports will be used).


FCServer.server.config.data.port.pool=8000-8999
In some cases port 21 may already be in use by an FTP server running on the same machine. If this is the case, you can change the server port number to any open port. Make sure to note the port for client configuration.
The data port range can also be configured by changing 8000-8999 to the values you desire.
Creating SSL Certificate and Enabling Security
A script is included to help you generate an SSL certificate. Run the following command and follow the on screen instructions:
./fc_server_genssl.sh
Once you have generated an SSL certificate, you must configure the server to use it. Edit the file fcconf.conf, and use the following settings:
## SSL settings

FCServer.server.config.private.key.pass=

FCServer.server.config.enable.security=true

FCServer.server.config.private.key=yourcert.pvk

FCServer.server.config.certificate.file=yourcert.pem
The password cannot be set directly in the fcconf.conf file, as it is not stored in plain text. To set the SSL certificate password, run the following command:
./jre/bin/java -jar FileCatalystServer.jar -passwdssl
When the password is set, restart FileCatalyst Server and SSL will be enabled.
Mode details on installing SSL certificates are available: https://support.filecatalyst.com/index.php?/Knowledgebase/Article/View/293/0/how-to-install-a-ssl-certificate-into-a-filecatalyst-server.
Managing Users
Users cannot be created or edited from the command line as this information is now stored in a database. However, it is possible to change a password for a user by running the following command:
./jre/bin/java -jar FileCatalystServer.jar -passwd <username>
Enabling Remote Admin
Remote Admin is stand alone application that can run on a machine that has GUI or XWindows and can connect to either a FileCatalyst Server running on a headless Linux machine or to manage a FileCatalyst server service. To enable remote admin, you must edit fcconf.conf, and enable the following settings:
FCServer.server.config.remote.admin.enabled=true

FCServer.server.config.remote.admin.username=admin

FCServer.server.config.remote.admin.password=

FCServer.server.config.remote.admin.port=12400
To change the remote administration password run the following command:
./jre/bin/java -jar FileCatalystServer.jar -passwdadmin
Specifying Configuration Directory
FileCatalyst Server normally stores configuration files in the working directory where the application is installed. If it is desired to have a separate directory to store configuration files, this can be done by modifying the command-line arguments used when starting the server.
On Linux installs, modify the starting script files to add the "-fconfig [dir]" as additional arguments. Example: fc_server_console.sh script would become:
./jre/bin/java -XX:+IgnoreUnrecognizedVMOptions --add-modules=java.xml.bind -Xms64M -Xmx1024M -jar FileCatalystServer.jar -fconfig /my/directory/ &
If launching the application as a service, the /conf/wapper.conf file must be modified to include these new run-time arguments:
# Application parameters. Add parameters as needed starting from 1

wrapper.app.parameter.1=unlimited.fc.server.FileCatalystServer

wrapper.app.parameter.2=-fconfig

wrapper.app.parameter.3=/my/directory/
On Windows machines, the executables (.exe) files cannot be used to start the application with separate configuration directories. However, you may start the FileCatalyst Server using a command-line JAVA call much like on Linux. In addition, if the server is run as a service, you may make similar modifications to the service wrapper portion of the fcconf.conf file in the installed directory. When the service is started, the Java service wrapper will load up FileCatalyst using a separate directory indicated by the application run-time arguments.
# Application parameters. Add parameters as needed starting from 1

wrapper.app.parameter.1=unlimited.fc.server.FileCatalystServer

wrapper.app.parameter.2=-fconfig

wrapper.app.parameter.3=c:/my/directory/
Note that two configuration files (fcconf.conf & ipfilters.xml) as well as database files (.fcdb/) will utilize this as the new configuration root directory.
Command Line Usage
Command-line usage for FileCatalyst Server

Usage:

  ./jre/bin/java -jar FileCatalystServer.jar [COMMANDS] [options]


HELP COMMANDS:

  -help                              --> prints this help to console

  -version                           --> prints out the Version number


OPTIONS:

  -fconfig <path>                 --> Specify alternate configuration (fcconf.conf, etc) path)

  -path <path>                    --> Specify alternate server working directory

  -license <license string>       --> Specify alternate licenses string to use at run-time

  -webroot <root www folder>      --> Specify alternate webroot path to use at run-time

  -port <port num>                --> Specify what socket plain server listens on (non-SSL)

  -writebuffer <buffer in KB>     --> Specify value of the write buffer in KB

  -maxblocksize <bytes>           --> Specify maximum block size (bytes)

  -controlpanel or -systray          --> Launches the Server Remote Admin GUI in addition to the Server.

  -quiet                             --> Do not create console output logger


ADDITIONAL COMMANDS:

  -shutdown                          --> Asks a running FileCatalyst Server to shut down

  -diagnostic                        --> Asks a running FileCatalyst Server to generate a diagnostics archive for debugging

  -requestString                     --> Prints out the request string that the FileCatalyst Server will use for licensing


INTERACTIVE COMMANDS:

  The following commands prompts user for more input to perform actions.

  FileCatalyst Server should be shut down first before running.


  -passwd <username>              --> Modify user password in database

  -passwdadmin                    --> Modify the administrative password

  -passwdssl                      --> Encrypt and insert the SSL password

  -testIO                         --> Execute a write IO test for the server

  -testReadIO                     --> Execute a read IO test for the server
Firewall Setup
Control Connection
The firewall on the server side of the network must be configured to allow incoming TCP connections on port 21, or whatever has been set as the incoming server port.
Data Connections
The firewall on the server side of the network must be configured to allow incoming UDP/TCP packets on ports 8000 - 8999, or whatever range has been specified in the server configuration. If you only plan to allow uploads to the server, and do not plan to use standard FTP clients to connect to the server, you can limit this to UDP only. TCP is only required to establish data connection to retrieve directory listings for FTP downloads and directory listings.
HTTP Transfers
If you wish to enable HTTP Transfers (including Link transfers) you must add a control connnection rule for port 12480.
REST Services
Enabling REST services
FileCatalyst Server is capable of accepting REST service calls in order to configure and control the service. REST services are required and automatically enabled when you connect the Server to be managed by FileCatalyst Central, but may also be used to build a remote control application external to the FileCatalyst Server.
To manually enable REST services, you need to allow HTTP access (see HTTP Settings tab). This will open up the web server port (default 12480), and allow access to REST services.
REST services security
All REST services require user authentication to run them. User credentials are passed in using HTTP headers. There are two ways to pass in user credentials.
-
Using the RESTAuthorization header.
This HTTP header can be used to pass in user credentials. The user credentials are Base 64 encoded and follow the following format: username:password
JSON Example assuming the administration username and password is admin:system
                            URL: http://localhost:12480/rs/users


                            Method: GET


                            Accept: application/json


                            RESTAuthorization: YWRtaW46c3lzdGVt
Returned JSON:
{{"totalRecords":3,"totalFilteredRecords":3,"isListFiltered":false,"user":[...]} -
Using the RESTSessionSecret header
This is the more secured (and recommended) version for using the REST services. At least one call needs to be called using the above mentioned HTTP Header (RESTAuthorization). A POST call to the /rs/AuthorizationSession REST service with the above header and the user credentials in the data content is required to get back a session secret. Once the session secret is known, it can then be used for all subsequent calls using the RESTSessionSecret header. The session secret will be valid for as long as the session stays alive on the server.
JSON Example assuming username/password is admin/system:
        URL: http://localhost:12480/rs/AuthorizationSession


        Method: POST


        Accept: application/json


        Content-Type: application/json


        RESTAuthorization: YWRtaW46c3lzdGVt


        Content:


        {"authorization":"YWRtaW46c3lzdGVt"}
Returned JSON:
{"sessionSecret":"644783159662526094"}
JSON Example using RESTSessionSecret:
        URL: http://localhost:12480/rs/users


        Method: GET


        Accept: application/json


        RESTSessionSecret: 644783159662526094
Returned JSON:
{{"totalRecords":3,"totalFilteredRecords":3,"isListFiltered":false,"user":[...]}
REST services documentation
Documentation on the REST services provided by the FileCatalyst Server application can be viewed here
Alternatively, the documentation may be downloaded from here
REST example using Swagger
In addition to the REST documentation, a web application built on the Swagger UI framework has been provided.
By using this application, you will be able to view all of the available REST services within the application, as well as examples of responses and requests that a particular call may produce or consume. In addition to these examples, the Swagger application supports the ability to configure REST call and make them directly against the application. Upon executing a REST call, the application will present you with the response for the call, as well as a small CURL example of the request that was made.
How to view the Swagger UI application
If you are viewing this document from a web-based connection, this application may be viewed by clicking here.
If you are viewing this document from a local connection, this application may be viewed at the following URL: http://{fc.server.web.ip}:{fc.server.web.port}/help/Server/restDocs/ui/index.html
Frequently Asked Questions and Troubleshooting
1) Users are unable to connect to the server, what is going on?
Your firewall may be blocking incoming TCP requests on port 21 (or whatever port you set for the control connection).
2) No files can be uploaded to the server, what is going on?
Make sure the user under which FileCatalyst server is running has sufficient permissions to write files to the data directory specified.
3) I am seeing 0 byte files in the data directory, why aren't transfers working properly?
Your firewall or router must allow incoming UDP traffic so data can be received from the client applications. Further, if the server is behind a NAT, the packets must be forwarded to the proper IP address. Another possible issue is that the client side is behind a firewall and doesn't allow outgoing UDP data.
4) It looks like even with no firewall, no UDP packets are being received by the server, why not?
It is possible that you have set the encoding unit size greater than 1472, which results in fragmented UDP packets. Some routers and firewall's will automatically drop fragmented packets. If this is the case try lowering the packet size to 1472 or less. Windows operating systems tend to perform better with a value of 1024.
5) Transfers are slower when there are a large number of incoming file transfers, why?
The answer is likely that your disk is not able to keep up with the transfers. The only option is to upgrade your disk to something faster. To receive at hundreds of Mbps, you will need to have a very efficient storage device to keep up. You could start with a fast SATA drive at 10K or 15K RPM, a fast RAID, or a fast SAN or NAS connected over GigE.
6) Will a hub affect my performance?
Hubs are more susceptible to collisions at high speeds which will result in an additional packet loss. As you increase the packet size, the UDP packets FileCatalyst sends will no longer fit in an ether frame. The OS will fragment the Jumbo packets into many smaller fragmented packets that match the MTU of your network (usually 1500 bytes). The larger the packet, the more pieces it is broken into.
7) Are there additional bottlenecks that I should be aware of?
If your concurrent connection speed is 100 Mbps and FileCatalyst server is storing data to network storage (NAS or SAN) on a 100Mbps or lower switch; this will cause FC to compete with itself for bandwidth when receiving and writing. The transfer rate using this network topology would be approximately 50Mbps or lower.
Performance may be further affected if you are connected to a 100 Mbps or lower hub as this is a potential source of packet loss due to congestion. If replacing the hub with a fast switch is not an option, do not attempt to send at the full capacity of the hub with a packet size greater than 1472 (or whatever setting does not cause fragmentation) or significant performance degradation could occur.
8) How can I see my networked mapped drives under Windows 8 or higher?
Windows machines which have mapped network drives may not being visible to the Server due to Microsoft's implementation of User Access Control (UAC) starting with Windows Vista.
There are examples online on how to disable this or set the system to allow drives to be visible to services.
To implement a workaround:
- Unzip the file enablelinkedconnections.zip in the application directory (C:\Program Files\FileCatalyst Server\)
- Run the registry entry enablelinkedconnections.reg to enable the Server to see mapped network drives.
- A reboot will be required for this to take effect
- To uninstall, run the undo.reg the same way as enablelinkedconnections.reg, a restart is also required on uninstall
9) Where are my logs?
On Window or Linux, the logs can be found in the logs directory in the application's install directory. On OS X, the logs will be found in logs folder of the appropriate application folder in "Library/Application Support/FileCatalyst" for the user running the application, or in the root library if the application is being run as a service. The path to the logs can also be found in the configuration file as log.location.
10) Why are transfers to/from my External File System slow or failing?
Due to their nature, External File Systems are subject to a number of limitations. Please consult the limitations section of your particular EFS in the FileCatalyst Server: External File Systems document.
About FileCatalyst
Save Info to Log Location
This will gather some basic info about your application version, Java version and OS
Diagnostic Report
The Diagnostic Report button collects state, logs, and configuration information about your application that will be useful to FileCatalyst engineers for analysis and troubleshooting. The information is assembled into a zip archive under the diagnostics subfolder of your application installation directory, from where it can be forwarded to the FileCatalyst support team if desired.
Generating diagnostics is a background activity, there will be limited visual feedback to the user when the Diagnostic Report button is pressed, and regular product usage can be resumed immediately. The diagnostics archive can take a few minutes to generate, depending on how busy the product is with other operations. In order to keep times short and the resulting zip file small, the logs are filtered based on time and size. Some temporary files may appear in the diagnostics folder during this time. When the archive is complete and ready to send, it will appear in the diagnostics folder with a name similar to "FileCatalyst<product>_<date×tamp>_diagnostics.zip".
Please login to the Support Portal (https://support.filecatalyst.com/) to submit a ticket and upload diagnostics and other relevant ticket files. If you already have a Ticket ID, you can also use Support2U (https://support2u.filecatalyst.com/) to send this diagnostics file directly.
Support
Support System
Visit our support website at https://support.filecatalyst.com to view the knowledge base and to submit a ticket (Available 24/7).
If you have already submitted a Ticket and would like to send us your case files please go to https://support2u.filecatalyst.com to upload them. A valid Ticket ID will be required.
Support Information
For support contact information, support hours and live chat: Visit our website at https://support.filecatalyst.com